
The RinGenie Marking Tool
3 Minute Read
Jewelers are constantly in search of tools that make them more productive. It helps to shop trade shows where tools are on display to try out, but it's really difficult to gauge whether the tool improves efficiency or accuracy without putting it through the paces in a real work environment.
Incorporating the tool into your workday also gives you the benefit of discovering new uses for it - either through true innovation, by accident, or by refusing to read the instructions and just messing with it.
Putting the RinGenie to the Test at the Bench
When I got ahold of the RinGenie from SDL Precision LLC, I began by just playing around with it, later reviewing the instructions on the DVD. A precision layout tool for accurate drilling, milling, and channel cutting, the RinGenie opened my eyes to a new marking technique for stone setting layout.
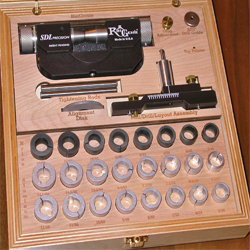
Here is a tour of the RinGenie Marking Tool in action: | |
 | It's a holding device that offers excellent grip with the inside ring collets. |
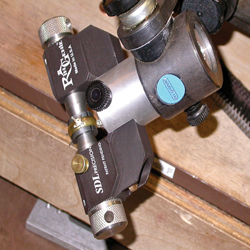 | It's easy to see the infinite positions that you can work with when you mount the RinGenie in a GRS Benchmate. A graver's ball gives many working angles, as well. |
 | The stable position of the ring allows you to accurately measure and scribe using conventional tools, such as a marker and a set of dividers. |
 | The ability to freely rotate the ring gives you an advantage when scribing: Less shaking means straighter lines. |
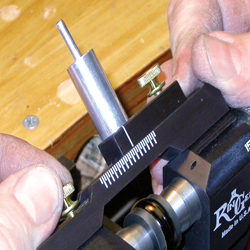 | The mill, drill, and layout assembly attaches with a thumbscrew and extends the usability of the RinGenie. |
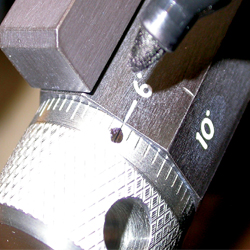
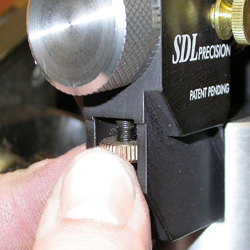 | On either side of the layout assembly is a thumbwheel that locks in a spin detent that clicks every 10 or 15 degrees. |
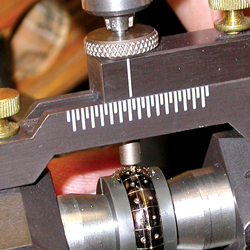
 | There is also a vernier caliper on top that can be manually tightened every 6 degrees. |
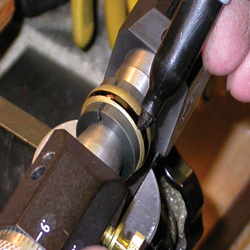
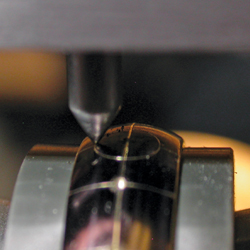
 | The marking punch has measurement marks for accurate marking. Here the layout pointer is lined up with a previously scribed centerline. |
 | I found out that by using a marker to mark the starting position of the ring rotations, it's easier to go back to the beginning if needed. |
 | This proved useful when inspecting measurement marks during rotation, then continuing to add more. |
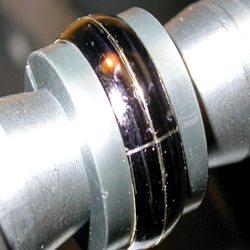
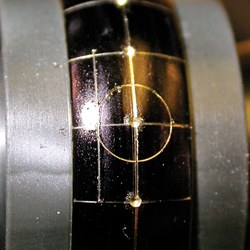
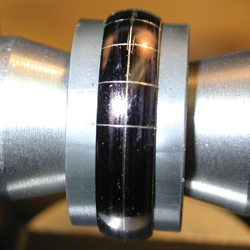 | This ring is marked neatly in 20-degree increments (two clicks on the 10 degree setting). The marks continue around the full circumference of the ring and join up with the first mark. This is difficult to do with dividers, especially on the first try. |
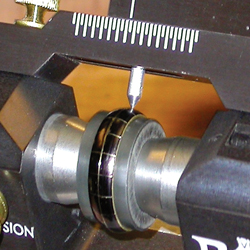  | Equal marks on a ring help greatly for engraving layout, but center punches on these marks are needed to drill holes and set stones. Bead, flush, or channel setting require good layout to look good. The layout scribe (a) can be used as a center punch, though I ended up removing, tempering, and re-installing mine. I did not miss a mark using the RinGenie (b). |
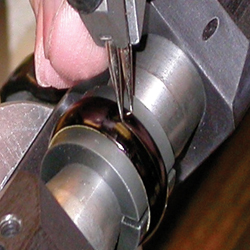
 | I could have used the caliper marks on the layout scribe, but instead used my dividers to scribe a circle around one of the center punch marks. The radius of the circle was the measurement from stone center to stone center. |
 | I then lined up the layout scribe with the edge of this circle and transferred the center marks around the circumference of the ring. |
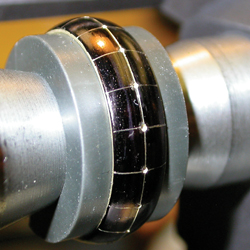
 | Here the ring has a layout of center punch marks spaced out for a pavé-set eternity ring. The center punch marks are deep enough to easily drill the holes for the stones. |
 | Removing the layout scribe and replacing it with the drill guide (a) substantially increased the accuracy of drilling holes for setting. |
 | I used a larger drill bit (b) than I normally would to cut down on time and reduce the wear on my burs. |
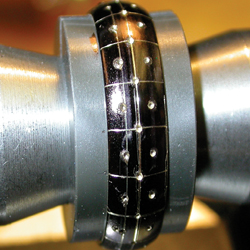
 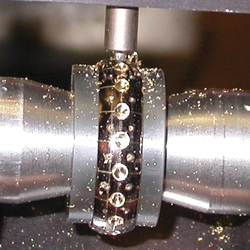 | Drilling the holes (a) still took steady speed and pressure with a steady hand, but the results were impressive. As long as the drill and RinGenie were tight, the holes stayed on mark (b). This example was an eternity-style band, but you can use the RinGenie on any ring where you need accurately spaced marks or holes. |
![]()
In association with
![]()
The award-winning Journal is published monthly by MJSA, the trade association for professional jewelry makers, designers, and related suppliers. It offers design ideas, fabrication and production techniques, bench tips, business and marketing insights, and trend and technology updates—the information crucial for business success. “More than other publications, MJSA Journal is oriented toward people like me: those trying to earn a living by designing and making jewelry,” says Jim Binnion of James Binnion Metal Arts.
Click here to read our latest articles
Click here to get a FREE four-month trial subscription.
Related Articles

Bench Tools for Jewelers
Notes on Presto-Lite Torch

Thai Chaser Tool Tricks
Laser Welding Basics – Part 2


The All-In-One Jewelry Making Solution At Your Fingertips
When you join the Ganoksin community, you get the tools you need to take your work to the next level.

