
Pulse-Arc-Welder: Pearl and Diamond Pendant
This karat gold pendant design calls for several solder joints in close proximity. To facilitate the assembly, I tack and/or pulse-arc-weld the parts prior to soldering to eliminate shifting or dropping off through the soldering process. Tack-welding also facilitated my ability to easily make adjustments for alignment through the process. Here's how.
2 Minute Read
This karat gold pendant design calls for several solder joints in close proximity. To facilitate the assembly, I tack and/or pulse-arc-weld the parts prior to soldering to eliminate shifting or dropping off through the soldering process. Tack-welding also facilitated my ability to easily make adjustments for alignment through the process.
Here's how:

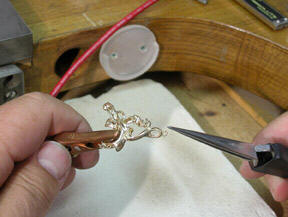
This pendant is being constructed from two 14 karat yellow gold cast pieces. Also shown are six 14 karat white gold die-struck settings, small diamonds, jump ring attachments and three cultured freshwater pearls.
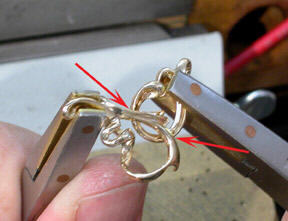 | I pre-finished and pre-polished the rough castings and prepared them for assembly by notching. The notched areas are indicated by the red arrows. Using firm pressure, I tacked the interlocking cast pieces where they joined. For tack-welding, I set the ABI Tack II tack welder to 50 volts on the high energy setting. If an alignment change is needed, the two pieces will easily come apart. |
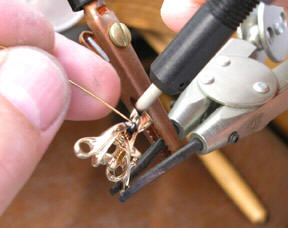 | No further adjustments are required and since the two pieces are heavy, additional welding is required to hold them together during the soldering process. I used the ABI Pulse-arc welder to strengthen the tacked joints. For this step, I used the #2 weld pencil tip with the ABI Pulse-Arc-Welder set to 50 volts on the high energy setting. The two pieces are permanently attached and soldering will complete the assembly. |
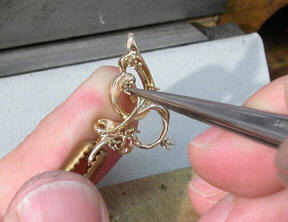 | I soldered the two pieces using 14 karat yellow easy solder. I then used a small ball bur and notched the pendant at each location for the 14 karat white gold settings. With the ABI Tack Welder set to 40 volts on the high energy setting, I tacked the six settings in place. Removing settings that were not aligned properly simply required light finger pressure prior to re-tacking. |
 | I soldered the settings using 14 karat yellow easy solder. Because they were tacked into location, no additional holding devices or heat sinks were required for the soldering procedure. No shifting of previously soldered pieces was possible. |
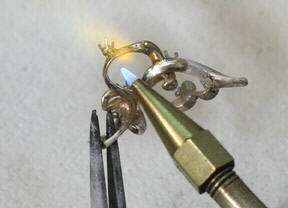
 | Next I filed one flat side on each jump ring near the joint. Then I tacked the jump rings on each side of the top where the chain will be attached and one for the pearl that will dangle from the bottom portion of the design. For these pieces, I set the ABI Tack Welder to 30 volts on the high energy setting. After the tack welding was complete, I soldered each with 14 karat yellow easy solder. For the final step (not shown) I tacked then soldered the two pearl posts. |
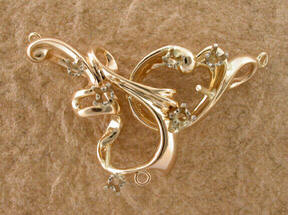 | This photograph shows the completed assembly ready for setting, finishing and installation of the chain. |
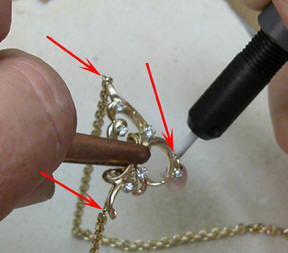 | After the diamonds were set, I finished the piece and installed the chain. The red arrows indicate where I pulse-arced the jump rings closed. No damage to the pearl or chain occurred and very minor finishing in those three areas was required to complete the job. For the pulse-arc welding, I used the #1 weld pencil and set the ABI Pulse-Arc-Welder to 25 volts on the low energy setting. |
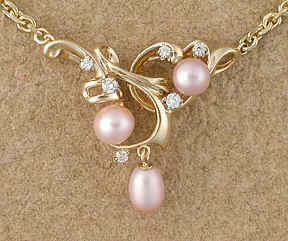 | With this design having multiple small parts in close proximity, tack and pulse-arc welding made this assembly quick and simple to accomplish. The tack and pulse-arc welding allowed me to use the torch less and therefore oxidation was minimized, almost eliminated which made the clean-up process more efficient. |
Important:
All tack-, fusion- and pulse-arc equipment settings will differ and are based upon the volume, amount of contact and alloy of the material you are assembling. Working with like materials will give you a parameter for the settings required for your application. Keep a record of settings and tasks for future reference.
Related Articles

American Holloware Changing Criteria

Laser Welding Tipping Prongs

950 Palladium: Stock Mountings and Findings
Laser Welding Basics – Part 1


The All-In-One Jewelry Making Solution At Your Fingertips
When you join the Ganoksin community, you get the tools you need to take your work to the next level.
