
One-Piece Die Cutting
13 Minute Read
One-Piece Die Cutting
The Society of North American Goldsmiths, its staff, directors, officers and members, and Metalsmith magazine specifically disclaim any responsibility or liability for damages or injuries as a result of any construction, design, use, manufacture or other activity undertaken as a result of the use or application of information contained in any Metalsmith article. Every effort has been made to insure the accuracy of information contained herein, but the use of any information is solely at the user's risk. Metalsmith assumes no responsibility or liability for the accuracy, fitness, proper design, safety or safe use of any information, technique, tool, tool, design, use, etc. contained herein.
The idea of using a die to cut out multiple pieces of a single shape is at least as old as Christmas cookies. Dies are used industrially to make millions of parts each day, from computer parts to soda cans. Because the tools used in industrial settings are both complicated and expensive, few metalsmiths have taken advantage of the possibilities that dies offer. Recent experiments in the use of a one piece cutting die, however, have resulted in a low cost studio-based alternative to commercial options.
Simply put, a cutting die works by sliding one hardened edge against another, as in a pair of scissors. The material to be cut, trapped between a stabile edge and a downward moving edge is sheared when it can no longer resist the strain. In the case of a traditional cutting die, one piece of the die (the negative) has a cut out silhouette of the desired shape and the other half (the positive) has a similar shape that is slightly smaller. The trick was never so much the making of these pieces as it was guaranteeing their precise alignment. The one piece die solves this problem by creating both the positive and negative pieces from a single sheet allowing the positive to remain attached or hinged as shown. The material to be cut is slid into position (the shaded area) and it will be sheared when the unit is pressed closed.
Though the concept is simple, the topic is large enough to warrant much more description that can be included here. Rather than furnishing a complete step-by-step guide, I will address some of the problems I have encountered and offer the solutions that have worked for me.
Designing the Die
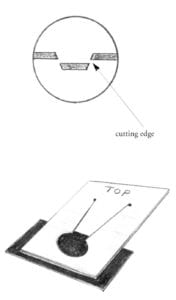
Successful one-piece cutting dies require the correct combination of three elements: the proper thickness of the tool steel, the sawblade size, and the angle of the cut. As Figure 1 illustrates, it is the angle of the cut that simultaneously creates a cutting edge on both die halves. The width of the sawblade must be carefully matched to the angle so that the two parts will have zero tolerance (no gap) when they pass by each other. The technique can accommodate most sawn shapes of thicknesses up to 12 gauge B&S. Some intricate patterns may require experimentation in order to develop a die that is tight enough to cut while remaining sufficiently loose to insert the work material. One drawback of this process is that it is limited to cutting only silhouettes and outline forms. "Donut holes" are not possible. Because the tolerances are so fine, things can get a little complicated in the practical application of the principle.
For very thing gauge material (28 or thinner) I suggest that you make the die even tighter by increasing the angle by ½ degree. This however will make the die difficult to open, especially if the design is intricate. Complicated designs must be cut a little "loose" to allow them to open for insertion of the stock. Unfortunately this also increases the possibility of poor cutting, especially on thin material. Because of this and the fact that blade size differs slightly between manufacturers, experimentation will be necessary to find the precise sizes that work best for you.
Intricate dies, especially those that have small projections, are best made of steel that is at least 1/16" thick. For these dies I use a smaller sawblade (such as 2/0) which allows for delicate cutting and light turns. As a rule of thumb, thick steel and fine blade size give the best results, but this combination is the slowest and most tiring when it comes to cutting. Most of my dies are made from 3/64" or 1/16" tool steel. I usually use a #0 blade, which results in a die that is relatively easy to saw and with proper heat treatment, such a die will survive a couple of thousand punches on jewelry metals.
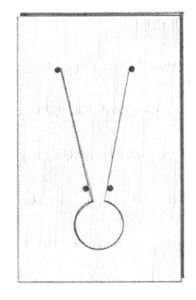
When laying out a die it is important to make the hinge long enough to provide spring for the positive element. Generally this length should be between 1½ to 3", depending on the scale of the design. Hinges that are too short make the die difficult to load, but a hinge that is too long allows the die to bend, shifting the parts of the die out of alignment. For an earring of typical size, I make the hinge about 2" long and allow at least a ⅜" border around the die. I drill a pair of holes at the top of the hinge and near the perimeter of the design (Figure 2) then carefully cut the design with the proper angle and blade. When this is done I connect the holes with two freehand lines, cut with a larger blade and a conventional sawing technique. No angle is necessary for this edge because it is not a cutting surface.
Making the Die
Several sawing options are available for the die maker. Industrial, machine-powered scroll saws represent one end of the spectrum, bringing both high tech and high cost. At the other end is the conventional jeweler's sawframe used with a tilting bench pin, (see endnotes.) Without some sort of guide to keep the blades vertical, the cutting angle will vary by enough to affect the function of the die. In my opinion the Bonny Doon precision saw guide offers an ideal and affordable solution to this problem. Consisting of a tilting bench pin with an apparatus which a jewelers saw clips into, this device assures that the saw is made to ride exactly vertical on a guide rail.
There is little to say about the sawing process except for the fact that it is physically taxing when done by hand. Obviously, powered saws make it less physically demanding, but in my opinion they are harder to control. Both methods of sawing require considerable practice to develop proficiency. After sawing, the die should be ground or sanded to soften the edges, so they will not scar the workpiece.
Heat treatment has caused me many headaches - there are many ways to make mistakes here and I have tried them all! If done correctly, however, this step can increase the life of a die by 10 or 20 times. On the other hand, if heat treatment is done incorrectly it will ruin the die. Precise temperatures are required and remember that consistent execution yields consistent results.
I use oil hardening steel because it is the most forgiving and readily available stock, but air or water hardening steels will also work, and case hardening is a possibility for larger dies. A small kiln with a pyrometer is necessary to achieve the exact temperatures needed for heat treating. A kiln with an internal size of 9" x 9" x 9" works well for me. Overheating or irregular heating will probably cause parts of the die to shift, ruining the alignment that is vital to a precise die.
In the hardening phase, the steel is brought to a red-orange color and quenched in oil. This is probably in the range of 1450 - 1500°F: follow the steel manufacture's directions. The die can be sealed in stainless steel "tool wrap" foil to reduce oxidation and subsequent cleanup. To minimize distortion, bring the whole die to a uniform color. This can take anywhere from a few minutes to about an hour, depending on the size of the kiln and the size and number of dies being heated at one time.
Grasp the die firmly in the center at the bottom and plunge it immediately into a bucket of slightly warm (125 - 150°F) lightweight oil. The die must be held vertically, or it will almost certainly warp. Swirl the die slowly in the oil to even the cooling process and allow it to remain there until it is cool enough to be held in the fingers. Remove the die from the bath and wipe off the oil coating.
At this point the die is very hard and also extremely brittle. For this reason, resist the temptation to correct it at this time, even if it is bent. The brittleness is relieved (and some of the hardness given up) in the process called tempering, in which the steel is brought up to a uniform temperature and soaked for about an hour.
There is no "correct" temperature for tempering but the range is between 450 - 600°F (230 - 320°C). I temper in the 500 - 575° (260 - 300°C) range, as I consider this range offers the best tradeoff between hardness and flexibility. As an example, a die tempered to only 450°F will be hard enough to cut tough metal like nickel silver or 14k gold without undue wear, but such a die risks breaking, especially if the design is delicate or requires a great deal of force to punch out. Conversely a die tempered to 600°F is probably not subject to breaking but it is soft enough to wear out prematurely, especially at sharp corners. The exact temperature should be determined for each die, considering factors such as its size, detail, and intended use. Experimentation is necessary.
After heat treatment and cleaning, the die must be prepared before being used. The hinge area functions as a spring and must undergo its own heat treatment, which brings it to a slightly higher temper than the rest of the die. Use a torch with a relatively small flame to heat the hinge and the area adjacent to its base to a bright blue color. It is only after this step that the die can be realigned. With the die on an anvil, strike it with a slightly rounded steel hammer to stretch the steel and move the positive element, (Figure 3). It will be forced away from the location of the blows, as shown. Check the alignment by examining the gap very closely. The time you spend in perfecting this fit will result in efficient cutting and a smooth edge.
The die should then be opened and cleaned with a steel wire brush. To "pre-spring" the die, leaving it in an opened position, slide a piece of brass shim into the die and anneal the section at the very base of the hinge in a line at connects the two holes there.
Dies sometime require realignment during use, so it is important to inspect them periodically. Misalignment can cause metal to jam in the die, throwing it even further out of alignment and causing the opposite area to overlap, driving the cutting edges into each other, which can damage or ruin the die.
Using the Die
The die cuts by pressing the positive element through the negative one. For consistently clean results, the action should be smooth, forceful and controlled. To achieve this, set the die between two pieces of ½" steel plate large enough to completely enclose the die. Hammers cannot be used to punch dies because the depth of the blow cannot be controlled. Pushing too far (bottoming out) presses the die into the opposite plate and will damage it. In addition, even a strong die may break under the shock of an impact blow.
For small dies a simple bench vise can be used to press the plates together. This method lacks sufficient power to tackle large jobs or thick stock, however. A screwdown arbor press offers an affordable alternative with increased power (in the 3 - 8 ton range), but even this may still lack the force needed for some dies and materials. Hand operated hydraulic jacks provide increased power (up to 20 tons) and are available at a reasonably low cost. The most expensive units are motorized hydraulic punch presses, but these are usually beyond the finances and usual needs of most metalsmiths. If larger jobs are undertaken I recommend consulting with commercial toolmakers.
Obviously, the push of the jack won't do any good unless it has something to press against. Commercial frames are available, or one can be welded together from 2" angle iron. The force being used here is considerable, so avoid thin steel and timid welds. The size of the frame will depend on your needs. When making your own I recommend that you purchase the jack first then make a frame about 6" taller in its inside dimension. I suggest lining the plates with ⅛" to ½" Plexiglass to prevent excessive marring of the work material. These sheets can be attached with double-sided tape and replaced when they start scarring the work material.
To operate the die, slide the material into position and set the prepared die into the press. Pump the jack and listen for the clear "snap" as the die punches out the shape. The press is then backed off, the cutout piece is retrieved, and the die is set up to cut out another piece.
Efficiency Techniques
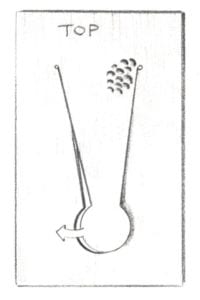
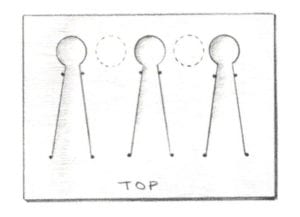
Once you discover a rhythm, simple die cutting can go relatively quickly (at least compared to sawing out each piece!) but when large numbers of pieces are needed you will want to increase efficiency even more. One method is to create a die that has several identical forms, as in Figure 4. This obviously takes longer in the sawing stage, but it will make each die plate that much more productive.
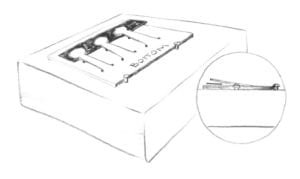
I use a homemade loading block (Figure 5) to lift the positive element of the die so a sheet of stock can be slid into position. These simple devices are made with a couple of screws at one end to hold the bottom edge of the die, and another to lift the center of the die. Be sure to locate the lifting screw away from the area of the pattern being cut. Blocks aren't needed for most single dies, but they are an immense help with multiple dies.
When using dies, be careful not to leave scraps of metal in the press, where they could overlap the next piece being cut. Because the die is made for a specific thickness of stock, such an overload can ruin the die in a single punch. Also because these dies cut in only one direction, the top should be clearly marked. If you insert the material to be cut from the back, the die will not be damaged, but the metal is likely to be difficult to remove. The result, by the way, is an interesting embossed effect that may have some use for the enterprising designer.
Allow 1/32 to 1/16 of an inch all the way around, though a tight die will cut right up to the edge of the sheet, leaving less scrap. Designs with a straight side should be loaded carefully to minimize cleanup of the cut piece.
Endnotes
This process has been most recently published by Roger Taylor of England, though there is evidence of experiments with similar techniques being done in ancient times and again in the early days of automobile manufacture.
Saws and presses are available from:
Rio Grande Albuquerque
6901 Washington Ave. NE
Albuquerque, NM 87109
(800) 545-6566
Bonny Doon Engineering
250 Tasset Court
Santa Cruz, CA 95060
(408) 423-1023
Precision Ground Flat Stock can also be bought from Grainger's (check local phonebook) and Manhattan Supply Company (800-645-7270) or Rutland Tool & Supply (800-289-4787). Call for a local dealer.
Troubleshooting
| PROBLEM | REASON | SOLUTION |
| Metal sticks in die | Dies loose, worn out or misaligned | Realign. Make over, tighter |
| Parts have burr | Die loose, worn out or misaligned | Realign. Make over, tighter |
| Even shifting | This is normal | Hammer or realign |
| Uneven shifting | Too hot, uneven heating or cooling | |
| Warping | Not immersed vertically when quenched, or die too large and thin | Use thicker steel; quench vertically |
| Breaking during use | Too low a heat or too short a time in tempering. Scraps in press | Temper at higher temperature |
| Wearing out; die too soft | Too hot when tempering not hot enough in quenching | Reharden, then temper to a higher temperature |
| Cracking during heat treatment | Oil too cold, water in the oil | Warm oil |
| Scarring of strips or parts | Sharp corners on edges of the die | Sand or grind round before heat treating |
| Dies breaking | Dies not fully covered by the press. Press imparting too much impact |
David Shelton manufactures dies for metalsmith through his company: Sheltech.
Related Articles

The Enamelware of Alan Mudd
Re-tipping Platinum Prongs

Anticlastic Forming Techniques

Metalsmith ’92 Summer: Book Reviews


The All-In-One Jewelry Making Solution At Your Fingertips
When you join the Ganoksin community, you get the tools you need to take your work to the next level.
