
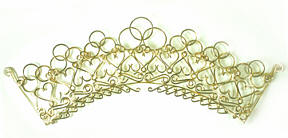
Making a Crown Using Welding Technology
David and Diana Howard, owners of My Jeweler, Inc. in Albuquerque , NM recently worked with a local church to design and manufacture a crown to be placed on a popular church icon painting. The churchs parishioners donated jewelry to the cause. Howard sent the old gold out for refining and received over 4 ounces of fine gold in return. He alloyed the gold to 14-karat yellow, poured ingots and rolled wire for the crown. The crown has over 600 contact joints so Howard decided to use tack- and pulse-arc-welding technology. Here is an overview of the procedures he used...
2 Minute Read
David and Diana Howard, owners of My Jeweler, Inc. in Albuquerque , NM recently worked with a local church to design and manufacture a crown to be placed on a popular church icon painting. The church's parishioners donated jewelry to the cause.
Howard sent the old gold out for refining and received over 4 ounces of fine gold in return. He alloyed the gold to 14-karat yellow, poured ingots and rolled wire for the crown. The crown has over 600 contact joints so Howard decided to use tack- and pulse-arc-welding technology. Here's an overview of the procedures he used:
Making a Crown Using Tack- and Pulse-Arc Welding Technology | |
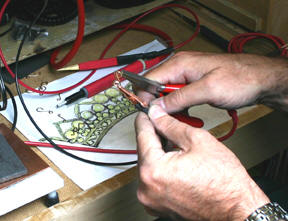 | After preparing and forming the wire, Howard shaped the components of the crown. He used the ABI Tack II tack welder to tack the parts. For this portion of the project, his Tack II was set on the high energy setting at 35 volts. He used the alligator and pliers leads as shown. |
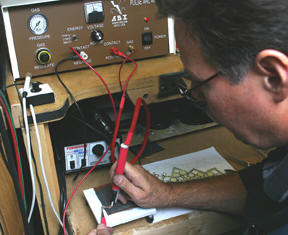 | With the parts tacked, he permanently joined them using ABI's Pulse-Arc-Welder. For this part of the project, he set the Pulse-Arc-Welder on the high energy setting at 45 volts and used the #2 tip on the weld pencil. He simultaneously used two leads attached to the negative terminal - the tweezers and contact pad to insure a good flow of energy. The weld pencil is always attached to the positive lead. |
 | After the components were pre-assembled, he permanently joined them. He again used the alligator clip and contact pad leads attached to the negative terminal and the weld pencil with the #2 tip on the positive terminal. He had the welder set on the high energy setting at 45 and 50 volts. A dark surface residue built up during the welding process but was easily removed by pickling, ultrasonic and steam cleaning. |
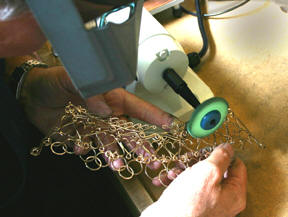 | Howard then used 3M Radial Bristle Discs to smooth and pre-polish the weld joints. |
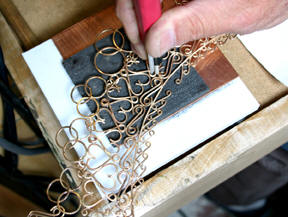
 | The crown is now ready for the settings. Howard burred and filed notches in the wires so there would be good metal to metal contact between the settings and the crown. Then he tacked them with the ABI Tack II. Howard arc-welded many of the joints between the settings and the crown while others were done more proficiently by soldering. |
 | Howard polished the crown, set all the gemstones and did the finish work. There are multiple colored gemstones and over 4 carats of diamonds. The tack- and pulse-arc-welding saved time over using traditional soldering methods. |
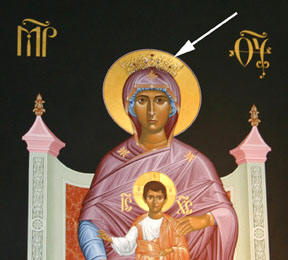 | The church was elated with the crown and has asked the Howard's to make a second. The crown is now mounted directly on the painting and on permanent display at the church. |
Important
Tack-, fusion- and pulse-arc equipment settings will differ and are based upon the volume, amount of contact and alloy of the material you are working with. Practicing using like materials will give you a parameter for the settings required for your application. Keep a record of settings and tasks for future reference.
Related Articles

Pulse-Arc-Welder: Sterling Silver Bracelet

Fabricating a Free Form Opal Pendant

Basic Bead Setting Techniques

Repairing an Omega Earring Clip


The All-In-One Jewelry Making Solution At Your Fingertips
When you join the Ganoksin community, you get the tools you need to take your work to the next level.
