
Low Cost Electric Grinding Machine
11 Minute Read
Enamel surfaces can be ground more quickly and efficiently with an electric grinding machine than by hand. Because professional grinding machines are expensive, here is an inexpensive alternative for the small workshop.
First, a WARNING! For this set-up NEVER use an electric drill that is connected to household power outlets. Splashing water could cause a short circuit and you could be shocked. Only use a cordless battery powered drill as described later in the article.
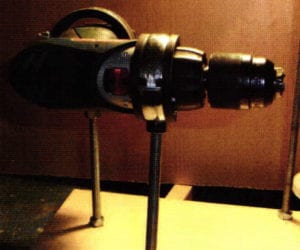
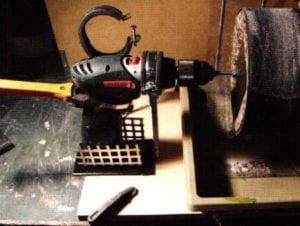
The drive consists of a cordless drill, which is attached to a base plate. Since there are hundreds of different makes and models of cordless drills, an exact blueprint cannot be given.
Here are some points to consider:
- It is important that the drill is secured by a clamp at two points, the neck and the handle, if not, it will shake and vibrate.
- Two measurements are important:
- The axle for the sanding drums should not be longer than 12-15 cm, otherwise the drum can shake.
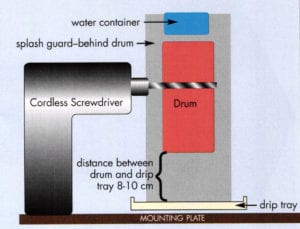
- The distance between the bottom edge of the drum and top edge of the drip pan should be about 10 cm so that there will be enough working space during grinding.
The distance between the axis of the chuck and the base board is determined by the diameter of the sanding drum. The space between the bottom of the sanding drum and the baseboard should be a least 8-10 cm (3-4 inches). Thus, sufficient space is available for the grinding of work pieces.
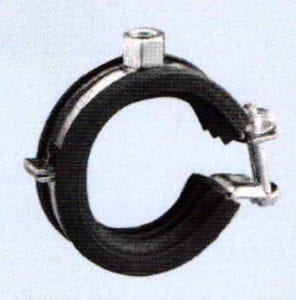
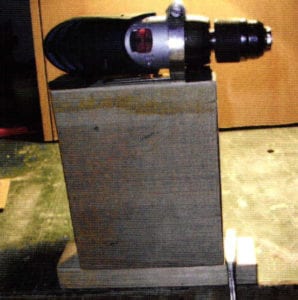
The machine can be quickly assembled and dismantled. It is installed with two threaded rods and two pipe clamps (Fig. 3) on a wooden board (Fig. 2). There are other ways to mount the cordless drill to a board. Here are two examples (Fig. 4 & Fig. 5).
Sand drums
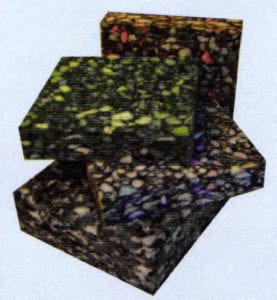
For the sanding drums I have tried different grades of foam. The most suitable is a rebounded foam, firm and very firm (Fig. 6). On the internet there are two companies who will cut the drums to the desired dimension. Make the diameter of the foam drum about 1 cm (0.4 inch) larger than the diameter of the abrasive belts. This will keep the belts from slipping while grinding.
If possible, have the foam supplier make the hole for the axle during cutting of the foam rollers. The hole should be about ½ as large as the diameter of the axle. For example, if the axle diameter is 8mm (0.3 inch), the hole should be about 4 mm (0.15 inch). If you create the hole by yourself, create first a cardboard pattern. The cardboard hole for the drum hole must be centered perfectly. To get the hole completely vertical, create it with a bench drill. The hole need not be drilled with a drill, it can easily be pricked with a sharpened stick through the drum perfectly.
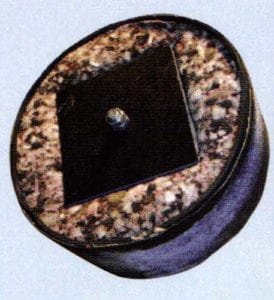
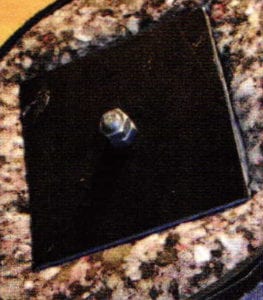
Cut out two square plastic or aluminum sheet pieces. The diagonal of the squares should be about 4-5 cm (1.65-2.0 inches) smaller than the diameter of the grinding drum. Into the center of the plates drill a hole the diameter of the axle (Fig. 7 & Fig. 8).
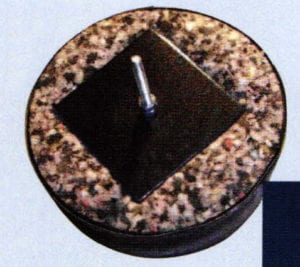
Saw off a piece of threaded rod in the length of the desired axis. Screw plastic sheet and the grinding drum together with the axis. The plastic sheets should penetrate somewhat into the foam, so the sanding drum cannot loosen while you work. Counter tighten the nuts for the same purpose. (Fig. 9).
As the foam drums are very cheap, it is advisable to purchase separate drums for each sanding belt. This saves the tiresome changing of the abrasive belts. For polishing, in place of a felt wheel a leather belt may be used.
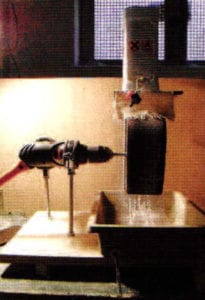
Enamel surfaces should always be wet sanded. In order to wet grind we need a water tank with a water outlet. When water drips onto the sanding drum as it turns, it splashes vigorously, so we need a splash gaurd, and to collect the water and grit we need a drip pan (Fig. 10).
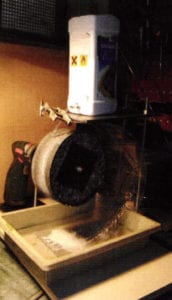
The splash gaurd has been made with an elastic, plastic strip. It can also be made from a strip of rubber or something similar. A splash guard cut from a small plastic bucket has the advantage that the spray protection is equal to the desired curved form shape of the bucket. It is important that the splash gaurd extends into the drip pan.
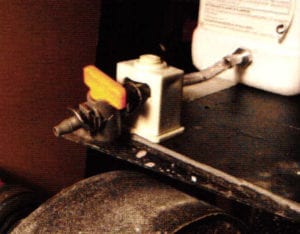
If there is a water supply in the workshop a small tube can be affixed directly from the faucet to a position above the grinding drum. If not, a 1-2 liter water container may be positioned above the grinding drum (Fig. 10). A small drip valve or a small tube with a pinch cock allows water to drop onto the abrasive belt. The valve is fixed with a cable clamp (Fig. 11). It was not easy to find a 1-2 liter container with an outlet connection on the bottom. An ideal solution turned out to be an enema container (Fig. 10a). If you order an enema set you get a container, a little valve and a rubber hose. That's all you need. If you use the enema set, the Gardena valve is not needed.
Never let the grinding water run directly into your house drain. The water contains a lot of sanding dust and enamel residue. This material can become very hard in the pipe drain and could only be removed with great difficulty. Let the contaminated water from the drip cup run into a slightly larger container (Fig. 13). The abrasive residue becomes deposited here. After a day you can decant the water off and let the abrasive materials dry and dispose of appropriately.
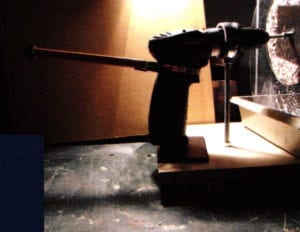
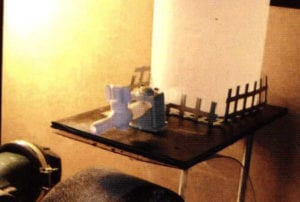
On most cordless drills the power button cannot be made to stay in the "on" position. I have found a slightly gimmicky solution. The screw cap opener "Strongboy" by Zyllis here is a big help. The thin steel band is wrapped around the switch. By tightening the rear Screw, the switch can be locked in any desired position (Fig. 12). The machine is ready for work (Fig. 13). The set-up has little weight so it must be connected to a workbench with bar clamps. The set-up is easily assembled or disassembled in a few minutes.
Materials:
- Cordless drill with 2 Lithium Ionen rechargeable batteries. Torque - 15-20 Newtonmettere. Can be found at most hardwares or on the internet
- Stainless threaded rod - purchased from hardware store
- Stainless bolts adequate to the threaded rod - purchased form hardware store
- Pipe clamps or hose clamps - purchased from hardware store
- Foam rubber; quality - rebounded from, firm or very firm - foamorder.com/cushions.html
- "Gardena" shut off valve 8357-20 or Enema set - 1-2 liter (unusual, but the best solution in my opinion) - on the internet - "Gardena" or garden center (USA - gardena.ca)
- Plastic container (drip pan) - on the internet or photo supplier
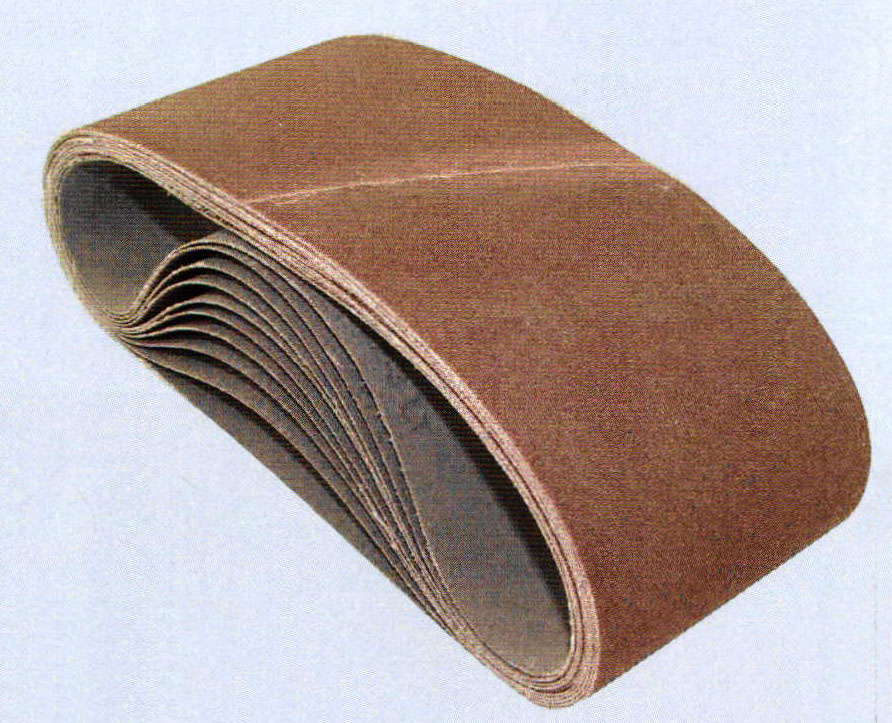
- Grinding belts - on the internet, see under lapidary grinding belts
- Diamond or Carborundum belts - on the internet - baiers.at/maschinen/maschinen.html or www.homberg-und-brusius.de/
- Screw cap opener (Zyllis Strongboy) - on the internet amazon.com
- "Strongboy" 1-2 liter plastic bottle or container
To use the Grinding Machine
I prefer using diamond sanding belts. At first glance they seem expensive, but in the long term they pay off. Diamond belts work very quickly and effectively and have a long life. But even working with Silicon Carbide (Carborundum) belts, your time spent grinding becomes shortened dramatically.
Sanding Belts:
- Grain 120, very rough, only used when you want to completely remove the enamel
- Grain 240, coarse, for grinding large enamel works, panels for example
- Grain 320-360, medium, for grinding small work or jewelry
- Grain 400, fine, for fine grinding jewelry
- Grain 500-600, very fine, 1st pre-polishing
- Grain 800-1000, extra fine, last grinding before polishing
- Filzrad + Cerium oxide for polishing
In an article entitled "Grinding Enamel Surfaces With Electrical Machines" (www.emailkunst.de/schleifen.html) I described how the electric grinder is used. Here is an excerpt:
Use 320 grit for small jewelry work like a brooch or pendant, especially if it has been made of silver. Use 400 grit for very small work like a cufflink. Use 500 grit for a pre-polish (here I recommend a diamond belt!). Use 800-1000 grit as a polish if you have many metal areas (champlevé) in your work. The last polish is achieved with a hard felt wheel, water and cerium oxide as polishing powder.
My father always said, "The poor man lives expensively; never buy cheap materials or tools because you will end up buying tools several times."
After working with both carborundum and diamond abrasives, I exclusively use diamond belts. They are more expensive, but work faster, save time and last longer, which justifies the price. The diamond belts will last longer if you use plenty of water; never use the belts dry.
Because the electrical grinding works so fast and easy, I overfill the cloisonné cells or the champlevé depressions with enamel. That means that all metal (wire or metal of champlevé) is covered with a thin layer of enamel.
My machine runs at about 1400 rpm. To prevent the water from splashing too much I hang a little piece of soft cloth above each wheel. Use a separate piece of cloth for each grit and always change the cloth when changing grits.
I start grinding very carefully with the 220-240 grit belt and always use plenty of running water. I use very little pressure. If you press too hard, you will get grooves in the metal and enamel (especially if it is a new belt). These will be difficult to remove later. During the grinding I only remove the surplus enamel so that you can just barely see the metal (cloisonné wires) surfaces. If there are any pits that open up during grinding I clean the surface with a stiff brush under running water, refill the holes and under-filled areas and refire.
At this point I change over to 320 grit. When changing from a coarser to a finer grit rinse the work well under running water to remove all dirt and the coarser abrasive residue from the enamel surface. It is very important to remove all the grooves made from the 220 grit grinding. If you do not, it is very hard to remove them with finer grit belts. Always work with light pressure. Watch the progress of the grinding very carefully. If there are any pits or underfilled areas you must refill and fire again. At this point I change over to a 400 grit and then to 500-600 grit.
If you have many or sizeable metal areas as in a champlevé, it is wise to use an 800 or finer grit belt for the final grinding, otherwise it will be difficult to polish the metal to a high gloss. When grinding cloisonné, you can change over from 500-600 grit to a felt wheel.
After 500-600 grit I usually change over to a felt wheel. I use cerium oxide for the polishing compound. This can be obtained from a lapidary supplier. This also requires a lot of water. I dip the wet enamel surface into cerium oxide powder and apply it to the wheel. I dip and polish repeatedly until I am satisfied with the result.
Under running water I clean the enamel piece. To get a high gloss on metal surface of jewelry I combine the workpiece, water and polishing soap into a tumbler for some hours. This results in a beautiful high gloss. Tumbling does not harm the enamel. After tumbling and drying I slightly warm up the piece and wipe the enamel surface with a colorless candle. I then polish the surface with the palm of my hand to a mat, silk like finish.
Grinding Enamel Panels
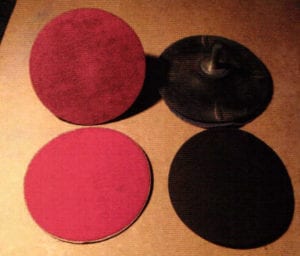
You can also use the cordless drill to grind larger enamel panels. You need a rubber backing disk with arbor, diamond or carborundum disks, a special glue or Velcro® fastener and a flat container.
Two different rubber disks are on the market. One is a rubber disk with a bolt which is coupled with the drill chuck. The abrasive disk is glued with a special glue to the rubber disks (Fig. 14 top and bottom right). Disks which are glued on the rubber disk can easily be removed and glued on again. This glue is available through a lapidary supplier. Also available are abrasive disks with a pressure sensitive adhesive backing.
The other rubber disk and abrasive disks are armed with hook and pile fasteners (Velcro®, Fig. 14 top and bottom left). Both the abrasive disks and rubber disks are available in 5 and 6 inch diameters.
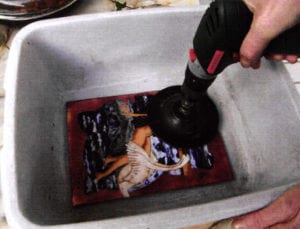
Lay the enamel plate to be ground into a shallow container. Fill with water until plate is covered (Fig. 15 for photo demonstration - no water in container). Abrade the enamel surface without pressure with the grinding disk.
Access the grinding progress at frequent intervals.
If you switch to a finer abrasive disk, remove the water from the container, clean the container and enamel plate thoroughly and pour new water into the container.
Materials
- Rubber disk 5 or 6 inches with arbor - toolstation.com/shop/Abrasives/Power+Sanding/d130/sd1790 or www.abbeypowertools.co.uk/subprod/power-tool-accessories-0000582.aspx or www.tooltrolley.co.uk
- Diamond disks in 5 or 6 inch diameters with or without Velcro® fastener - dadsrockshop.com/discs.html
- 3M PSA 6 inch Diamond Sanding Disc - www.riogrande.com.
Related Articles

Engraving Machines

Customized Robo Grip Pliers
CNC Milling vs. 3D Printing

Making a Multi-Grit Sanding Stick


The All-In-One Jewelry Making Solution At Your Fingertips
When you join the Ganoksin community, you get the tools you need to take your work to the next level.
