
Installing and Repairing Hinge Rivets
Installing or repairing hinge rivets can be difficult with a torch. Flooding a hinge with solder and permanently joining a link to adjacent links are among the risks when using a torch and solder. Use of the following pulse-arc welding techniques to weld the hinge rivets will eliminate potential problems and speed up the overall procedure..
1 Minute Read
Installing and repairing hinge rivets can be difficult with a torch. Flooding a hinge with solder and permanently joining a link to adjacent links are among the risks when using a torch and solder.
Use of the following pulse-arc welding techniques to weld the hinge rivets will eliminate potential problems and speed up the overall procedure.
Installing and Repairing Hinge Rivets | |
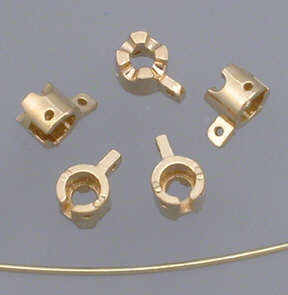 | For this example of welding hinge rivets, I will use 14k yellow gold bracelet links and 14k yellow gold 21 gauge round wire. |
 | I pre-finish the cast links and true-up the hinge joints using a drill the same diameter as the wire to be used. I slightly recess each outer side of the joint with a small cone bur. |
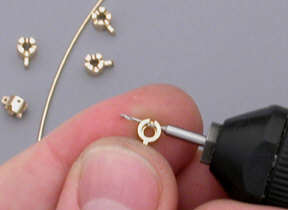
 | With the pre-finishing of the links completed, I join them together inserting a length of wire through both links leaving about 1 millimeter extended on each side. I flush cut the hinge wire on each end. |
 | With the ABI Pulse-arc Welder set at 45 volts on the high energy setting using the #2 tip, I weld each joint with 2 or 3 pulses of energy on each side. The tip of the weld pencil is placed off center over the exposed hinge-pin wire slightly off the surface of the link. The electrode is recessed about 1.5 millimeters in the ceramic collar. |
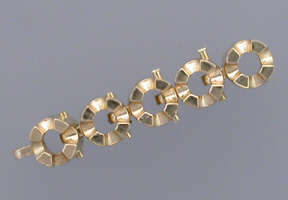
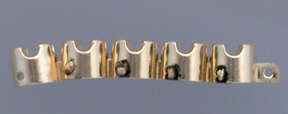 | This is a view after each weld joint has been completed on both sides of the link. I cleaned the assembly in the ultrasonic to remove the surface residue. The melted and welded end of each hinge rivet is raised less than 1/2 millimeter above the surface of the link. |
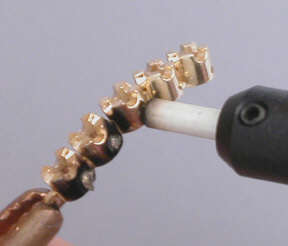
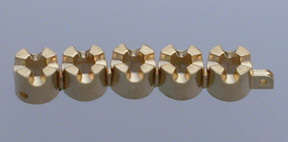 | I used abrasive wheels to remove the excess hinge rivet wire and to smooth the link and inspected each link for pits or incomplete joints. After finial finishing, there should be no visible seams where the hinge pin joints were welded. |
Important
Tack-, fusion- and pulse-arc equipment settings will differ and are based upon the volume, amount of contact and alloy of the material you are working with. Practicing using like materials will give you a parameter for the settings required for your application. Keep a record of settings and tasks for future reference.
Related Articles

Chain and Bracelet Catches 2

Pulse-Arc-Welder: Sterling Silver Bracelet

Laser Welding Tipping Prongs

The Best Flux For Soldering Jewelry: How To Choose The Right One For Your Project


The All-In-One Jewelry Making Solution At Your Fingertips
When you join the Ganoksin community, you get the tools you need to take your work to the next level.
