
Chain and Bracelet Catches 2
Box catches lend themselves to a wide range of shapes and are frequently used on chains, bracelets and cuff bracelets. They combine security with ease of use and the ability to be adapted to the needs of each design. After mastering the basics, it becomes an appealing challenge to a goldsmith to design a box catch uniquely suited to each new piece. The basic ingredients – tongue, box, snag and trigger – will be introduced through the basic box shown here, and they will reappear in each permutation.
22 Minute Read
This article is the second installment written by Prof. Dr. Erhard Brepohl discussing the different types of jewelry catches and what type of jewelry they are each suited for.
![]() Chain and Bracelet Catches - Part 1
Chain and Bracelet Catches - Part 1 ![]() Get your own copy of The Theory and Practice of Goldsmithing
Get your own copy of The Theory and Practice of Goldsmithing
Box Catches
Box catches lend themselves to a wide range of shapes and are frequently used on chains, bracelets and cuff bracelets. They combine security with ease of use and the ability to be adapted to the needs of each design. After mastering the basics, it becomes an appealing challenge to a goldsmith to design a box catch uniquely suited to each new piece. The basic ingredients - tongue, box, snag and trigger - will be introduced through the basic box shown here, and they will reappear in each permutation.
There are many ways to approach the construction of a box catch, each with its proponents and detractors. The following pages show several traditional procedures with the hope that each reader will take from them whatever tips and suggestions seem best suited to his or her individual working style.
First Variation
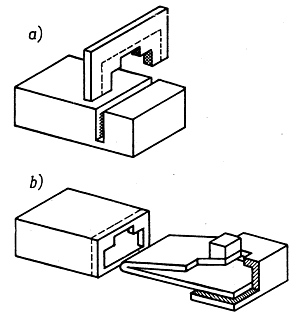
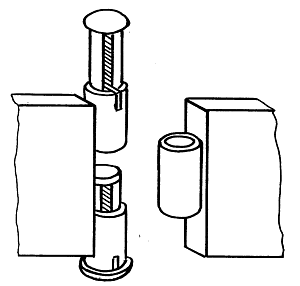
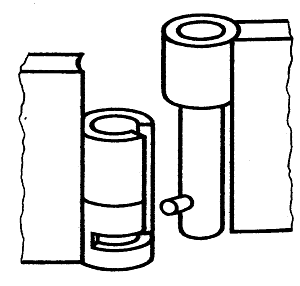
Figure 12.44 shows a bracelet catch. Start by bending up a rectangular frame from strips of sheet metal, probably about 0.5 mm (24 gauge), leaving the wall high enough to allow a slight curve to be filed in. This will accommodate the curve of the wrist and allow the catch to blend in with the rest of the bracelet. The frame is decked with curved panels of the same gauge. In order to avoid the problem of soldering an enclosed form, cut a line (or drill a small hole) in the top panel at the place where the slot will be cut in the next step.
 |
| Figure 12.44 The constructions details of a box clasp, described here as the first variation. |
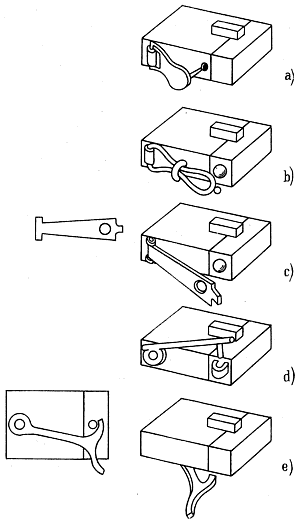
Fold a sheet of the same gauge metal in half and tap it with a mallet make it flat. This will become the two face plates of the catch. As seen in 12.44b and c, cut a slot in the box that will permit this folded sheet to slide snugly into place. Slide the folded piece into position and scribe a line onto this piece to indicate its location in the box. This fine line shows up in the center illustration. Centered in this space, use a saw and files to create the silhouette shown in (b) to provide a space for the tongue, which will be attached to the shorter side of the catch. The shape and proportion of this cutout might seem odd at first, but will make sense after going through the process a few times. The face plates are centered in the slot using the scribed line drawn earlier and soldered. The projecting portions of the face plates and the floor of the original box are cut with a saw so the box comes apart in two pieces. The floor plate is separated with a sawblade between the two halves of the face plate.
Use a thin sawblade to cut a rectangular opening in the top of each half to accommodate the trigger, the vertical segment that is pressed down to release the catch. The size of this opening depends on the size of the trigger, which is in turn a function of the design and location of the catch.
The tongue can be made in several ways, but however it is constructed it must make a snug fit into the matching slot and be springy enough to recoil when it is depressed (figure 12.44d). One way to achieve this is to attach the trigger onto a strip of thin metal that is then folded, trimmed to size and checked against the slot. When the tongue fits well and the action is as desired, the tongue is soldered to the shorter section of the catch.
An alternate method is to construct the tongue from two pieces of metal that are riveted together at the tip. The trigger is attached to the top panel and the lower piece is soldered onto the box, then both pieces can be hammered to restore their hardness. Tiny rivets are set in the tip to bind the two pieces together. In either case it is useful to saw or file small notches in the top of the trigger to allow the user's fingernail to grip it.
In a proper box catch the pieces will not rattle against each other, but rather fit like a hand in a glove. A light push on the trigger should flex the tongue enough to allow it to clear the place where it is "hung up" on the inside of the face plate. When being closed, the tongue should be easily pinched as it slides into the box, then it should snap up to engage. The pressure needed to make this happen should be noticeable but not painful.
Second Variation
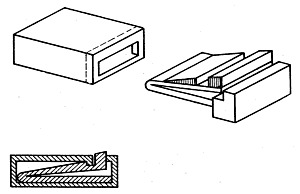
Figure 12.45 shows a variation in which a single face plate is used. The box is prepared as before and the appropriate profile sawn into a single sheet. A slot is cut into the box as shown, wide enough that the plate attaches to just one side when soldered. Of course it is also possible to cut the box into its two halves then solder the face plate onto the larger unit.
Cut a strip of thin metal that will become the tongue and solder the trigger onto one end. Position this, trigger down, in the smaller box and solder it there. Scribe a line and fold the tongue in half, striking it with a mallet or small hammer to crimp the fold and work harden the tongue. Use a knife blade or similar small tool to lift the tongue to its springy position.
 |
| Figure 12.45 The construction details of an alternate style box catch, described in the text as second variation. |
Third Variation
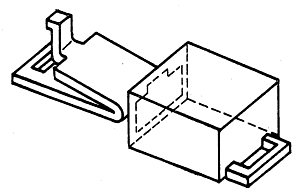
In the catch shown in figure 12.46 the box is the same as the previous types, but the tongue is different. The trigger is a bar the goes across the width of the tongue, made either by soldering on a section of square wire as shown here, or by bending the tip of the tongue up at a right angle.
The element of the tongue that engages the lip of the box is not the end of the tongue as before, but the leading edge of an applied piece of sheet soldered across the tongue. This must have a sharp corner at the edge closest to the trigger - this is what gets "stuck" on the inside lip of the face plate and makes the catch work. The appliqué sheet is filed to a wedge shape to allow it to slide easily into position.
 |
| Figure 12.46 A third variation on the box catch. |
Fourth Variation
The tongue of a box catch can be as simple as a single piece of sheet metal, cut and bent as shown in figure 12.47. In this case no soldering is done to the tongue so it remains work hardened. The construction is so simple this kind of box catch is often used on inexpensive commercial chains. Though simple, this most basic version is rarely used for high end jewelry because it lacks the delicacy of the versions shown above.
 |
| Figure 12.47 Box catch with tongue made from a single sheet of metal. |
Fifth Variation
The tongue is sometimes made from a sheet riveted onto a single plate (figure 12.48). This is easy to make but the tongue can easily bend out of shape or break off at the point where it is soldered to the short plate that makes up the back of the catch.
 |
| Figure 12.48 A box catch in which the tongue has been riveted on to the base plate. |
As stated above, each situation will dictate the appropriate size and shape for a box catch. Nevertheless, it might be useful to have some general guidelines:
- To achieve the necessary springiness and tensile strength, the tongue should be about 10 mm long, 6 mm wide and made of metal that is 0.4 mm (24 gauge) thick.
- The height of the catch must be sufficient that the tongue can spring up inside it. Note that the end of the tongue must engage with the inside of the face plate, but that only a small lip is necessary.
- The slit in the face plate into which the tongue slides has to be high enough for the tongue (two pieces of sheet) can enter it when pressed together.
Box Catch Safeties
Box catches are very secure if they are well made and properly used. Because they're relatively easy to make and virtually foolproof to use, most of the time they are sufficient and reliable. The only way they can come undone by accident is if there is some force that unintentionally presses down on the trigger. Especially in the case of bracelets, where a wrist can easily bump against a surface, this is cause for some concern.
 |
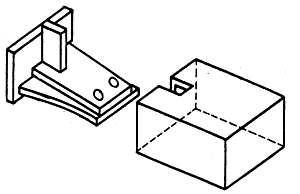
| Figure 12.49 The trigger can be protected against accidental opening by placing ornamental ribs on either side. |
A simple solution is the addition of pieces of metal on either side of the trigger as shown in figure 12.49. These can of course take a variety of shapes and offer an opportunity to embellish the design. They generally contribute to the look of a box clasp in that the trigger no longer projects abruptly from the flat surface of the box.
 |
| Figure 12.50 Various safety catches on box clasps. |
An alternative that can work with or without the addition of blocks is a safety clasp that is engaged after the box clasp is secured. A selection of this kind of attachment is shown in figure 12.50.
The safety in figure 12.50a consists of a flap with a pin projecting from it. This flat is made to hinge from the body of the box catch and is secured be pressing the pin into a hole in the same half of the clasp. With the pin in place the tongue of the box clasp cannot be depressed.
The most common style of safety is the figure 8 safety seen in figure 12.50b. The wire loop pivots in a section of tubing and snaps in place behind a ball which is soldered onto the tongue portion of the catch. The first benefit of this safety is that it guarantees that the tongue is pushed far enough into the box catch - the mechanism only works when the box catch is fully closed. In addition it also holds the box catch together if the trigger is accidentally depressed.
The safety device in figure 12.50c works just like the figure 8. In this version a strip of sheet cut to the shape shown in the drawing is used instead of a wire loop. Some variation on a hinge is used to allow a pivot on the end of the strip while the free end snaps tightly over a ball soldered onto the tongue-end of the clasp.
Yet another variation is shown at 12.50d. In this case the safety is loosely riveted on and rotates up or down to engage or release a pin from within a small loop. It is worth mentioning here again that each of these examples could be modified in many ways. In this case, for example, the loop could be a section of tubing or the rotating bar sawn from sheet.
Almost all of the mechanisms above can be applied to the top plate of a box catch as well as to the sides as shown. In some cases it is possible that the safety takes the role of the bars mentioned above in that the mechanism shields the trigger from an accidental push. In addition it can sometimes be contrived that the loop like the figure 8 loop hooks directly onto the trigger, in which case the addition of a ball can be avoided.
The drawback of these ingenious variations is that they sometimes get too complex, visually and manually. Two important factors in evaluating a catch are its ease of use and its ability to blend into the overall design.
The safety shown in figure 12.50e illustrates a device that can be almost completely hidden beneath the box catch. In this case a horizontal action is used to hook or disconnect a loosely riveted hasp. The pivoting section can be sawn from sheet or made from wire and will probably require delicate adjustment to achieve a snap fit.
Hinge-Style Catches
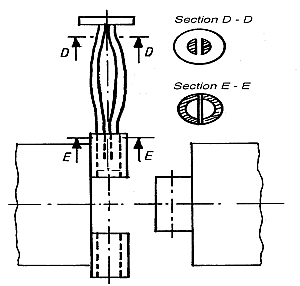
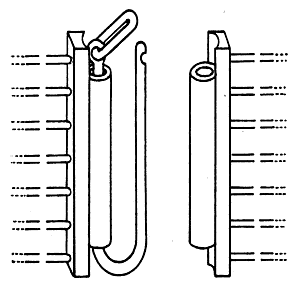
The following catches are all based on a conventional hinge - that is, a series of tubes (knuckles) soldered alternately onto two elements in an alignment that permits a rod (hinge pin) to penetrate the entire series. In the case of a clasp, the pin is removable. The basic arrangement is shown in figure 12.51.
Though it has other uses, this style catch is most commonly seen on hinged bracelets. Among its advantages are the facts that it blends in with the rest of the piece and has the same range of movement as the other joints.
 |
| Figure 12.51 Variations on a hinge-style catch. |
As with other catches, many variations are possible. As a general rule, each will have these requirements:
- The pin must be loose enough to be removed, but tight enough that it doesn't fall out by accident.
- The pin must have a knob or similar arrangement to provide a grip for ease of removal.
- The pin must be somehow permanently attached to the clasp so it is not lost.
The hinge-style catches illustrated here use three-part hinges, and though five or seven part hinges can be used, it is usually best to limit the number to three. More knuckles make closing the catch more difficult. To make the clasp match other hinges that have more units, file grooves as needed to imitate a multiple knuckle hinge.
Pin catch with a friction fit
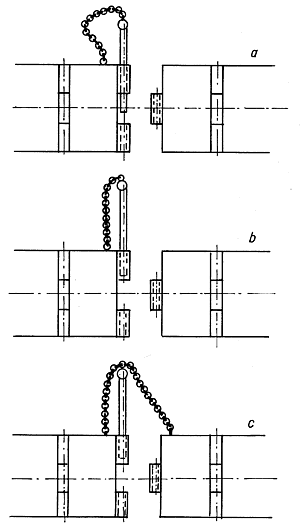
The simplest version of this style is depicted in figure 12.51a, a catch that has traditionally be used in filigree bracelets. In this case the tubes are exactly the same as the other hinges in the bracelet. A pin is made of a tapered rod onto which a ball has been soldered to serve as a knob. A small piece of chain is attached to the pin to prevent its being lost when removed and the pin is flattened slightly to make it a tight fit in the tubes.
A simple variation is shown in 12.51b. Here the chain length is contrived so the pin cannot be withdrawn from the last knuckle of the tubing. Obviously when this clasp is being assembled the pin must be in location before the chain is soldered to the knob.
If the chain is attached to both ends of the bracelet as well as to the pin (figure 12.51c) it also has the function of a safety chain. As with other uses of this safety chain, there is risk that the delicate chain will get caught on things as a wearer moves her arm, rendering the chain more of a liability than a safety. In the case of the example shown at (c) this means the safety chain would encourage removal of the pin rather than prevent it!
In the basic version shown here, the tubes are often of the same thin-walled construction as the hinges, though thicker material is preferred because it will stand up to the stresses of use associated with the catch. In the following variations, thicker tubing is assumed.
 |
| Figure 12.52 In this variation of the hinge-style clasp the pin is held into the top knuckle. This makes the attaching chain unnecessary. |
Figure 12.52 shows a variation of the hinge-style catch in which the pin is prevented from coming completely free by a stop that is attached to the end knuckle. In this version the pin is made of a length of tubing that makes a snug fit inside the knuckles. Cut a small slit at the top of the end knuckle (or, alternately, drill a hole there) and insert a tiny piece of sheet or wire so that it projects into the tubing. Cut a slot along the length of the tube equivalent to two knuckles and insert the pin, from the "bottom" into the catch. Contrive the length of the pin so that it can be withdrawn only far enough to disengage the knuckle on the other unit of the bracelet. With the tube in its fully extended position it is relatively easy to solder on some sort of knob that will prevent the pin from falling out. This sequence, in which soldering is done on the pin when extended will be used on the following examples as well.
 |
| Figure 12.53 In this device, two pins are used, entering from opposite ends and extending half the length of the hinge. |
The same catch principle can be seen again in figure 12.53 but here two catch hinge pins are used, one coming from each side. This makes the construction more complex but increases the safety factor because the bracelet can be lost only if both pins are opened simultaneously.
The variation shown in 12.54 uses a solid round wire as the hinge pin. This wire is filed to have a flat facet on its upper two-thirds as shown. A wire or tiny piece of sheet is soldered across the top opening of the end knuckle, the pin is insert (again, from the "bottom") and the knob is soldered on.
 |
| Figure 12.54 This catch shows yet another way to trap the sliding pin into the tubes. |
Catch with a Tension Pin
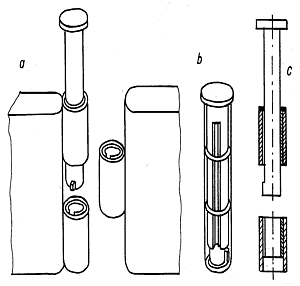
The action of the pin will feel more secure if there is friction of the pin against the inner walls of the tubing. The catch shown in figure 12.55 illustrates a version that achieves this while also using a stop similar to the styles just shown.
The pin is made of two lengths of half-round wire. This can be purchased or made by folding over a flattened strip of wire and pulling it through a round drawplate. The tip of the two pieces is reinforced by soldering and they are rounded to make a tidy end. The top of the end knuckle is prepared as before by sawing a slit and inserting a small piece of thin sheet. This is soldered into position across the opening of the tube, shown here at E-E.
 |
| Figure 12.55 Outword tension of the pin against the tube walls provides adjustable tension. |
The split pin is inserted from below and slid up the tubes so that one leg goes on each side of the bar. A knob is soldered on, thereby locking the pin into place. The legs of the pin are pulled apart as needed to achieve a snug fit when the catch is closed.
The catch with a spring pin shown in figure 12.56 has no stop against falling out, but the degree of security is significantly higher because of the springiness of the pin wires. A knob is made by soldering a disk to a short length of tubing that makes a snug fit in the top knuckle of the catch. Half-round wire is prepared as before but left springy as a consequence of its being drawn down. Two pieces of this wire are laid flat-to-flat and attached inside the knob with tin solder. This will insure that the springiness is retained.
Make a jump ring of thin wire and solder it inside the opening of the end knuckle, then file small notches in the two wires that make the pin as shown. The wires are sprung outward so they make a tight friction along the walls of the tubing. Before the pin can be completely removed these filed notches will snag on the jump ring. The tips of the wires are filed round to make it easier to insert the pin.
 |
| Figure 12.56 A simple yet effective mechanism that protects against the pin sliding out. |
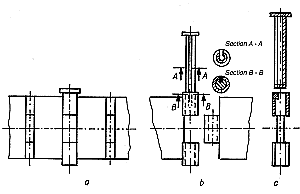
Turning Pin Catch
This version of the hinge-style catch (figure 12.57) is somewhat elaborate, both to construct and to use, but the result is sophisticated and very secure. Start by making a pair of tubes that fit snugly together, one inside the other. Cut a length of the smaller tube that is slightly shorter than the width of the catch and saw a slot along almost the entire length of this tube.
Prepare the hinge pin by creating a rod or tube that fits into the catch. Solder a short piece of sheet at one end as a key flag. The size will be such that this pin slides neatly along the track made by the slot in the inner tube. When all the pieces work together, slide the tubes together and solder them. This tubing is then cut into three sections and soldered to the bracelet units, with care taken that the slot matches up when the pieces are brought together.
Notice in figure 12.57b that the inner tube is slightly shorter than the catch itself. In this way the pin can be rotated when the bracelet is closed, considerably improving the security of the catch. To achieve this effect, slide the pin into place, rotate it to engage the
flag on the lip of the inner tube, and trim the top of the pin flush. Rotate the pin enough to allow the flag to find the track, extend the pin, and solder the knob on the top.
 |
| Figure 12.57 This challenging construction allows for the pin to lock into place by being rotated when closed. |
Catch with a Fixed Hinge Pin
This catch looks like a hinge-style catch, though in fact its mechanism is considerably different. In situations where there is flexibility, it makes an easy and intriguing alternative.
As seen in figure 12.58, the catch consists of two pieces of tubing, one twice as long as the other. A shallow line can be cut around the longer tube to give the appearance of a hinge. A piece of round wire is soldered into the shorter length tube and given a small projecting pin as shown.
 |
| Figure 12.58 This catch has no moving parts, but instead depends on the stiffness of the bracelet to provide tthe tension needed to keep the clasp secure. |
The larger tube is slotted with a saw to create an opening whose width will allow the pin to travel easily along it. These two prepared tubes are soldered onto the bracelet in an orientation that requires the bracelet to be flexed at an extreme angle to engage the pin in the slot. The pieces are linked together and the short horizontal part of the track allows the bracelet to return to its normal, wearable position.
U-Shaped Link with a Hook
Unlike the catches described above, this variation rarely blends into the design. It particularly lends itself to flexible bracelets and necklaces made up of beads, jump rings or wire elements. As shown in figure 12.59, the catch is built on two panels that will connect to the bracelet. These can vary considerably in shape, depending on the context of the work.
 |
| Figure 12.59 This simple catch is often appropriate for multiple strand necklaces and bracelets. |
Onto these are soldered two identical lengths of tubing. A wire is prepared so it makes a snug fit inside this tube. Solder a small tube or jump ring at one end of this wire and through it feed a jump ring of thin gauge wire. This is soldered and bent to a long oval. Feed the wire through one of the tubes and bend it into a U-shape in which the two arms are parallel and an appropriate distance apart to make the clasp look good. Slide the other tube in place to close the catch, trim the wire to length and file a notch as shown to snap onto the oval ring. It should be clear that springiness in the U-shaped wire will add strength to the catch.
Figure 12.60 shows a less exotic catch that is included here only because it can be made to resemble a hinge. Solder a length of tubing onto one side of the bracelet and cut a slot along its entire length close to the point where it attaches to the bracelet. On the opposite side, bend a wire to make a wicket that will engage the open tube as a hook engages an eye. Of course it is possible that this is a simple wire, but the proportions are generally improved if the wicket is thickened with the addition of a tube as shown. In practice it is important that the slot is a tight fit for the wicket so the two elements snap together.
 |
| Figure 12.60 More a wide hook than a tube catch, this resembles a hinge catch but has no moving parts. |
Functional Analysis
By way of a summary it might be helpful to review several familiar catches in objective terms. This analysis will consider the use or application of a finding, the appropriate environment for the catch (i.e. the flexibility, weight, and access associated with it), its direction of opening, security, and how well it lends itself to harmonizing with a design.
The illustrations on pages above show each of the clasps discussed in this section. The drawings and descriptions above are intended to present in a general way a few of the most common families of catches. For simplicity most have been presented in the context of a bracelet, but it must be emphasized that the relevance of these catches extends to necklaces, armbands, watch straps, and dozens of uses yet to be devised.
Designers must consider many factors as they decide which closure will best complete a given jewelry piece. In some catches the direction of tension is the same as the direction of opening. An example would be a box catch, in which the tongue slides into the box in the same axis as the chain it is closing. An example of the other category in which the direction of closing is at a right angle to the direction of tension is a hinge-style catch. Here the joining mechanism of the pin is 90° from the direction of opening of the bracelet.
This tells us that in the former cases, security depends on the tensile strength, springiness and wear resistance of the metal selected. In the second category, the closure is primarily a matter of mechanics. For maximum security it is best if the opening direction and the direction of stress on the catch are at right angles to each other because external forces are completely absorbed by the rigid parts of the catch.
One of the enjoyable challenges of goldsmithing is that of determining the ideal clasp for each situation. This will be aided by a thorough understanding of the traditional devices outlined here, but it must be more. A creative designer will modify findings to his or her particular need, going so far in some cases that the end result is an entirely new concept!
Related Articles
The Economics of Ornamenta 1

The Jewelry of Hermann Junger

Superfit’s Hinge and Latch System

Jewelry Designs: Sisters Pendant


The All-In-One Jewelry Making Solution At Your Fingertips
When you join the Ganoksin community, you get the tools you need to take your work to the next level.
