
Hydraulic Die Forming for the Artist/Metalsmith
25 Minute Read
Hydraulic die forming is a process which hasn't received a lot of press. Perhaps its usefulness seems limited to mass production, and it sounds as if you need to divert rivers to do it. This article is intended to clear up a few misconceptions as well as to present some new information.
The die-forming process has many applications in addition to "production" in the usual sense, many of which could be useful to an artist/metalsmith. The dies you make become tools for creating unique pieces, but it is unlikely that the design or intention of your work will become overpowered by the look of a "technique." A homemade hydraulic press, using a 20-ton jack, can be put together fairly easily (and inexpensively), and your neighbors won't even know.
I began working with die forming in 1978, shortly after the publication of Marc Paisin's article in Goldsmilhs Journal (Volume III, Number 6, December 1977), which described the process. Robin Casady designed the bolt-together press, which is described in this article, and should also be credited with much of the research and development involving the use of a product called Flexane, which will be explained later.
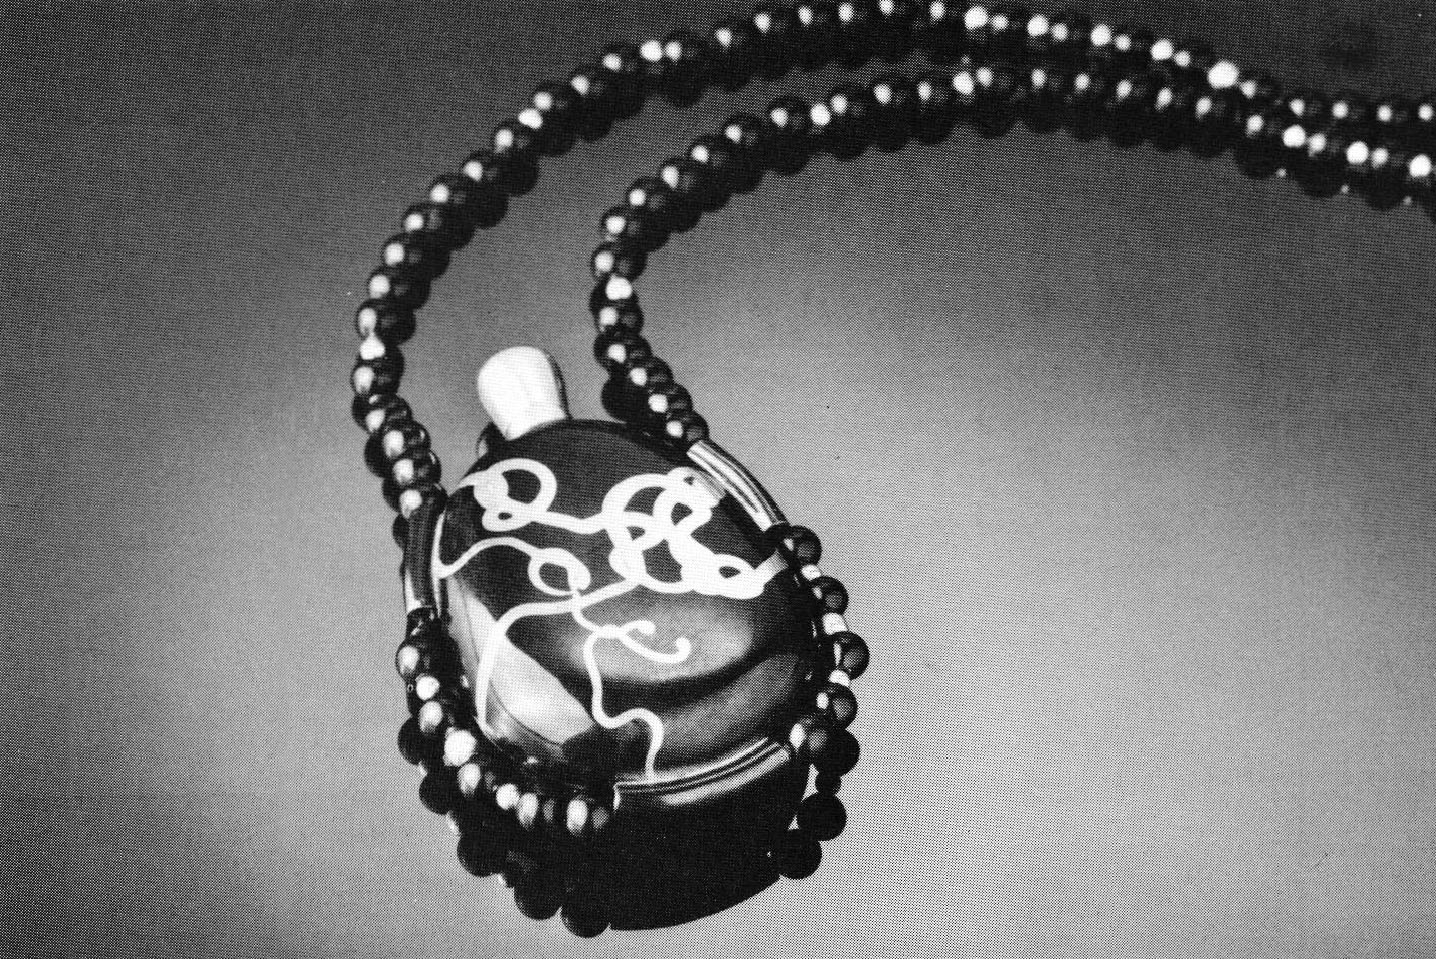
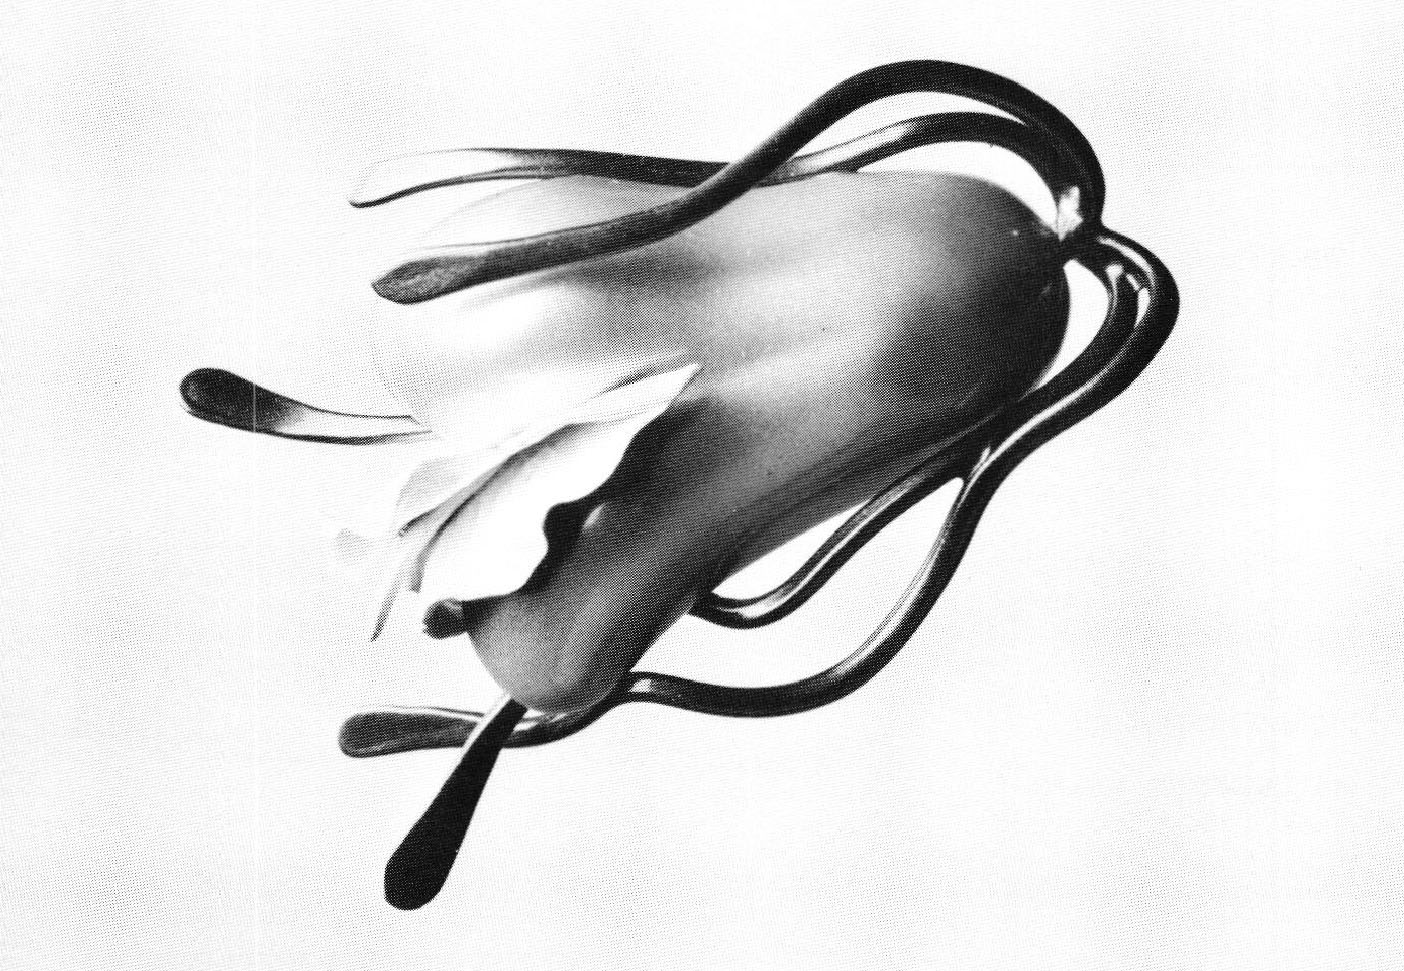
My original use for die forming was the limited production of a hollow pendant in gold and silver. Later, I used a reversible conforming die to make a series of miniature bottles that had various surface designs incorporating the use of Japanese alloys, married metals and soldered inlay techniques. Most recently, I have been using die-forming techniques to make elements for use both in jewelry and sculpture. In addition to forming individual small shapes, I often use multiple images for repetition in a single piece and use a die to form very small parts that would be difficult to form otherwise.
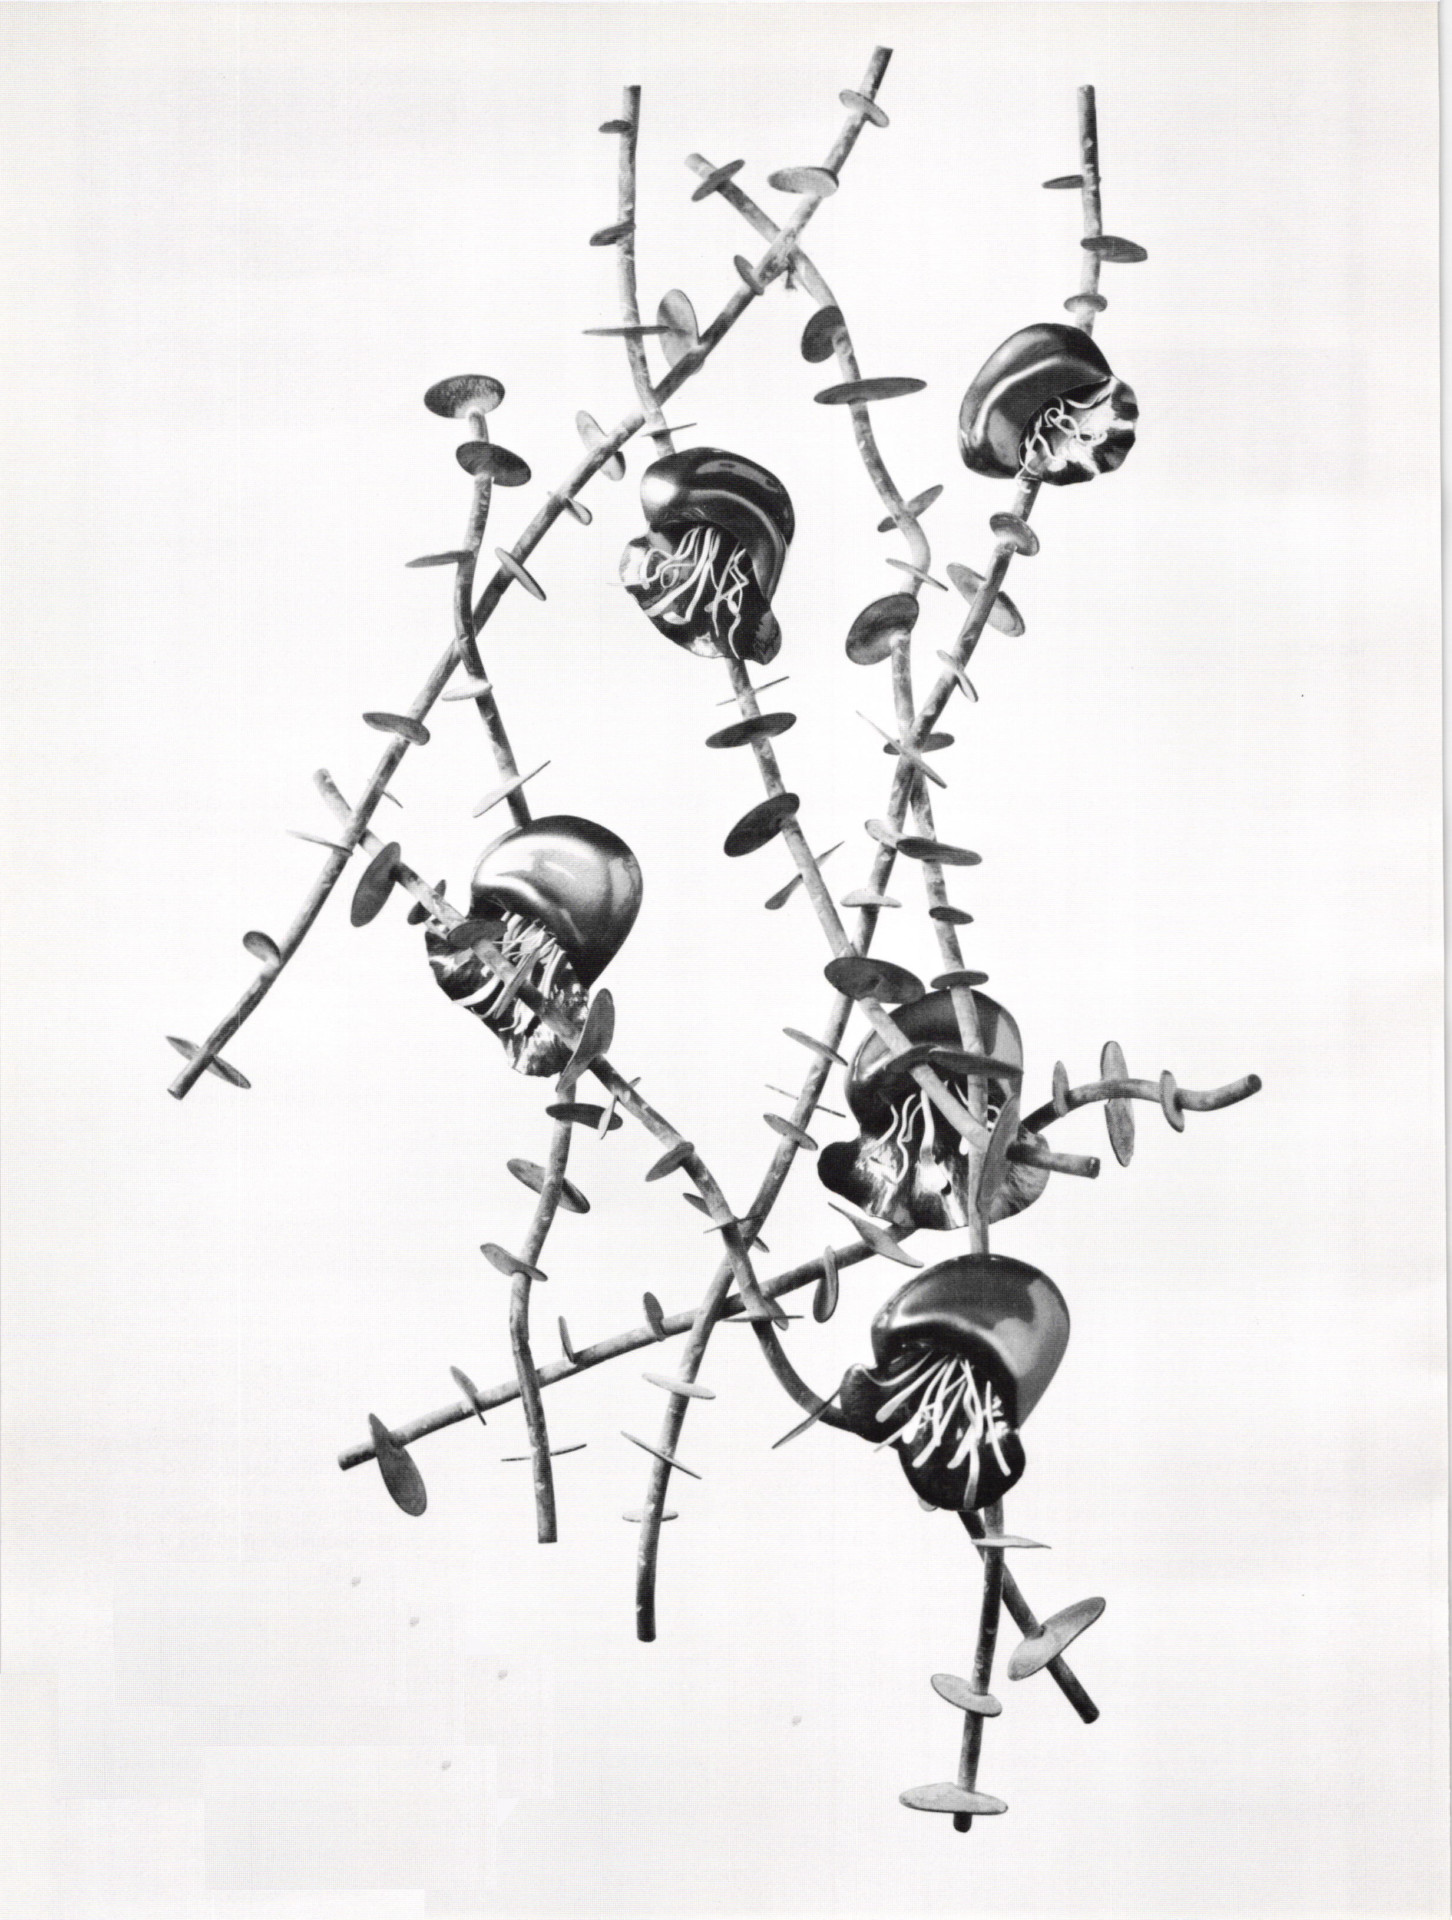
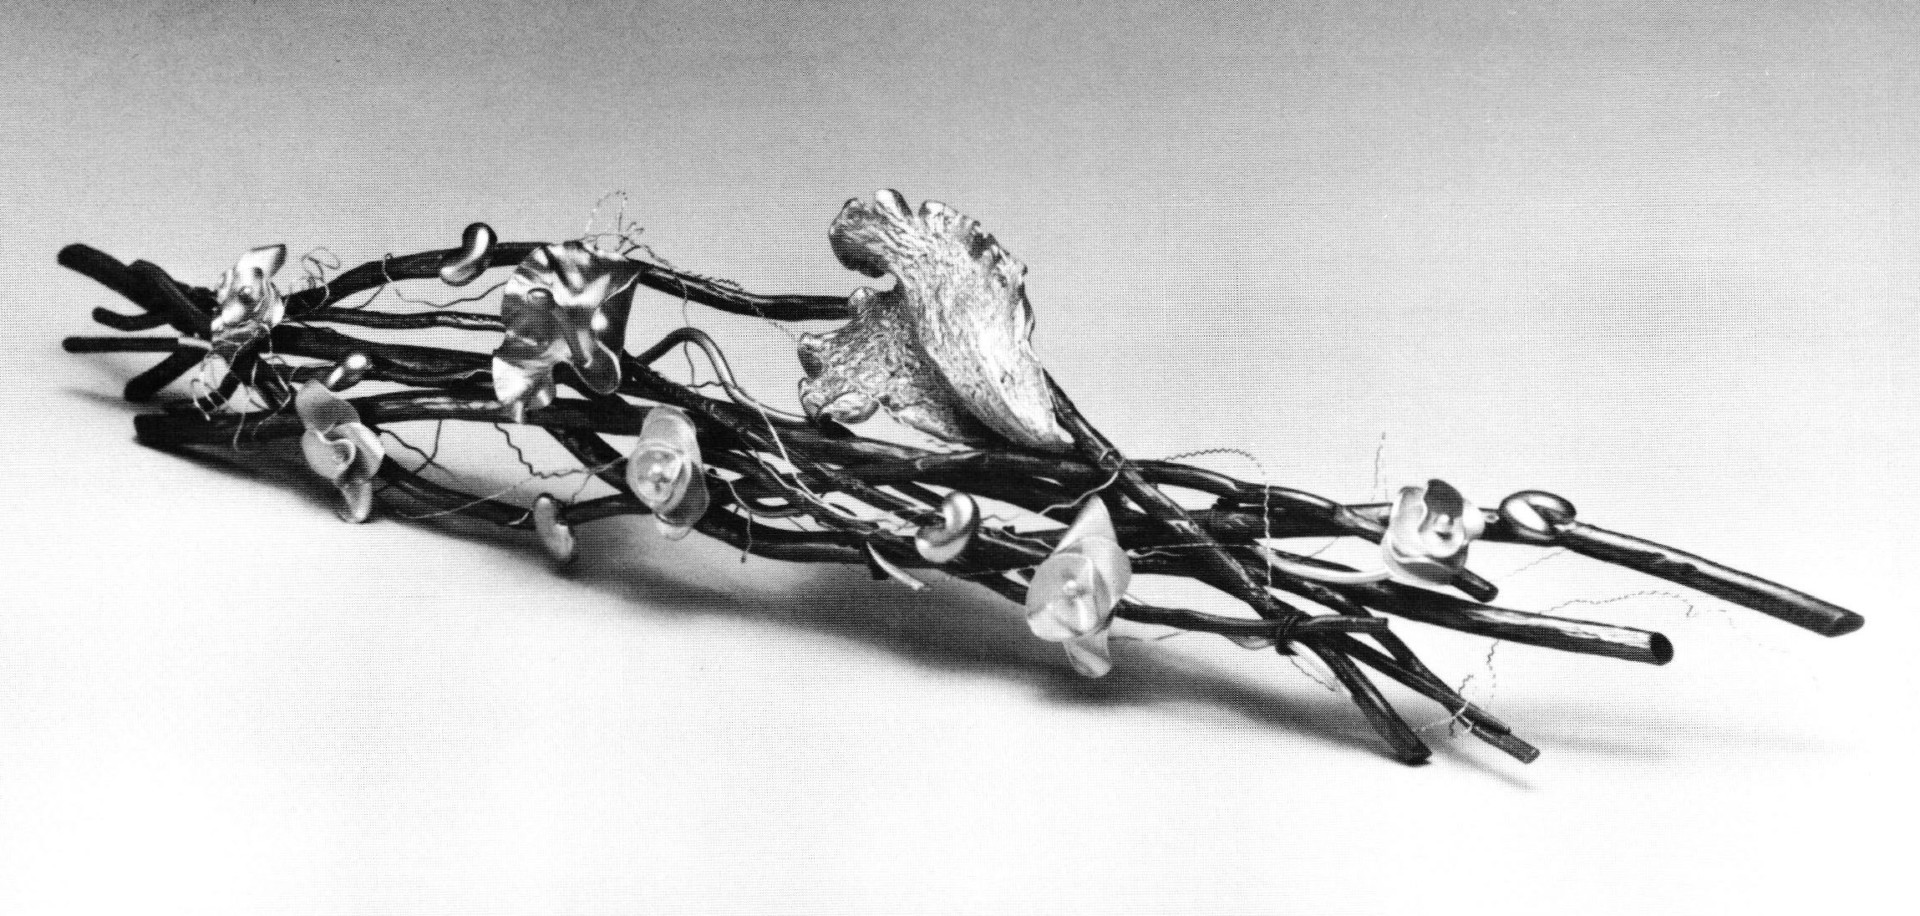
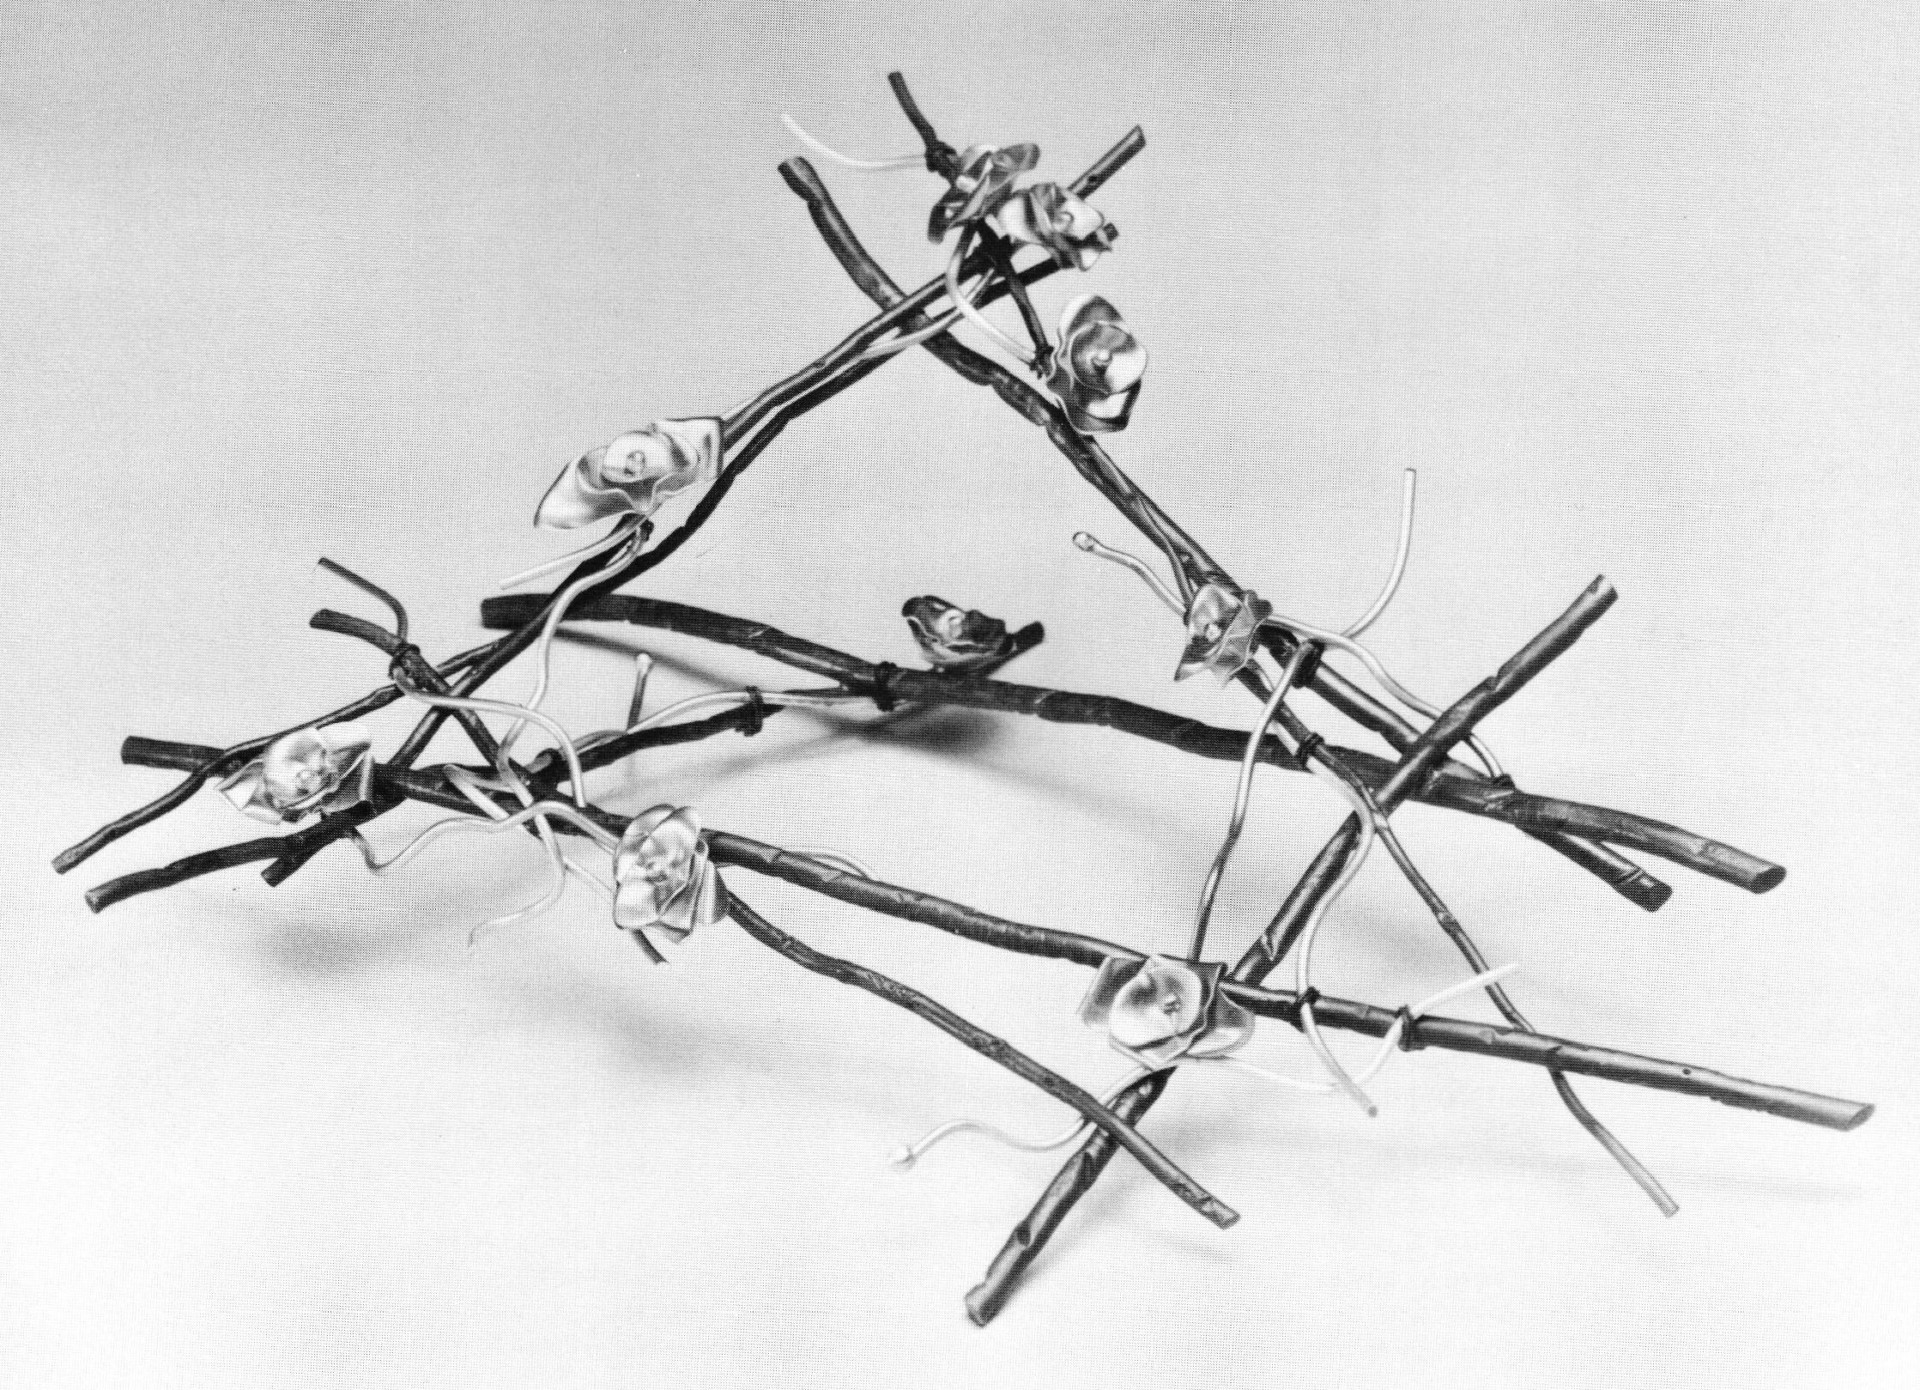
Instead of discussing the use of die forming for "production," I would like to suggest the idea of multiple units. A unit could be a complete entity (a pendant, for instance) or it could be a part of a group assembled to create an object (as in a link bracelet). Multiple units can be identical or altered in some way to make "variations." In addition, a single die can be used to produce varied objects, such as mirror-image opposites, or parts with the same relief but a different outline or silhouette. The possibilities seem endless.
The use of (reversible) conforming dies to make small hollow objects was suggested by Marc Paisin in the previously mentioned article. The use of the hydraulic press and "Devcon Plastic Steel" dies for this purpose is very efficient. Their usefulness, however, is not limited to the production of hollow objects. Conforming dies allow you to stretch and push sheet metal into the third dimension. They can produce smooth, clean and complex sculptural forms that have a casual flowing quality. Soft curves and the absence of tool marks distinguish die-formed metal from repoussage (although surface detail could be added later by chasing). Including the time that it takes to make the dies, conforming dies can be an efficient way to form metal, if you intend to make multiples or not. In addition, you may be able to use a thinner gauge metal, cutting material costs. A 2 inch conforming die of plastic steel, as described in the example below costs only about $7.50 to make.
Hydraulic Press Design
The hydraulic press illustrated can be put together for around $350.00. The advantages of this design are that it is inexpensive (compared to industrial models), easy to assemble and adjustable to various heights. If you can find a second-hand jack, or use scrap metal for the plates, it can probably be built for less. Most machine shops or metal-fabricating businesses can supply the steel parts you need; threaded steel rod, steel tubing, nuts, washers and steel plate. They can also do the cutting and drilling. The springs come from a hardware store, and the jack can be purchased from an automotive supply store or tool dealer.
The hydraulic press works as follows: the tubing acts as a spacer between the top and bottom plates (see Diagram 1, plates A and C). They are stationary, although the distance between them can be adjusted by using different length sections of tube as spacers. Plate B rests on the jack and moves up and down. Threaded rods run from the top, down through holes in the table and are secured by nuts underneath.
Everything needed to assemble the press is listed, with measurements, in the parts diagram (Diagram 2). The size of this press has proven useful for making jewelry and small sculpture. Research was done by a machinist to determine the correct thickness for the steel plates, the threaded rod size and the number of nuts needed to withstand the stress of 20 tons. As the press is assembled, level each plate and make sure that they are all parallel. Also, it helps to grease the tubing in the areas where plate B slides.
Making a Conforming Die | |
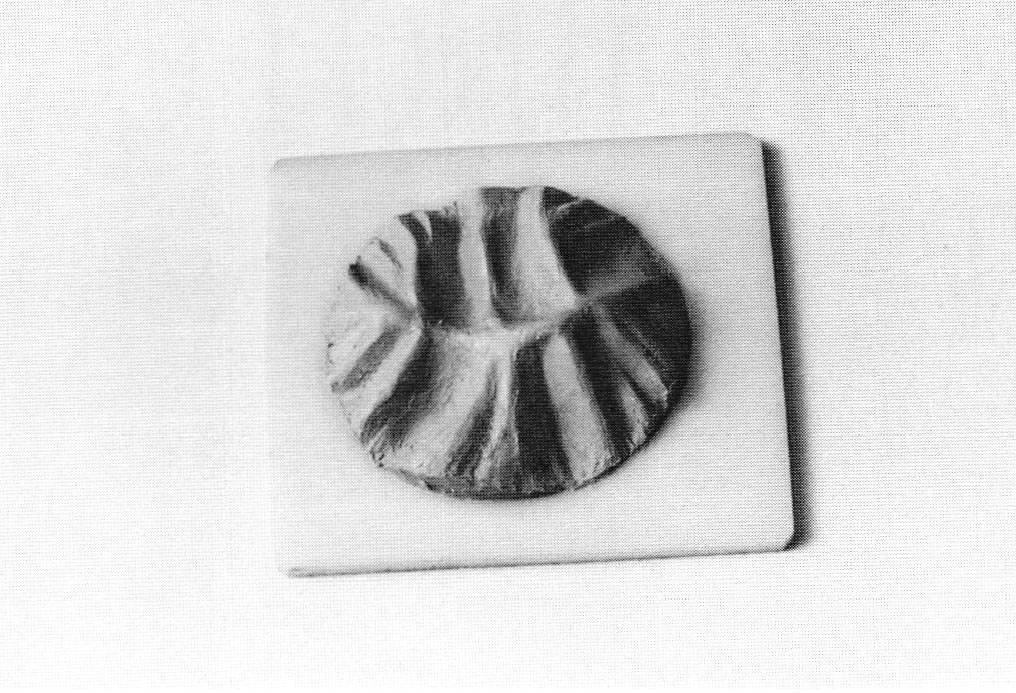 | The first step in making a conforming die is to make a model of the form you want to produce. It could be made of wax, wood, plaster or plasticene, as shown. Stick to the model to a flat base of some rigid material, such as plexiglass. |
 | Place a section of steel pipe around the model to act as a retaining ring and put pasticene around it to seal and hold it in place. |
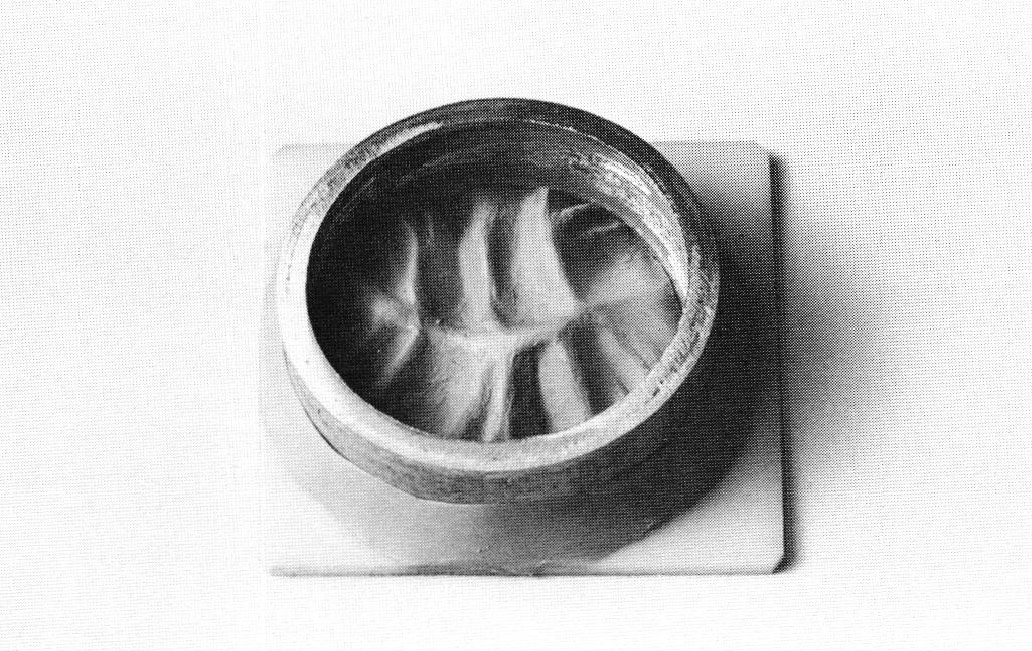
 | The matrix die used as a mold for the punch, with masking tape as the outside "retaining wall." Measure and calculate the amount of plastic steel needed for the punch. |
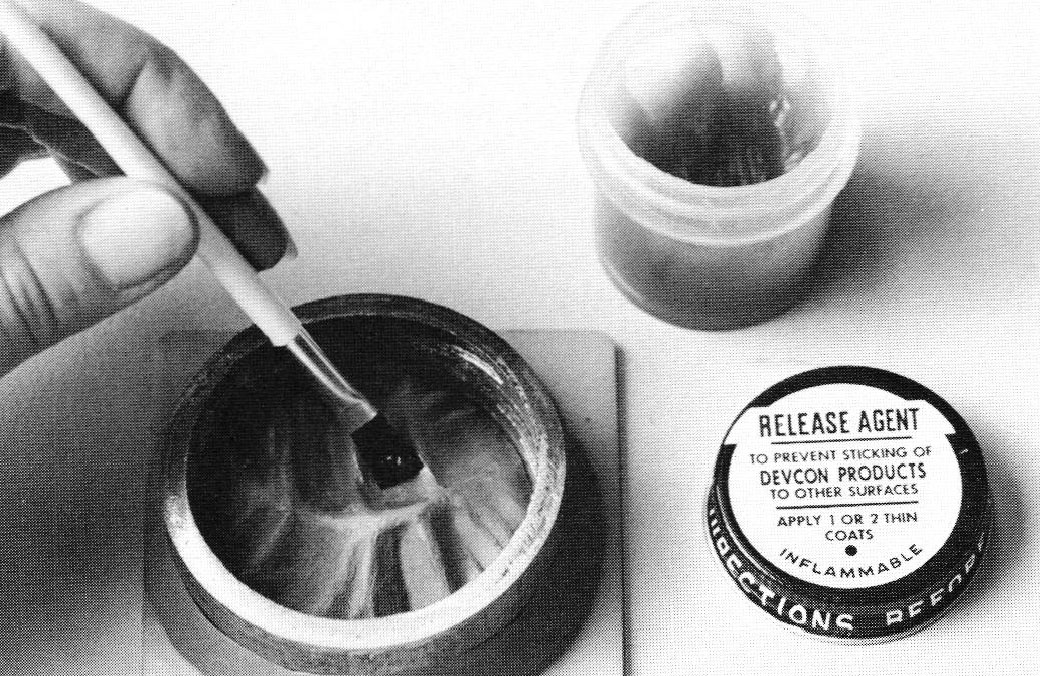 | Carefully coat the model and flat base material (if exposed) with the release agent supplied with Devcon B. |
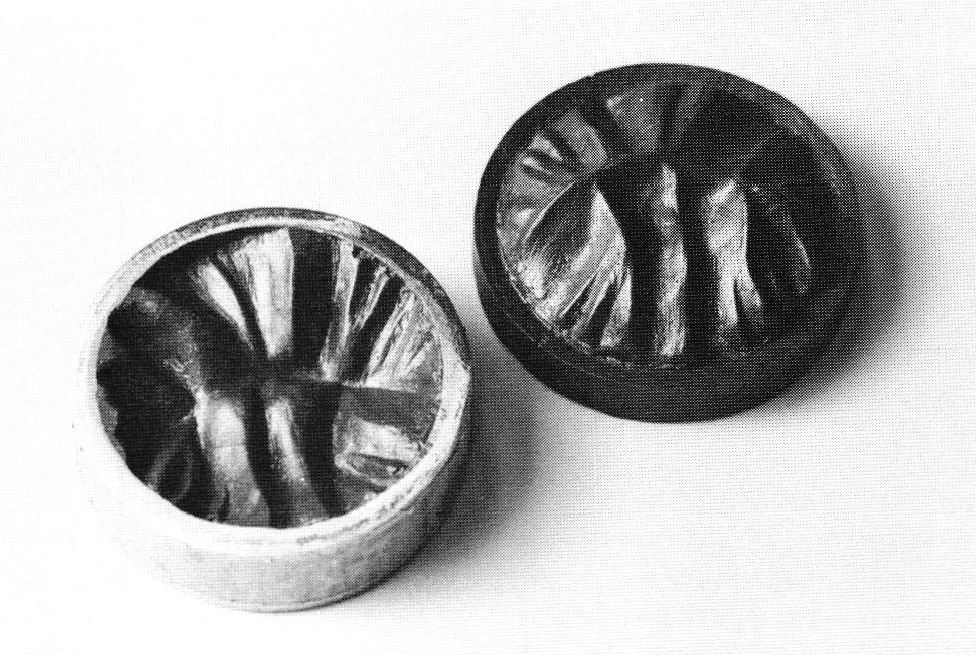
 | The plastic steel hardens in about four hours. When the model is removed, the matrix part of the conforming die is complete. |
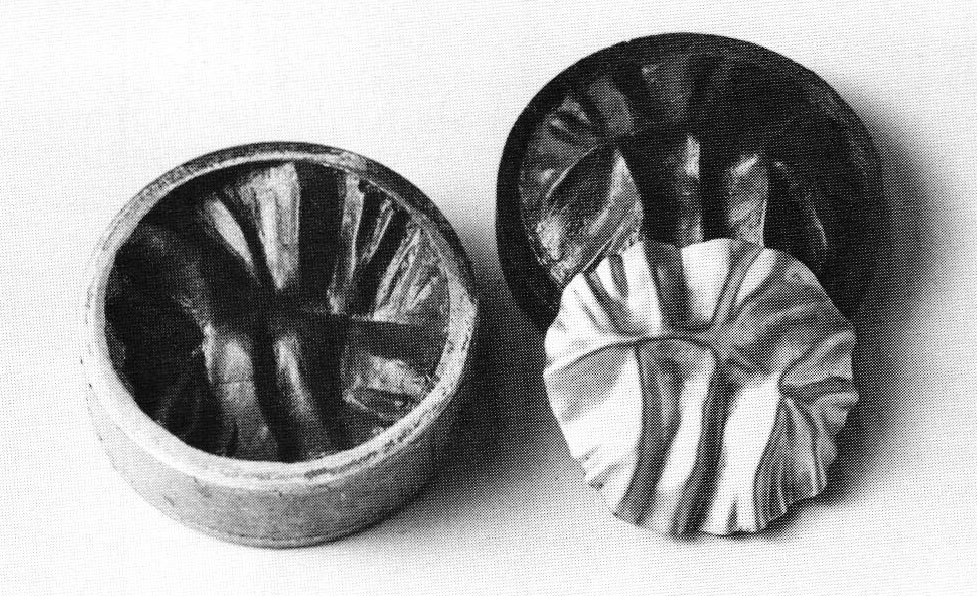
 | The punch can be removed from the matrix after four hours, but wait for a full cure (16 hours) before testing it. |
 | Plastic steel conforming dies, as described, work well with 22- to 26-gauge soft metals (copper, silver or gold and their alloys), which have been annealed. Good results have also been achieved with soft grades of aluminum and annealed titanium. |
 | Conforming dies constructed of steel rod were used to produce these two pairs of corrugated earrings. An embossing die, consisting of wires soldered to a disc, was used with a thin Flexane pad to make the round earrings. A shearing die was used to punch out the others. (Later the surface was hammered for texture.) |
 | A very simple silhouette die can be made by sawing a shape out of heave-gauge metal and backing it with plexiglass. It can be used with a contained block of Flexane acting as a punch to produce a "pillowed" form. |
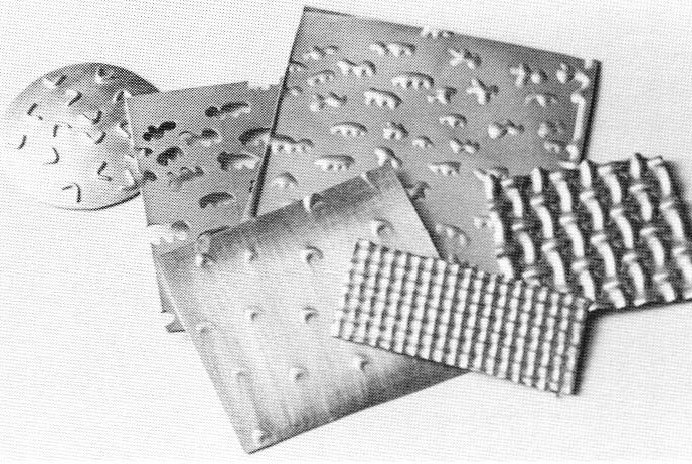 | The use of Flexane for embossing achieves unique results. Embossing dies can be made by soldering wires or cutouts to a sheet of metal, or by piercing. Found objects, such as wire mesh, can also be used to emboss. |
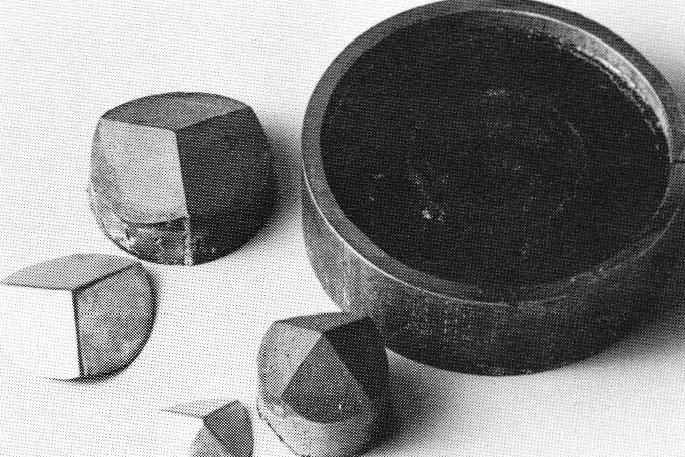 | A block of Flexane, a tough rubberlike urethane, contained in a section of steel pipe, can be used as a matrix with a variety of different punches. Extra quantities of Devcon B can be poured into containers and later filed or carved into punches such as these. |
Making Conforming Dies with "Devcon Plastic Steel"
The first step in making a conforming die is to make a model of the form you want to produce. The model could be made of plexiglass, wax, wood, plaster or plasticene. The depth should be about ¼ inch for a 2 inch diameter die. Larger dies could have a deeper relief. Avoid undercuts and sharp bends. Small detail and textures will not be reproduced, but can be added later by chasing. If the die is to be reversible, to produce two matching halves of a hollow form, the model's outline or silhouette must be perfectly symmetrical, and extreme accuracy is necessary.
Stick the model to a flat base of glass or plexiglass that is at least 1 inch larger in all directions. Then place a cleaned section of steel pipe around it to act as a retaining ring. The model can be as close as ⅛ inch to the ring, and as close as ¼ inch to its depth. More than ¼ inch in either direction is unnecessary and wastes material. The ring should be filed so that the edges are flat and parallel. Next, put some plasticene around the outside of the ring to stick and seal it to the flat base. Then carefully coat the model and base inside the ring with the release agent that is supplied with the plastic steel. Avoid getting it too thick.
Now you are ready to mix the plastic steel. You will need a gram scale, a ruler, a calculator, a watch, waxed paper cups and a sturdy flat metal spatula (not a rod) for mixing. Be organized, and work in a well-ventilated area. The following formulas may look complicated, but careful measurements and calculations are necessary when mixing small amounts to both ensure good results and avoid waste. First, measure (in inches) the inside height and diameter (and divide by 2 to get the radius) of your die.
DEVCON Plastic Steel B - Liquid
1 pound (453.6 grams) "Devcon B" = 13.1 cu. in
34.63 grams = 1 cu. in.
Mix proportions = 90% steel resin by weight, 10% hardener by weight
πr2 x Height = Volume
Volume x 34.63 = Weight (total)
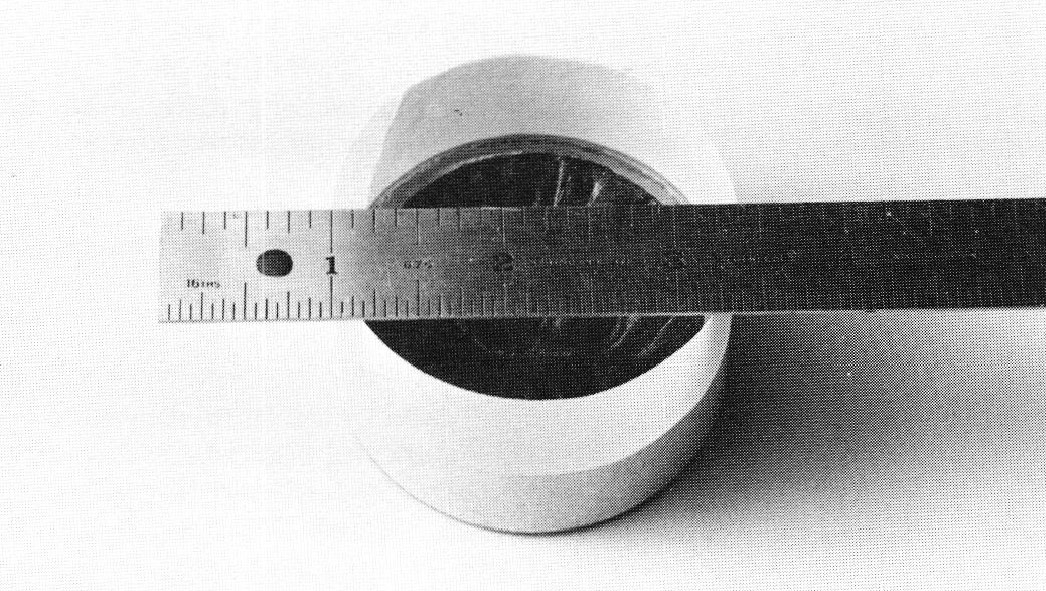
For example, the die in the photographs measures 2 inches in diameter and .75 inches high.
π(1)2 x .75 = 2.36 cu. in.
2.36 x 34.63 = 81.73 grams
81.73 x .9 = 73.55 grams steel resin
81.73 x .1 = 8.1 grams hardener
Since there is some waste in mixing, and these are small volumes, do not subtract anything for the model when figuring for the matrix die. When figuring for the punch, the estimated volume of the model must be added Measure the resin first, and add the hardener to the resin. Do not contaminate either container with the contents of the other. Mix thoroughly, until you have a uniform consistency—at least four minutes by the clock lf the mixture is too thick to flow easily around the model when poured, add a small amount of Anchor Seal Epoxy Thinner (not to exceed one teaspoon thinner to 75 grams Devcon B by weight) Pour slowly into the lowest area of the die and let the plastic steel creep over the model. Fill to the top of the ring. Any time that there is plastic steel left over, pour it into a container and use it later to file or carve a punch.
"De-bubblize" by tapping the die on a hard surface, and then place it on a level surface in a safe place to cure. The small bubbles that form on the top of the die are of no consequence. Working time is 45 minutes. Hardening time for a ½ inch thick die is about four hours: full cure takes 16 hours. Larger dies with a greater mass cure faster. A heat lamp may be used to hurry things up Epoxy will not cure properly at temperatures below 60 degrees F.
When the plastic steel is hard, you can carefully remove the model from the matrix. At this point, you can smooth and make corrections with a file or a steel burr in a flexible shaft. It is also possible to fill in with plastic steel, should you have any large holes left by bubbles. The Liquid Steel Filler that you can buy in a tube at most hardware stores is fine for this purpose.
Now you are ready to make the punch, using the matrix as a mold. Make a "retaining wall" around the matrix with masking tape. Coat the entire interior of the mold with release agent. Repeat the same process of measuring and calculating the volume and weight of plastic steel needed to fill the die. The punch should be ⅜ to ½ inch thick at its perimeter. Remember to estimate and add the extra volume needed to fill the recessed area (left by the model) in the matrix.
The punch can be removed from the matrix when it is hard, but you should wait for the full cure before testing it. You may need to file off the rough edge at the top and fill any small bubbles in the punch.
When you are ready to test the conforming dies, begin with annealed 26-gauge copper which is at least ⅜ inches larger all around than the shape that you are forming. Lubricate the dies and/or metal with silicone or release agent.
The die can be aligned in the press by positioning it (with the punch in the matrix), in the center of the middle steel plate (B) with doublestick tape of the top and bottom of the die. Carpet tape works well. Raise the plate until the punch is stuck to the underside of plate A and the matrix is stuck to plate B. Then, release the lack and allow plate B to drop several inches. Place annealed metal on the matrix, and raise plate B again. If the metal flange starts to fold as you press, take it out and flatten it with a leather mallet or wooden punch. If the metal tears, use a heavier gauge metal or press it in small increments, annealing several times. Good results have also been achieved with soft grades of aluminum and annealed titanium. Forming less ductile metals. such as brass or nickel, is not recommended.
If you want to use heavier gauges. extra space in the die is needed. Carefully file down the punch, removing about a metal's thickness. Another method would be to file around the edge of the matrix. A third alternative is to plan for the extra metal thickness when making the die. A layer of wax, the thickness of the metal to be used, could be put over the matrix when the punch is being poured.
The edges of the die will wear with use. If you plan to make a large number of pressings, and/or the sharpness of the outside edge is extremely important (as in a reversible die), make a brass or steel plate, with the silhouette removed, to place over the matrix. It can be held in place with glue doublestick tape or gravity.
As mentioned above, Devcon Plastic Steel can be drilled, filed and carved with a burr in the flexible shaft. These dies can be revised, altered and even completely reworked. Remember to wear a dust mask and goggles as the dust is toxic.
Die Forming with Flexane
Flexane is a tough, rubberlike urethane which can be used for metal forming. A pad or block of Flexane can be used as a matrix or female die, with a variety of different punches, or male dies. Flexane does not compress but flows up around the part being formed. After use, it returns to its original shape and can be reused thousands of times.
Flexane offers many new possibilities in die forming. For some applications it short-cuts the process. For example, a punch and a Flexane matrix can sometimes produce the same result as a conforming die, eliminating considerable setup time. Flexane does not disturb or scratch the metal being formed, resulting in a smooth surface, free of hammer marks, that reduces finishing time. Etched, roll-printed, engraved or other textured surfaces can be formed with minimal change. And because uniform pressure is maintained over the whole surface of the work when forming with Flexane, married metals, soldered inlay and overlay work can be formed with less risk. And, finally, it is possible to form metal with results that are unique to this process. For instance, you can use Flexane for embossing.
Several kinds and sizes of Flexane blocks and pads have proven useful: contained blocks, uncontained blocks and pads. (Their applications will be described later.) They are made by mixing Flexane resin and hardener, pouring the mixture into molds, and allowing them to cure at room temperature. Flexane 94 Liquid, which is supplied in either one pound or 10 pound quantities, should be used (Flexane comes in a variety of different compounds.) At present, it costs about $14 per pound. The seven sizes of blocks and pads suggested in this article require about 10 pounds.
Contained blocks can be cast into heavy steel pipe sections. The idea of containing the Flexane is that when you press into a contained block, it is forced to flow up and around the die, rather than out. The thickness of the walls of the pipe must be at least ¼ inch to withstand the lateral pressure of the Flexane. Plumbing pipe works well, and should be machine cut for accuracy. Most plumbing supply houses will do this for a reasonable fee. Suggested sizes for general use would be a 2 inch length of 2 inch diameter pipe, a 3 inch length of 3 inch diameter pipe, a 2 inch length of 4 inch diameter pipe, and a 4 inch length of 6 inch diameter pipe. To prepare the pipe sections, file away the rough edges and clean off any dirt or rust. Seal one end with heavy tape or with plasticene on a flat surface.
Flexane 94 Liquid can be prepared in measured amounts according to the following formulas. (Sizes are measured in inches and weights are in grams.)
Flexane 94 Liquid
1 pound (453.6 grams) Flexane = 26 cu. in.
17.45 grams = .1 cu. in.
Mix proportions: 68.7% resin by weight, 31 .3% hardener by weight
First calculate the volume of the block you want to cast, measuring in inches.
For a cylinder: πr2 x Height = Volume
For a block: Height x Width x Depth = Volume
Then multiply:
Volume x 17.45 : Weight (total grams)
W x .687 = weight of resin
W x .313 = weight of hardener
When mixing Flexane, work in a well ventilated area, and avoid breathing the vapor. Skin contact should also be avoided. Working life is only about 10 minutes, so have everything organized before you begin. The Flexane blocks and pads can be unmolded after about 12 hours, and 70% to 90% strength is achieved after two days. A week is needed for full cure: for best results, wait.
With these Flexane blocks you can use a great variety of different punches. Anything from a mushroom stake to a dapping punch can be used with a Flexane matrix to form a dome, without changing the surface of the metal. It is also possible to form metal which has wires or cutouts appliqued. Specially shaped punches could be cast in metal or tooled from Delrin. Simple punches can be made very easily and quickly out of hardwood, masonite or plexiglass. (Plexiglass sheet has a surprising compressive strength of 18,000 psi!) Any extra Devcon B, which you might have left after pouring con forming dies, could be poured into a container, and made into a punch by carving or filing after it has cured. In general, thin metal pressed into a contained block will form with the greatest depth and detail, and this can often be improved by a second annealing and pressing. (Of course, always begin with annealed metal.) The uncontained blocks are for use with punches that are too large or oddly shaped to fit into the contained ones, or when great depth or detail are not necessary.
Another possibility is to use the contained Flexane block as a punch with a rigid silhouette die. The effect is something like a gentle sag or pillowing into the outline of the cut-out shape. Very simple silhouette dies can be made out of plexiglass or masonite. A carefully made steel or heavy gauge brass silhouette die (with a support of plexiglass or masonite to add thickness) can even be used as a reversible die by using it from both sides.
The use of thin Flexane pads for embossing achieves a result unique to this process. The metal to be embossed should be soft (either copper or silver) and annealed. Pierced plates of hardened (16- to 18-gauge) sheet metal, such as what one might use for roll printing, will make an embossed design which is more raised than a roll-printed one and without distortion. Plates of hardened sheet metal with a raised design (such as one with wires soldered to the surface) will create an impression on one side and a raised design on the other side, each with a different and unique appearance. The pressing of any number of odd found objects is possible, from wire meshes to key chains, from waffle irons to washers (the flat kind) The thin Flexane pads become very ragged-looking in a short time, but their performance is not affected.
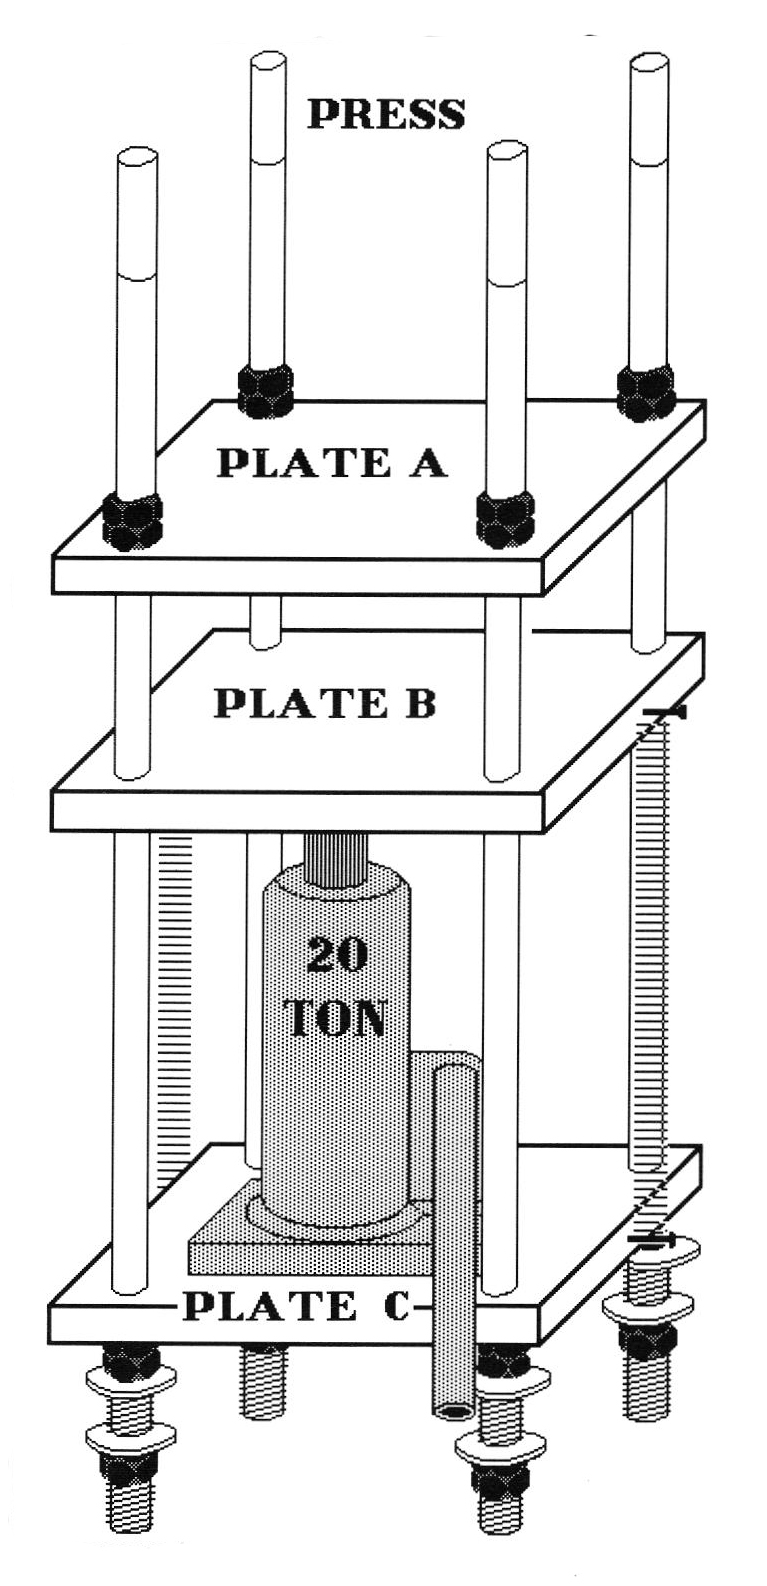
The advantages of this press, designed by Robin Casady, are that it is inexpensive (compared to industrial models), easy to put together, and adjustable to various heights. The way it works is this: tubing acts as a spacer between the top and bottom plates (Plates A and C). They are stationary, although you can adjust the distance between then by using different-length spacers. Plate B rests on the jack and moves up and down. Threaded rods run from the top, down through holes in the table and are secured by nuts underneath.
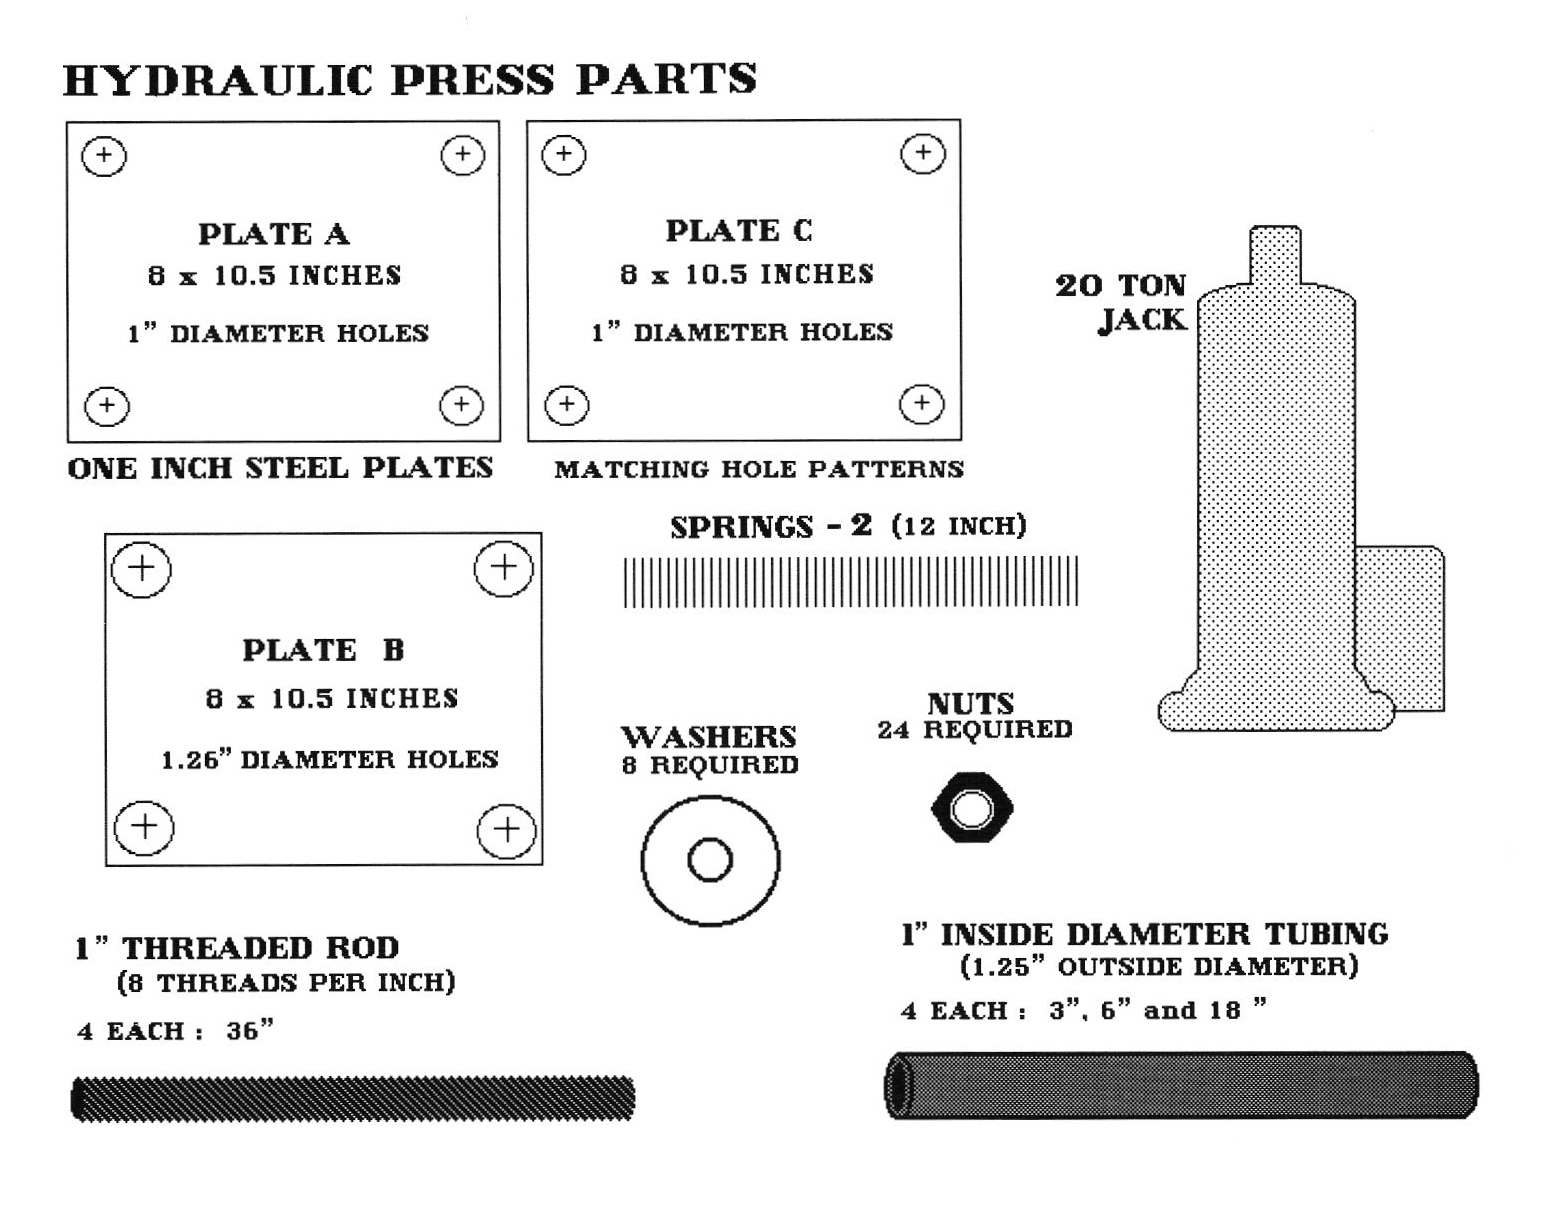
Most machine shops or metal fabricating businesses can supply the steel parts needed: threaded steel rod, steel tubing, nuts, washers, and steel plate. They can also do the cutting and drilling. The springs come from a hardware store, and the jack can be purchased from an automotive supply store or tool dealer.
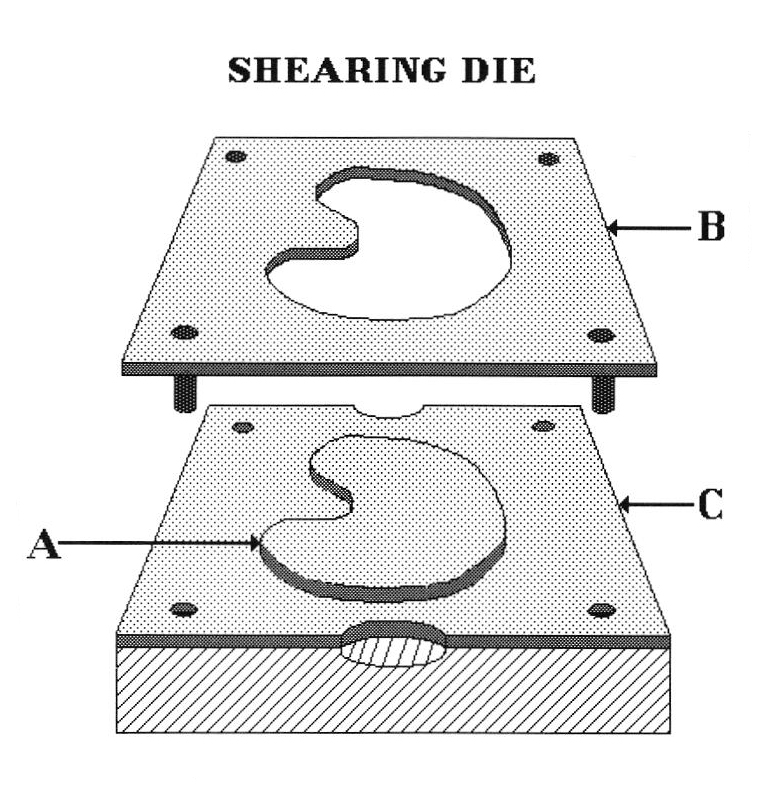
A simple shearing die such as this, used in the hydraulic press, can fill the gap between industrial blanking processes and hand sawing. It can punch out identical pieces faster thank you could saw them and produce shapes that you could not cut with shears.
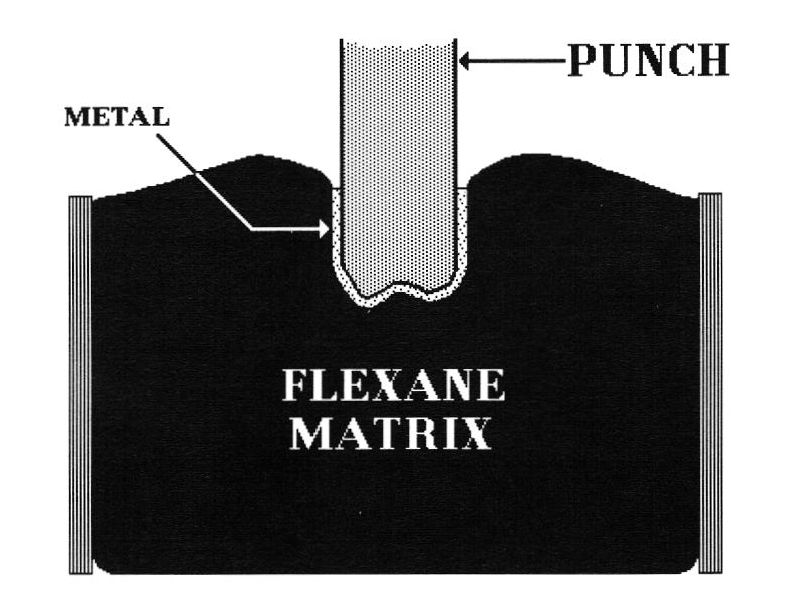
Flexane is a tough, rubberlike urethane which can be used in die forming. A block of Flexane, contained within a steel pipe section, can be used as a matrix with a variety of different punches. It does not compress but flows up around the part being formed. After use, it returns to its original shape and can be reused thousands of times.
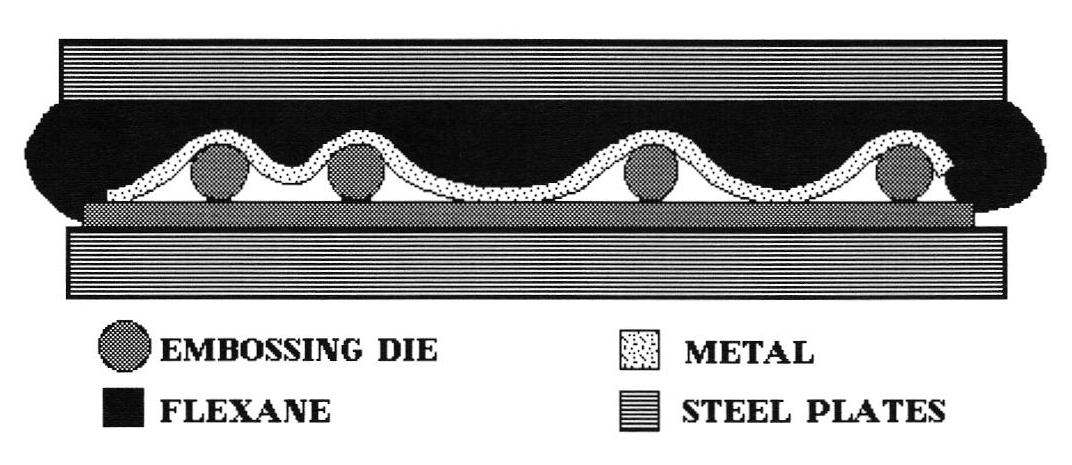
The use of thin Flexane pads for embossing achieves a singular result. A plate of sheet metal with a raised design such as this, with wires soldered to the surface, will create an impression on one side and a raised design on the other side, each with a unique appearance.
Making a Shearing Die
It is possible to use the hydraulic press for shearing. A standard disc punch can be used in the press. The advantages are that the punches don't become mushroomed at the top and that it takes less muscle to shear heavy sheet. However, as with the mallet method, it takes some time to remove the punch and blank from the die.
Below are directions for making the simple shearing die in Diagram 3. As described, made of 14-gauge brass, it will shear 22-gauge or thinner copper or silver. It is being suggested as a practical way of filling the gap between industrial blanking and hand sawing. The useful life of this die is untested, as is the likelihood of being able to shear heavier gauges with a steel die. No claim is being made that it will punch out blanks fast. You still have to align and "crank" out each one and remove it from the die. And, as with any blanking die, considerable scrap is generated. But it will punch out identical pieces faster than you could saw them and can produce shapes that you could not cut with shears. There is minimal burr if you make the die accurately. Your only investment is three or four hours of time to make the die and a few pieces of metal.
First, trace your design on a flat sheet of 10- or 12-gauge brass or steel and saw it out. File the edges smooth, keeping them very straight and perpendicular to the faces. Rounded corners will cause problems. This cutout is part A on Diagram 3.
Next, you need to determine the overall dimensions for the die. There should be a minimum margin of ¾ inch around the shape to be cut out. From a flat sheet of 14-gauge metal, cut two plates the appropriate size.
Center part A, the cutout, over one of the plates, and carefully scribe a line around it. Drill and saw the shape out of the plate, staying within the line. Then very carefully file up to the scribed line, maintaining straight perpendicular sides. This needs to be done with extreme accuracy. Do not round the edges. Keep filing until the cutout, part A, just fits inside the hole. This plate becomes part B, the upper part of the die.
Next, place part B over the blank plate and scribe a line, using part B as a template. Clean and flux this blank plate and Part A, the cutout. Align and sweat solder them together, heating evenly with the torch and letting them air cool to avoid warping. This becomes part C, the lower part of the die.
A ⅜ or ½ inch thick piece of Masonite or plexiglass, cut to size, forms the bottom of part C. Fit the parts together and stack with part B on top, part C in the middle and the masonite or plexiglass on the bottom. Tape them securely together in this position, with double-stick tape sandwiched in all the corners.
Then cut four guide pins of ¼ inch brass or steel rod. They should be about ½ inch longer than the height of the stack. Next, mark and center punch locations for the guide pins, positioning them about ⅜ inch in from the corners. Drill through all the layers with a ¼ inch drill bit (or one that is the same size as the pins). Use a drill press to insure that the holes are all exactly perpendicular to the plate(s).
Solder the guide pins through plate B, extending downward. Take care that the pins are exactly perpendicular to the plate. Plate C could be used as a jig. Again, take precautions to avoid warping the plate(s).
After cleaning everything up, you will need to do some final fitting. The guide pins should be filed even with the top and bottom of the die. The holes in part C should be large enough that the pins slide fairly easily, but there should be no "play." Cut finger holds from part C and the masonite or plexiglass to allow easier separation of the parts.
Glue plate C to the base. (An adhesive called Depend is ideal for this purpose.) Grease all the guide pins so that they don't become stuck, and clamp it or put it in the press to hold it together while the glue sets. (Yet another use for a hydraulic press!)
When you are ready to use your shearing die, spray it with silicone or use another lubricant on the pins. The metal to be punched is easier to handle and feed into the die if it is cut into a strip. A piece of hardwood on the top of the die will prevent the surface of the blanks you are making from being marred by the upper plate of the press.
Terminology
Die: A die is any one of the various tools or devices for molding, shaping, stamping or cutting metal.
Punch: A punch is a tool that is driven against a surface to be shaped or stamped and is sometimes called a "male" die.
Matrix: The impression part of a die, within which a form is shaped, is called a matrix, or "female' die.
Conforming Die: A die with two parts made of rigid material is called a conforming die. Metal is formed by pressing it between the two parts, which conform to each other.
Nonconforming Die: This is a die with only one part, either a matrix or punch
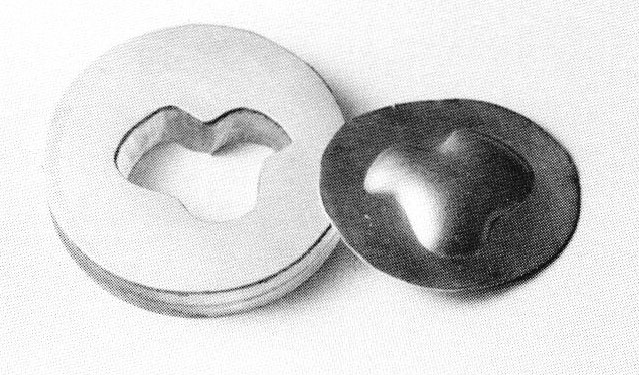
Silhouette Die: This a very simple matrix die, consisting of a thick plate with the silhouette of a form cut out.
Reversible Die: A matrix or conforming die with a symmetrical outline is a reversible die. It can be used to shape two parts that fit together making a hollow form.
Embossing Die: A die, either a punch or a matrix, used for making a design or pattern which stands out in low relief from the surface of a sheet of metal is an embossing die.
Shearing Die: A special die that cuts or "punches out" a shape from a sheet of metal is a shearing die. A shearing die can also be called a punch or blanking die.
Blank: The "cutout" metal shape produced by a shearing die is called a blank.
Flange: The extra metal that skirts a die formed shape after pressing is called a flange.
Devcon Plastic Steel Liquid—Type B: A steel-filled epoxy compound, consisting of 80% steel and 20% epoxy, used to make dies. When they are mixed, the steel resin and hardener form a pourable liquid.
Flexane 94 Liquid: A tough, rubberlike urethane which can be used for metal forming. The resin and hardener mix into a pourable liquid, which can be cast into blocks and pads.
Sources for Materials
Devcon Plastic Steel Liquid—Type B, and Flexane 94 Liquid are made by the Devcon Corporation, Danvers, MA 01923. For the name of a supplier in your area, call 1-800-225-2548 Unopened cans of Devcon B have a shelf life of two years; unopened Flexane 94, one year. The mixing ratios and instructions given in this article are current. However, these are subject to change by the manufacturer. Always read the manufacturer's instructions. Anchor Seal Epoxy Thinner (*PA5022) is made by Anchor Seal Epoxy Products, 126 Water Street, Danvers, MA 01923.
Bibliography
- McCreight, Tim. The Complete Metalsmith, Worcester, MA: Davis Publications, Inc. 1982
- _____________. Metalworking for Jewelry, New York: Van Nostrand Reinhold, 1979
- Paisin, Marc David "Practical, Inexpensive, Hydraulic Pressing and Die-Forming for the Artist Metalsmith," Goldsmiths Journal, Volume III, Number 6, December 1977
- Untracht, Oppi. Jewelry Concepts and Technology, New York: Doubleday, 1982
- "Tooling with Devcon," Bulletin T-1, Devcon Corporation, Danvers, MA
- "Metalforming Economically with Flexane," Bulletin FT/2, Devcon Corporation, Danvers, MA
Susan Kingsley is an artist/metalsmith in Carmel, California.
Photographs by Lee Hocker
Related Articles

Full eBook: Doming Silver Beads

Low-Cost Press Forming Technique

Live And Let Die (Struck)

Cold Forging of Karat Gold Findings


The All-In-One Jewelry Making Solution At Your Fingertips
When you join the Ganoksin community, you get the tools you need to take your work to the next level.
