
How to Make a Chasing or Forming Tool
We are assuming you are using W1 water hardening square stock drill rod, W1 tool steel. Many suppliers will sell W1 tool steel. It is often called drill rod (In England 'silver steel'). It should be square for less work in tool making, but round drill rod can be filed or forged to square. You should not use key stock, which some hardware suppliers will try and sell to you: it cannot be hardened as described below.
17 Minute Read
We are assuming you are using W1 water hardening square stock drill rod, W1 tool steel. Many suppliers will sell W1 tool steel. It is often called drill rod (In England 'silver steel'). It should be square for less work in tool making, but round drill rod can be filed or forged to square. You should not use key stock, which some hardware suppliers will try and sell to you: it cannot be hardened as described below.
Steps on making a chasing or forming tool
Cut a tool steel to length
- Approximately from the tip of your index finger to two/thirds the distance from where your finger joins the hand and where the thumb does
If necessary, anneal the steel.
- Heat to bright orange-red (until the 'shadows' disappear) and heap a refractive material (pumice, graphite, broken firebrick, ashes, kitty liter, etc.) on it, leaving it alone until cool. W1 drill comes already dead soft and does not need to be annealed.
Forge or file square. (if using round stock)
- Forge hot and true the length of the rod until mostly square. (or use the square stock-a favorite source of mine is MSCdirect.com.
- Forging retains metal = a bigger tool blank, filing reduces it.
- For a stamp, or matting tool it works (if done correctly) to hammer the blank cold just on two sides so that you have a flattened oval. This is sufficient for a stamp, provided there are actual flat sides.
- The reason for square stock is that it gives excellent control.
Taper back end, streamline the tool, prepare the face.
- Be aware of the trueness of your filing. It should remain square in section (the blank) as you work.
- The taper from face to back should be about (just under) two-thirds the length of the tool. The back taper begins gently at that point. Depending on the tool, the point where the taper changes should be the starting square section of the stock. i.e. start with 3/8" and the taper change point is 3/8" square.
- The reason for the taper is better control. The tapered tool should be balanced and feel slightly lighter than it looks.
- The front is hot forged gently to a small rectangle to prepare for upsetting. The sharp edges are then beveled a bit to prevent metal cracking and splitting when upsetting.
- A blank of W1 water hardening tool steel can also be step rolled in the wire rolling mill to taper it and prepare its shape. This saves lot of work and allows a shorter piece of steel to be used - as it is lengthened by the step rolling. When step rolling steel, remember to test it by hitting it with a rough hammer before you start. If it squishes then you can put it in the mill. If nothing happens then do not use it in the mill as it can damage it.
Upset face and fold over and under.
- Place the tool in a vise, vertically, so that about 1/2" to an inch protrudes from the vise. Thinner tools protrude less.
- Heat and when red-orange tap with a flat or slightly crowned hammer on the face of the tool. The blows must be exactly perpendicular to the face of the tool and in the same line as the tool is at first. This upsets the stock, thickening it.
- Keep some water nearby to cool the hammer in occasionally (a quick dip) as otherwise it may lose it's temper.
- When upset sufficiently begin to bring the blows in from a very slight angle, circling the face as you do so, increasing the angle slowly. This mushrooms it, almost like rivetting. By increasing the angle of the blows to the point that they are almost coming from underneath one can fold the steel under so that it isn't sharp to the touch and becomes a nice rounded surface.
- Finish off with light taps and correct any bending of the shaft that may have occurred. Sight for symmetry.
Hot file the face.
- Use an old, preferably crummy file.
- While the work is red-hot file in long slow strokes the length of the tool face, following the curve as you do so. This enables you to correct any symmetrical problems, smooth (almost burnish) the face, and go straight to emery.
- On large work the file may need cooling.
Finish the tapering of the body of the tool.
- It is here that the final balancing occurs.
- The shaft behind the head is usually filed down somewhat at this point, curving smoothly into the head just behind it.
Emery with course, medium and fine papers. (cloth works better)
- The body may be emeryed now, but it isn't really necessary.
- While the body actually needs to be fairly rough for better gripping, the face should be a mirror finish to allow for easier movement on the work and to impart a corresponding finish to the work.
- A method of emerying is to tear or cut long (6 inch) strips about 1/2 inch wide and by gripping both ends pull it back and forth across the face (rather like towelling your back dry). Do this in the two main axes that the face has, as this maintains symmetry.
- Another method is to tear or cut a small square of emery cloth (between 1 and 2 inches square) and place it in the palm of your hand. Place your palm and emery on the tool face and rub back and forth on the two main axes until the worst is off, then rotate your hand slightly, occasionally changing the angle which you are rubbing at. This constantly changes the emery at any one point on the tool, randomly distributing the pressure and quality of abrasion, making for an evenly emeryed tool. It works best for a rounded tool like a planisher or flattened tapping tool, but when combined with an occasional linear movement along the two main axes it works very well.
- Moving the emery in one direction for a second or two enables one to check the evenness of one's emerying.
- For tools with flat faces, placing the emery on a flat surface and moving the tool over the emery is sometimes more effective.
- The principle of random emerying is important in even abrasion.
- Use at least three grades of emery or cloth.
Polish the face.
- Tripoli first, wash and scrub in soap and ammonia and then go to rouge. It is possible to bring the face to a satisfactory degree of polish with fine emery and crocus cloth.
- A faster alternative is to use a steel "cutting and coloring" compound such as Saphralite. A steel polishing compound like Fabulustre® is my current favorite method. These compounds are usually white and both abrade and polish at the same time.
- Use the above methods on a machine buff, or if you have lots of time on your hands use a piece of leather with diamond powder or tin oxide on it. Green or yellow rouge works too.
Prepare for hardening (quenching)
- At this point you should have a tool that looks finished, has a polished face and bared, clean steel sides. If it doesn't then at least the length of one side should be bared with a file. This is to allow the later observation of the tempering colors.
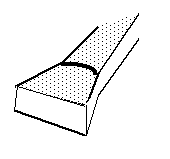
- Build a "kiln" or muffle with fire-bricks as shown. For the floor use a brick that has obviously been used for it before. i.e. with melted flux on it.

- It saves time to prevent oxidation on the face and bared side of the tool, rather than cleaning the scale formed by heating after quenching. Therefore we prevent the oxidation on those surfaces. SOAP!
- We can prevent oxygen from reaching the surface (and causing scale) by covering it various materials. Best of all is ordinary bar soap, just slide the warmed tool on the soap until it melts and coats it. I recommend this over other options. In the past I have used a stoneware or porcelain slip. Mix it to the consistency of cream and dip the tool face (and side if possible) in. Dry with a light flame and repeat the dip at least once. I found porcelain to work better. The more finely ground the better too.
- In some cases a good coating of borax flux (Handy Flux) is useful - but nothing is as good as bar soap. The borax is sticky and doesn't crack off as the clay slips may do. It absorbs oxygen as well as shielding the surface from the air. In a water quench the shock is enough to shatter it off but in oil it remains, requiring a quick brush with a file. Another disadvantage is that it makes the brick messy. So use one already used for the purpose. The clay slips shatter off nicely in either water or oil.
- One can lessen the amount of oxygen reaching the surface by using a reducing flame on the torch. That is a flame with more gas than air in it, usually characterized by a large light blue secondary cone on the flame. An oxyacetylene torch may be adjusted to a yellowish flame, more gas than air.
Quench in water or oil.
- The purpose of quenching the tool is to harden the crystal structure. After this hardening it is then softened, which process is known as tempering. When it is quenched into a cooling liquid it becomes as hard as the steel which it is made of is capable of becoming. W1 is intended to quench in water most of the time.
- There are three main liquids one may quench in: water, brine and oil. They are listed in the order in which they transmit heat (or the rate at which they cool the steel), water fastest, brine next and oil the slowest. For our tools they are the only cooling media we need to be concerned with.
- The cooling rate is important because the slower the rate the softer the inside of the piece of steel. In all three liquids the outside of the steel is the same hardness but the inside varies according to the cooling rate of the quench. In steel this means that a tool with varying hardnesses (soft inside, hard out) is tougher than one with less variation. The cooling rate also varies with the size of the steel stock, so that for the average relatively thin chasing tool oil is the best quench. If quenched too fast steel will crack, sometimes a good test of a correct quench. For thicker tools where the inside would get too soft it is a good idea to use a faster quench. Old motor oil is good and readily available in bulk.
- It is certainly possible to quench W1 chasing tools in water without apparent ill effect.
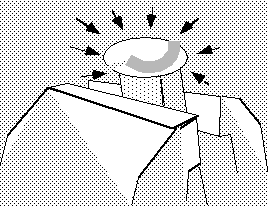
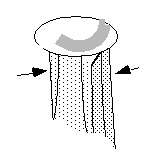
- The tool is brought to an even orange-red heat with a big (#7-8 acetylene/air tips) torch, until "the shadows disappear", that is when all the darker patches fade into an even red heat. If you need to you can have a magnet on a chain and hold it onto the glowing steel. If the magnet does not stick then it is the right temperature to quench for maximum hardening. It is then taken with tongs and plunged into the quench. If possible it should be quenched on the ascending heat, while the tool is still gathering heat. It should be plunged in as vertically as possible to avoid warping, and perhaps moved from side to side, (if you can do it and still remain vertical, I have problems and usually forget about it). This prevents unevenly distributed cooling. The water can also be swirled vigorously beforehand so that no air bubbles form on the steel to insulate it when hardening. After the "vibration" stops it may be removed.
- It is suggested that one heat the tool until a drop of water will bubble on it. This is called "taking the snap out" and relieves stresses in the steel, which may be quite considerable. In the old days engravers would bake their tools in a loaf of bread (350oF) for the same reason.
Bare side if necessary.
- It is necessary to sand the surface of the steel so that it can oxidize properly to show us the tempering colors. Steel oxide scale is very hard indeed and if clogged in a file may do damage to another piece of metal. The same goes for using the steel compound on a buff to remove the scale. Do so if it is unlikely to damage something in the future. Emery works well.
- Be very careful with the tool. Although it is very hard, it is extremely brittle, like glass, and just tapping it against a table might snap it in two.
Tempering the tool.
- We already quenched the whole tool all at once. This hardened the whole thing.
- Tempering is actually softening the tool to a certain desired point, having properties peculiar to that point. As we heat the tool the hard crystal structure changes. Although by heating it one sacrifices some hardness one gains toughness. (More "whip, more resiliency, springiness).
- We have one side and the face bare.
- If we heat the tool the softer states correspond to higher temperatures. They also correspond to a series of layers of oxidation on the surface of the clean steel. We see these layers of oxidation as different colors. Therefore we are able to tell what degree of softness has been attained by what color is present on the surface of the steel. (These oxidation colors happen also on mild steel and unhardened steel; for us they are useful because the steel has been hardened).
- The order in which the colors appear, from cold to hot is:
| Color | Degrees Fahrenheit |
| Beginning of color | 350 |
| Pale yellow | 430 |
| Light straw | 450 |
| Dark straw | 470 |
| Brown | 490 |
| Brown with purple spots | 510 |
| Purple | 530 |
| Bright blue | 560 |
| Dark blue | 600 |
- Tools intended for different purposes are tempered to different colors. Chasing tool faces are tempered to pale yellow or light straw while springs are tempered to purple. The difference between a piece of spring and a cutting tool or chasing tool are fairly obvious. An idea of the suggested uses for different colors is useful.
| Color | Tools |
| Pale yellow | Cutting tools for lathe, planer, shaper. |
| Light straw | Milling cutters, drills, reamers. |
| Dark straw | Taps and dies. |
| Purple | Centre punches, cold chisels. |
| Purple verging into blue | Screw drivers |
- For our tool we will temper parts of it to different colors, a nice theoretically constructed tool which will probably last forever but is perhaps too finely made. It doesn't take much longer than other tempering methods however, and is a better "feeling" tool. The face will be light straw, the neck purple back to the main stem which is brown to dark straw and the back end purple, the very back perhaps dark blue.
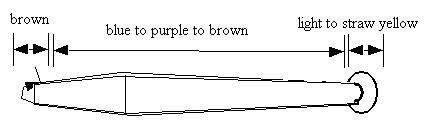
- The face is straw yellow for durability, the neck purple for resiliency and so on.
- Holding the tool with tongs heat gently in soft sweeping motions from the body towards the face. Flutter the flame, so that the heat takes a while to build up and gives you some time to control what happens. The colors will appear in the order of their corresponding temperatures. When the colors are at or almost at the correct point the tool must be immediately cooled in water. It takes a little practice to learn when to begin moving your hand for the quench, but it isn't hard to do. It is possible to retard the temperature in one part by dipping it in water while one heats another section of the tool.
- You now have a tool which has on it's surface a visual record of what hardnesses are present where in the tool. If you softened parts too much, repeat steps 9-13.
- It is essential that there be no hard spots in a tool, as people have been blinded before when an un-tempered hard spot shattered as a tool was struck. Make sure that all the back and middle of the tool show tempering colors, at least to purple or blue to avoid this very real danger.
Polish the face.
- This is mainly for looks. Some chasers never go to a buff again but use crocus cloth or a piece of leather mounted on wood with ruby or diamond powder on it, with a little oil. They use this every now and then while they are using the tool, which keeps it mirror-bright and prevents crud from making marks on the metal they are chasing.
Grind back angle.
- This may have been done before the tool was hardened with a file or a grinding wheel, but it makes a nice finishing process.
- The angle is a truncated cone ground on the back end of the tool in order to give some room for mushrooming metal (which may fly off and damage one's eyes) caused by hammering. It also provides a smaller area for the hammer to hit, hopefully centered over the main axis of the tool, making for more effective use of the blow.
- When turning a grinding wheel on always stand aside from the front of the wheel, as a cracked wheel may fly apart when starting and fill you with little bits of grindstone. You should stand aside at least until the wheel reaches full speed and preferably a little after that.
- You should use the front of the wheel only and if grinding a flat plane, draw the steel (steel only) across the face of the wheel, cooling it occasionally in water to prevent temper loss or burning of the steel. For our taper grinding, hold the steel rod between the thumb and forefinger of one hand braced on the tool rest, and turn the tool at the other end with the other hand, grinding a taper onto the tool.
Test back angle hardness.
- Draw a file across the back or hit it with an already scarred hammer to see if the metal is soft enough to give so as not to harm the chasing hammer. It should flatten ever so slightly when hit. If it's too hard the file skids or the hammer is dented. Temper further if necessary.
Hold the tool correctly when using it.
- This method of holding the tool is a Northern European one and is perhaps the best controlled method of using a chasing tool. Place your left (for right handed people) third finger on the table. Place your middle finger on top of it and raise your hand in the air so that the knuckle of your index finger is about in a vertical line with the knuckle of your middle finger and the two nails of the middle and third fingers, one over the other. The pinky sticks out and has no use except that old chasers would hold extra tools in it. The thumb holds the tool against the other fingers. The position is somewhat painful at first but the control gained is worth one or two days of stiff fingers. The reason for the increased control is that the middle finger acts as a ball-joint, swiveling easily to the required position. The chasing tool is always stroked towards you, several passes over the same spot being preferable to one or two heavily hammered ones. Light tapping blows are the best. It helps not to grip the hammer but to let it flop in the hand, so that the weight of the hammer head falling is what actually hits the tool and not a blow of the hand or the wrist.
Some further points
- When forging out on the anvil, keep the end of the tool being forged at the edge of the anvil thus avoiding damaging either hammer or anvil. See 4. d.
- Acetylene torch tips #6 and #8 are better for a broad flame than #7, which is a finer jet.
- See TEMPERING for other methods of dealing with hardening tool steel. A proper understanding of the process enables one to be flexible enough to take intelligent advantage of a tool making situation.
- The better a tool feels in the hand (run your fingers up and down it while holding it in your hand) the easier it will be to work with, leading to a change for better work. A well made tool is beautiful to look at also.
- Use goggles on the grinding wheel and think always before you do something for the first, second or more times.
Suggested Reading
- The Modern Blacksmith and The Making of Tools by Weygers.
Creative Iron Work by Meilach.
Machine Tool Operation by Burghardt.
The New Edge of the Anvil, by Andrews
Related Articles

Homemade Soldering Station Venting System

Making Wooden Raising Stakes

How to Make a Tumbler

Customized 3 Jaw Chuck & Earring Holder


The All-In-One Jewelry Making Solution At Your Fingertips
When you join the Ganoksin community, you get the tools you need to take your work to the next level.
