
Creating Colorful Jewelry Designs
8 Minute Read
When most people think of colored jewelry, their minds conjure visions of rubies, sapphires, and emeralds. After all, jewelry makers have been relying on gemstones to add color to their work for thousands of years. But there are other ways to achieve a variety of vibrant hues in your jewelry designs—particularly when working with alternative metals.
Creating Colorful Jewelry Designs by Anodizing Titanium and Niobium
As the precious metals markets remain high, alternative options have become increasingly more attractive to jewelry makers. Titanium and niobium in particular offer designers and manufacturers the unique ability to transform the metals' appearance from an ordinary gray to nearly any color found in a rainbow using a process that isn't very complicated to perform in the shop.
Understand the Metals
Before even considering designing with colored titanium and niobium, you must first understand the capabilities and limitations of the metals themselves:
Titanium
An extremely hard and durable material, titanium is not terribly difficult to work with, especially when compared to some of the harder white golds on the market today. That said, there are several titanium alloys available, and if you choose the wrong one, you may have a less than pleasant experience working with it. Use either grade 1 or grade 2 "commercially pure" titanium, which are the softest. A conventional jeweler's saw will suffice for cutting out basic or complex shapes in sheet, although you will need to replace the blade more often. I use Laser Gold saw blades, as I find they tend to last longer. For drilling, I prefer cobalt bits over high-speed steel because I find they stay sharp longer, aren't brittle, and can be re-sharpened. Remember to drill slowly while frequently lubricating the bit.
When forming, titanium is a slightly stubborn material but will take on a variety of shapes with some effort. Like most metals, it will slowly begin to work harden as you manipulate it. Since titanium cannot be annealed in a typical jeweler's studio, it is important to limit the amount of forming done. Titanium can't be soldered in a typical jeweler's studio either, so it must be cold joined (via rivets, screws, or tabs), laser welded under argon, or micro TIG welded under argon.
Niobium
A bit darker gray than titanium and twice as heavy, niobium is entirely different to work with than titanium. Considerably softer, niobium is very slow to work harden. Although it can't be annealed by conventional means, niobium can be shaped into complex forms. In this respect, it is similar to platinum. It can be bent back and forth a number of times without compromising the integrity of the metal. In regard to drilling and machining, it is very gummy. Like titanium, it can be joined via cold connections or welding, with the same provisions.
In terms of finishing, both titanium and niobium require tenacity and patience. Much like when finishing platinum, it is imperative that you go through the entire sequence of sanding grits before polishing. If any step is skipped or not completed thoroughly, you will surely find scratches when you go to polish. I recommend using silicon carbide sandpaper in lieu of aluminum oxide, as it lasts longer and cuts faster. Matte finishes are much quicker and easier to achieve. In addition to a simple sanded finish, both titanium and niobium can be sandblasted or brushed.
The Coloring Process
Titanium and niobium are unique in terms of their coloring properties. The surface of each metal is capable of creating an oxide layer that can exhibit a wide range of colors. Unlike aluminum, titanium and niobium are able to do this free of any pigments or dyes. Instead, they react with oxygen to create what are known as interference colors, which are achieved when the outer surface of the metal combines with oxygen to form titanium oxide. The way light interacts with this oxide layer is what causes the perception of color on the surface of the metal. As the thickness of the oxide layer increases, the surface of the metal undergoes a series of color changes.
There are two common methods used to achieve these colors:
Torch Coloring Process
The easiest way to color titanium is to apply heat directly to the metal using a standard torch. Very little preparation is necessary: Clean titanium with Multi-Etch, a non-acid solution; niobium can be cleaned with a degreaser. Rinse both thoroughly in distilled water. Although Multi-Etch works faster when heated, I prefer to use it cold, as it reduces any health hazards. Once the metal is clean, simply move the torch around the piece you wish to color. You will quickly start to see various colors emerge from the metal.
* Multi Etch is an acid (just very low acid) but not completely safe as it wouldn't work if it was. Precautions still need to be upheld (gloves, fan or fume hood, eye protection) whether using heated or at room temp.
** Multi Etch may not work on torched on colors for titanium as they are mostly nitrides, not oxides so don't count on it to remove torch color mistakes. Those might need physical removal and a bit of elbow grease.

The type of flame you choose will impact the end result. For example, a reducing flame will more evenly heat the metal, causing a more even oxide layer to form and create a fairly uniform color on the metal's surface. On the other hand, an oxidizing flame will apply more localized heat, causing the oxide layer to form more rapidly where the tip of the flame is applied, resulting in various colors radiating outward from that point.
That said, both methods are fairly unpredictable. After years of experience using this method, I find it to be most useful when a more organic or "artistic" look is desired.
Anodizing Process
For more consistent and even results, opt for anodizing for niobium, an electrolytic process.
*** Niobium cannot be heat colored the way titanium can. It will just turn dark grey/blackish (which might be desirable!) but it won't produce rainbow colors. The only way to color niobium is by anodizing.
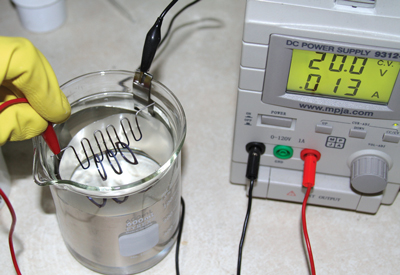
In this method, the cathode lead is connected to a piece of stainless steel and the anode lead is connected to the piece you wish to color. A rectifier capable of producing a voltage output of at least 100 volts to achieve the full color spectrum is required. Also, an electrolytic bath must be prepared. I typically use TSP-PF, an environmentally safe electrolyte. Once the electrolytic bath is prepared and the leads are connected properly, you are ready to anodize. (Safety Note: When operating a device capable of emitting 100 volts or more, use extreme caution. Ensure adequate ventilation and always wear a pair of thick rubber gloves.)
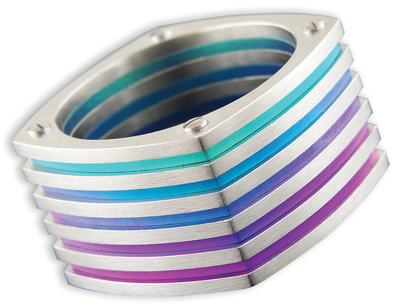
The actual anodizing process is very brief. All colors can be achieved in a matter of seconds. The most important part of this process is to make sure the metal is clean and to set the correct voltage for the color you want to achieve. Since everyone's perception of color is somewhat subjective, I cannot give exact voltages and the corresponding colors they produce. Having said that, the sequence of colors that occur from 0 to 100 volts is as follows, respectively: gold, bronze, purple, blue, light blue, yellow, orange, pink, magenta, turquoise, and green. Red and black are the only major colors that are not achievable with this particular process.
Before anodizing the piece I wish to color, I often prepare a quick sample. Once I get the exact color I want on the sample, I have complete confidence that I can reproduce it when anodizing the final piece. After that, it is as simple as setting the rectifier to the proper voltage and dipping the piece in the electrolytic bath until the desired color is achieved. I then turn off the rectifier, pull the piece out, and drop it in a small container of distilled water.
If you are serious about anodizing titanium and niobium, I highly recommend "Studio Preparation and Coloring of Titanium," a technical research paper by Bill Seeley of Reactive Metals Studio in Clarkdale, Arizona. It thoroughly describes each step in the anodizing process.
Designing for Color
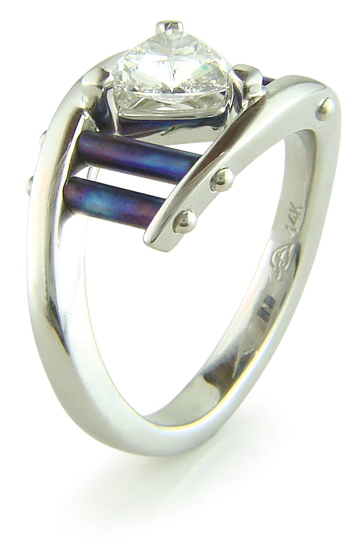
When designing a piece of jewelry that will be anodized, it is important to realize that there are some limitations. Although anodized titanium or niobium is fairly tough, on items that receive a lot of wear, such as rings, you need to make sure the colored area is well protected or recessed. Over time, the exposed oxide layer will slowly wear away, much like the surface of a rhodium plated ring; however, in this case there is such a contrast between the colored oxide layer and the raw metal underneath that scratches show up very quickly.
For low-wear items such as pendants or earrings, the colored areas can be more exposed. But keep in mind, the more protected the anodized areas are, the longer they will last. If strategically applied and well protected, the colored areas will last many years, if not the entire life of the piece. Should the anodized areas happen to wear off over time, they can simply be cleaned and re-anodized similarly to how a rhodium-plated piece would be treated.
If your design requires areas to be masked off so they don't get colored, use anodizing or plating tape, which can be cut into almost any shape. Although slightly less effective, nail polish will protect very small areas that are difficult to mask off with tape.
To achieve multiple colors on one piece, you simply mask off the piece and anodize the highest voltage setting first, continuing to unmask the areas in order from highest to lowest voltage. Clean the piece between processes. Continue until you have obtained all of the hues you want on the piece.
With a simple anodizing bath and some creativity, you can add vibrant color to your jewelry pieces in a nontraditional, cost-effective, and fun way.
Notes:
| * ** *** | Michele Watters, Reactive Metals Studio Inc. |
![]()
In association with
![]()
The award-winning Journal is published monthly by MJSA, the trade association for professional jewelry makers, designers, and related suppliers. It offers design ideas, fabrication and production techniques, bench tips, business and marketing insights, and trend and technology updates—the information crucial for business success. “More than other publications, MJSA Journal is oriented toward people like me: those trying to earn a living by designing and making jewelry,” says Jim Binnion of James Binnion Metal Arts.
Click here to read our latest articles
Click here to get a FREE four-month trial subscription.
Related Articles

Fancy Color Diamonds
Modes of Working with Jewelry

Al Pine: Conceptual Exploration

The Metalwork and Jewelry of Harry Bertoia


The All-In-One Jewelry Making Solution At Your Fingertips
When you join the Ganoksin community, you get the tools you need to take your work to the next level.

