
Bi-Metal Casting to Titanium
14 Minute Read
Titanium and the other refractory metals other the metalsmith a new range of exotic colors - colors that are beautiful and subtle. The saying "less is more applies to titanium since the colors are created by the refraction of light rather than pigments. As you rotate a piece of titanium jewelry, the colors vary and the interest level is maintained different types of light create different shades of color.
The colors available in refractory metals are much richer than those available in enamels, plastics or gemstones. Opalescent and iridescent colors seem to exude a touch of mysticism; they suggest instead of insist.
Bi-Metal Casting to Titanium
Most artists leave titanium in its original form (sheet, rods and tubes). This often looks like sheet, rods and tubes when it's finished. They do not take advantage of dimensional possibilities, because titanium cannot be cast or soldered except in an oxygen-free atmosphere. Artists who think that rivets are beautiful utilize them to join titanium. I believe rivets are rivets. Some artists are cold-forming the metal by sinking, forging or bending.
Bi-metal casting is the casting of one metal to another. The first metal is formed and undercut in such a manner that the second metal will lock to it. The first metal is formed into the wax and invested as a wax and metal model. The second metal is cast in the conventional way. Bi-metal casting to hot- or cold-formed titanium minimizes many dimensional restrictions and opens a new range of design possibilities. Any metal that will withstand normal burn-out temperatures (approximately 1350°F) such as sterling, gold, copper, brass, bronze, corten and titanium can be placed into the wax and invested. (You cannot bi-metal cast to niobium, which is attacked by either the high temperature, the investment or both.) The second metal can be any castable metal. Normal burn out and casting temperatures are utilized.
Theoretically, the metal that is in the mold should have the higher melting point. If the second metal has a higher melting point, it could melt the first metal on contact. In reality unless the metal in the mold has very fine parts: or melts several hundred degrees lower than the incoming metal, there is little chance of fusion. Actually fusion might be a blessing since it would eliminate the need for under-cutting the metal to be cast in place. There are special investments that provide a reducing atmosphere. These encourage fusion. However, fusion rarely occurs even in a reducing environment. These special investments are not required. Some people even flux the first metal and fuse tiny pieces of solder on the contact area in the hope that the incoming molten metal will melt the solder and solder the two metals together.
However, this is also unreliable. In practice, most fusion efforts do not work. Either you must accept that two separate metals will emerge from the mold, which can be soldered together later, or you must design the first metal in such a way that it will mechanically lock with the second metal during the casting.
Cold-Forming Titanium
Although titanium is tough, it can be cold-formed. If possible, purchase fully annealed titanium. Obviously thinner gauges are much easier to form. However, it is possible to form 16 - 18 gauge sheet with modest effort. Since titanium is so much harder than nonferrous metals, a cutting lubricant should be used. You need to allow extra metal to compensate for loss during sinking. Extra metal is also needed around the edges if you are going to embed the titanium in wax (for interlocking areas that don't show).
Cut out the desired shape from sheet titanium and place it on a hardwood surface. If a variety of depressions already exists in your wood block use a dapping punch to hammer the titanium into the selected recess to the desired depth. Often the correct depression must be carved into the wood. A flexible shaft machine and large burrs will speed up this operation. Thicker gauges and deeper depths require more deformation. This quickly damages the wooden form. The end-grain of hardwood such as maple works very well.
A variety of forms can be prepared by combining large sinkings with small; working with opposite laces; sinking some parts and not others; or simply letting the metal tear open and then adding creative touches to the opening. The metal can also be formed with one or two pliers. You might consider setting aside a separate set of tools for exclusive use with titanium because it quickly dulls tools such as files, drills and punches.
Hot-Forming Titanium
Titanium, like steel, is hard when cold, but is very malleable when red hot. Direct a torch on the area to be formed. When it is red hot use pliers and bend as desired. For complex curves several heatings may be necessary because the steel pliers quickly draw heat from points of contact. Titanium is somewhat brittle so drastic bends should only be done when it is red hot.
Carving Titanium
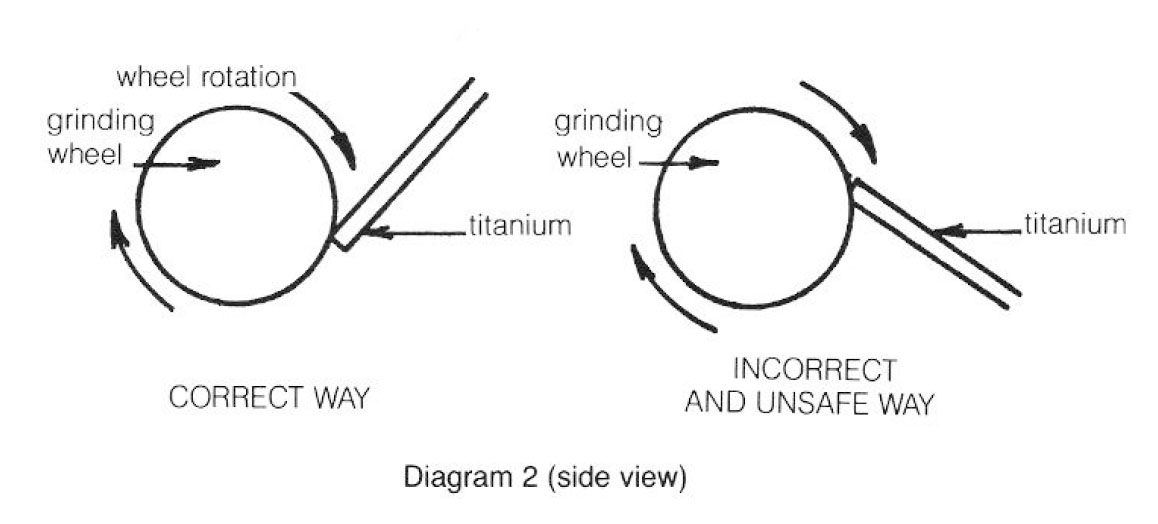
Shaping of titanium can be accomplished subtractively - simply grind away any undesired areas. while this is a time-consuming process, it offers the possibility of creating unique three-dimensional shapes. Thick sheets can be ground thin on their edges. maintaining original dimensions and strength but appearing very thin and light. Grinding, like most abrasive methods. requires that you work from large grinding wheels and files to smaller ones, and coarse to fine. If a large gender is available use it first to remove as much metal as possible. When large wheels will no longer perform, switch to smaller grinding wheels, such as the 1″ x ⅛" Mizzy wheels (available from most jewelry supply companies). These wheels are available in many diameters and widths. As you grind, the metal will have to be dipped in a coolant (water) as the need arises. Always wear proper goggles and a respirator while grinding and always have the wheel cut away from the edges and not into them. Otherwise the metal can be caught and thrown.
Save some of the 1″ grinding wheels whose diameters have been greatly reduced by the grinding, so that you will have smaller wheels (such as ¼")when you need them. Cut-off and separating discs are also good for fine carving. Again, save some smaller diameter discs for final carving. Grinding leaves an interesting surface but I believe that it is not as colorful as a polished or burred surface. It also usually looks somewhat crude. Alter grinding, various dental burrs can be used to provide delicate or detailed carving. Again, work from large to small (for example, 1/16" cylinder-shaped burrs down to cylinder burrs the size of a needle). Do not execute the detailed carving before casting because the titanium forms an oxide layer during the burn-out procedure. You must remove the oxide layer from the titanium after casting so there is no sense in carving detail twice.
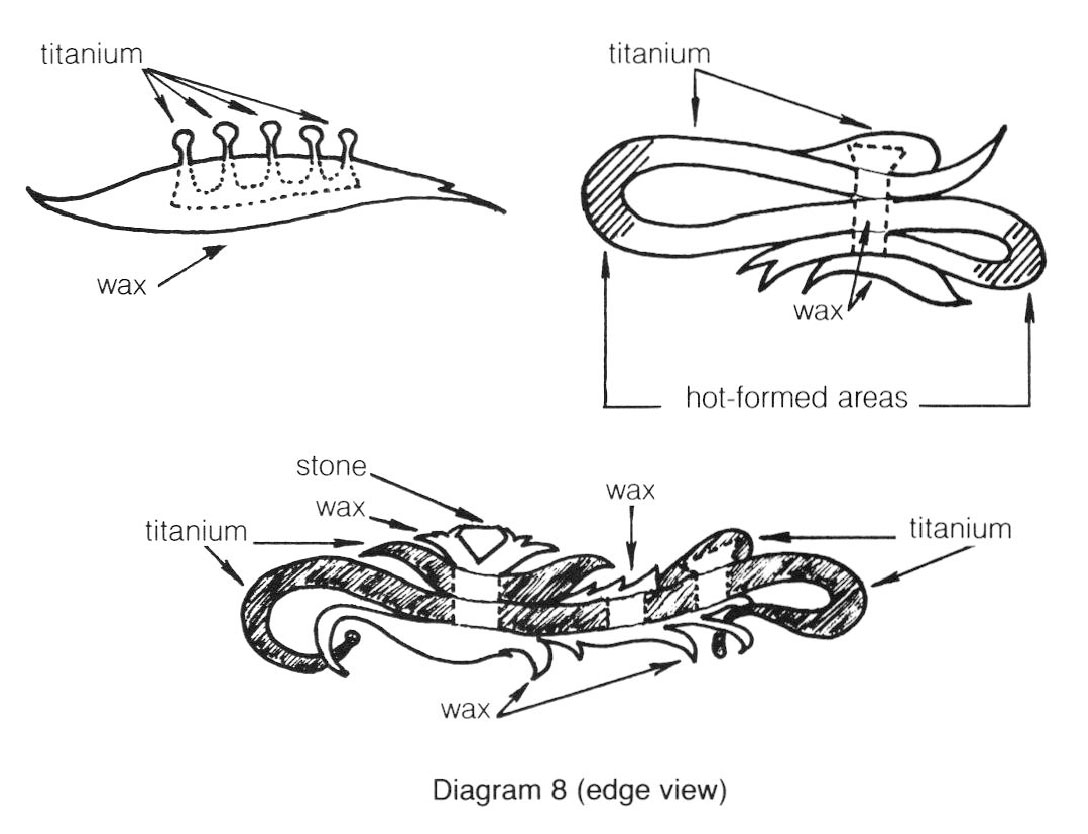
It is necessary to decide which interlocking method(s) will be utilized prior to any carving, forming or cutting of the titanium in order to leave sufficient excess metal. The sequence is very simple. First, you must plan on how the titanium will be locked in place when it is surrounded by incoming metal. Second, you must make sure the titanium is locked in place by the investment so it will not shift when the wax is drained during burn-out.
Bi-Metal Wrapping
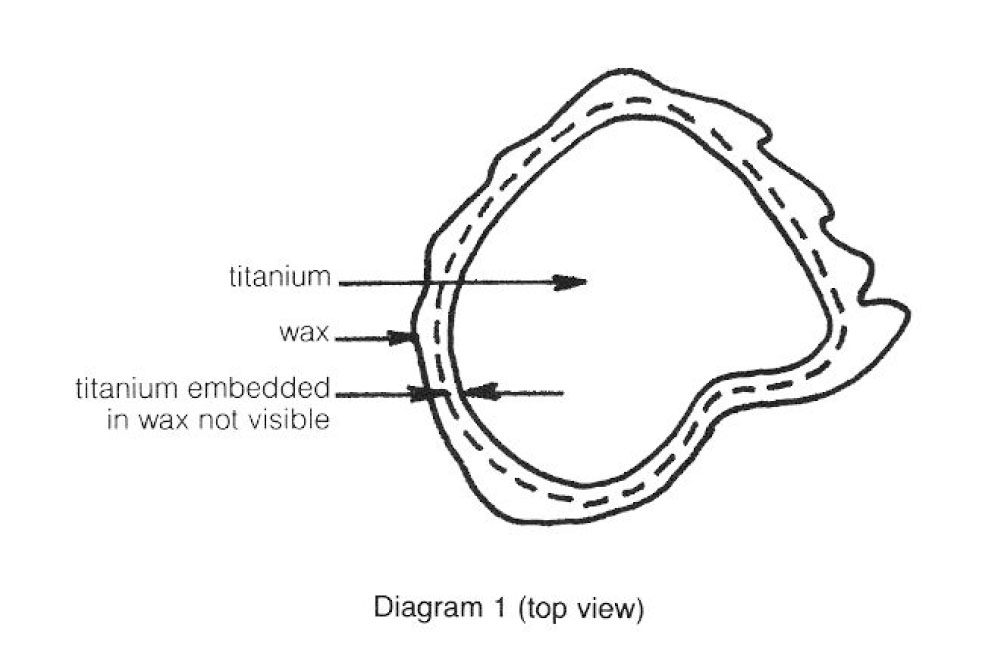
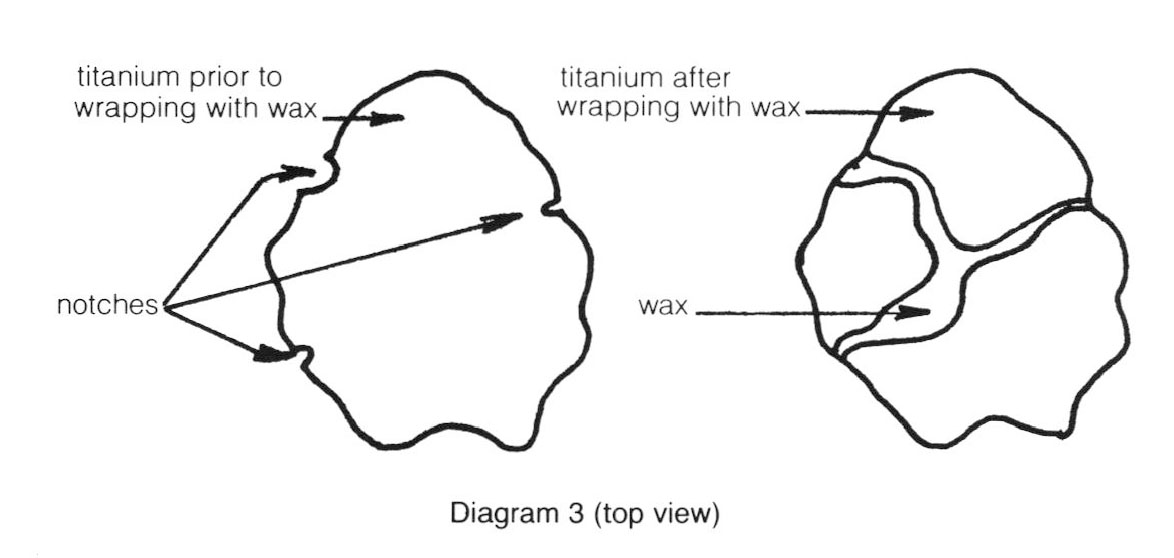
One way of locking the titanium would be to wrap wax wire around the piece so it cannot escape. It would be best to notch the titanium where the wax will be wrapped prior to the wrapping to reduce the amount of wrapping needed. This wax will later be replaced with the cast metal. Example:
Another variation of wrapping is to shape the wax around part or all of the periphery of the titanium:
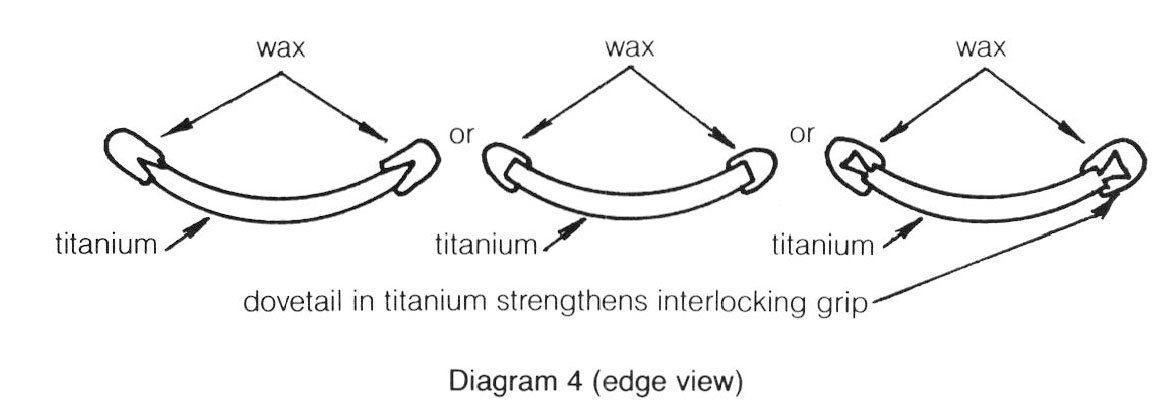
Bi-Metal Riveting
Another way of locking is to drill holes in the titanium and carve one side of the hole larger. These holes should be a minimum of 1/16" in diameter. When using thick titanium, it is not necessary to drill entirely through the metal, just a minimum of 1/16" deep. In all cases, the more undercutting and the wider and deeper the holes, the better, because cast metal is not strong and much stress takes place during heating and cooling. Wax should be placed in all of the holes so the incoming metal will form the rivets.
Other variations include placing wax on both sides of the titanium so that undercutting is not necessary:
Likewise, several layers of titanium can be stacked:
Obviously there are unlimited combinations, determined only by the desired results:
The wax may be dripped into place. It is possible to cut a hole in the wax, insert the titanium and then seal it with more wax. My preference is blue File-a-Wax because of its strength and machine ability, but any wax should work.
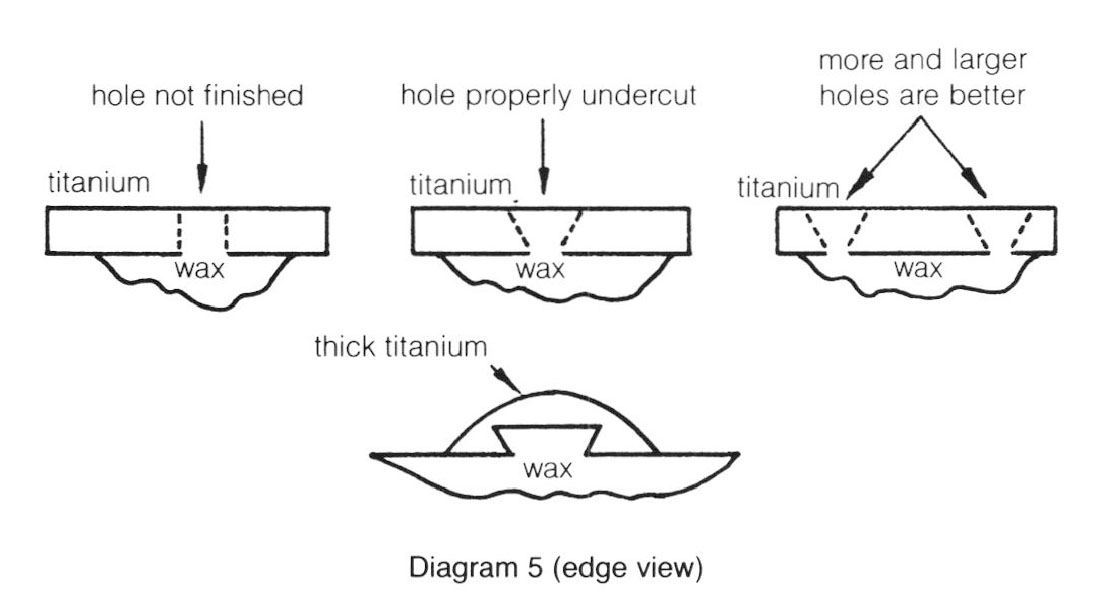
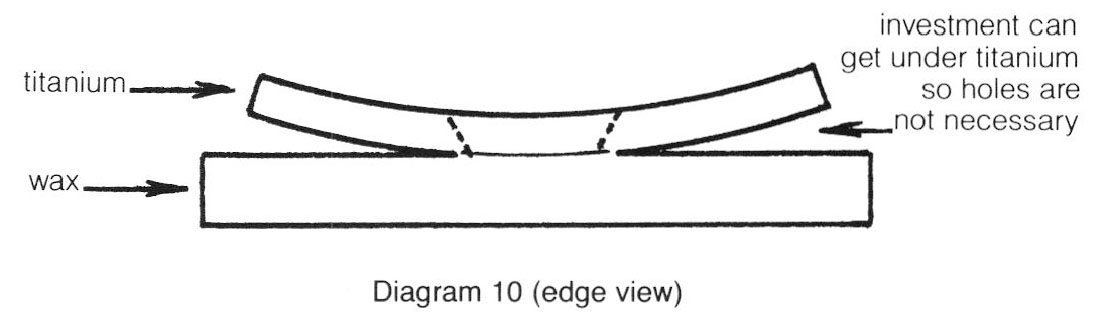
Remember that you not only have to interlock the wax with the titanium (or vice-versa) but you must interlock the titanium with the investment. Try to visualize whether the metal will shift or drop in the mold when the wax is eliminated. In theory, all you need is a hole or two through the wax directly beneath the titanium that fills the investment and forms pillars to lock the metal in place during burn-out.

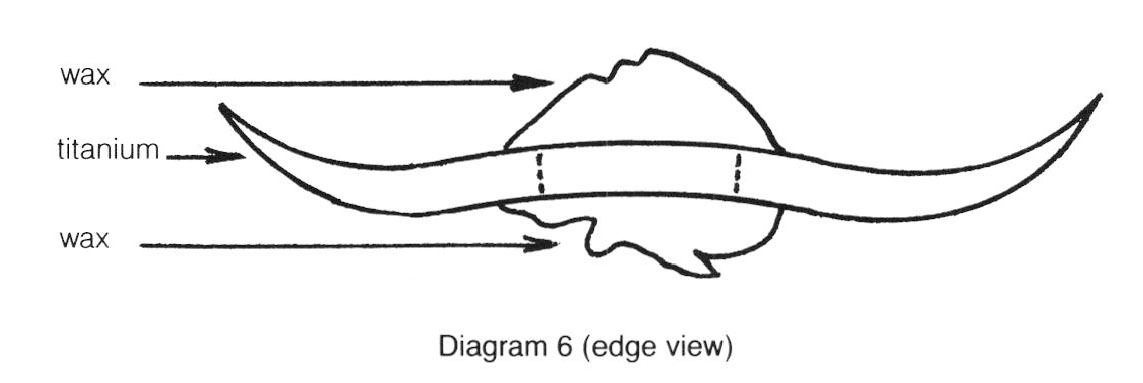
These holes may be unnecessary, especially when the titanium is dimensional, or when it has projections into the air, since the investment will be below it:
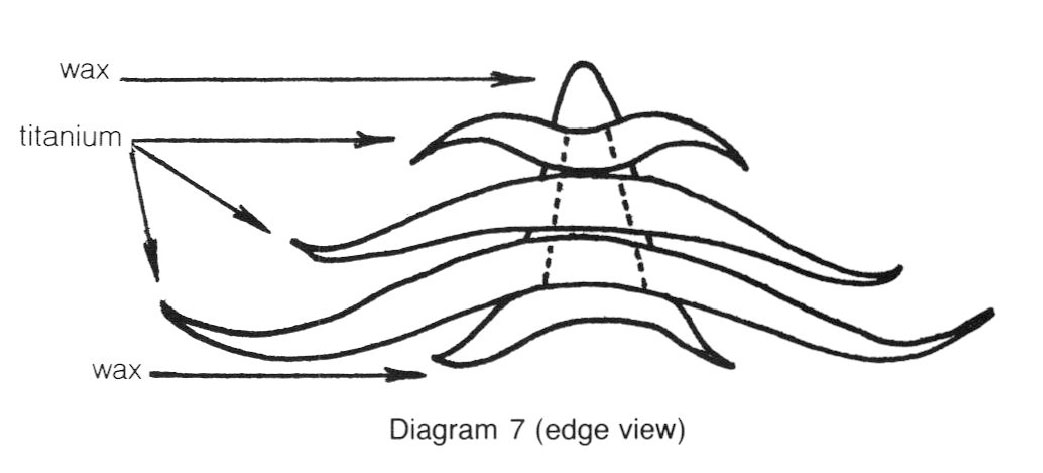
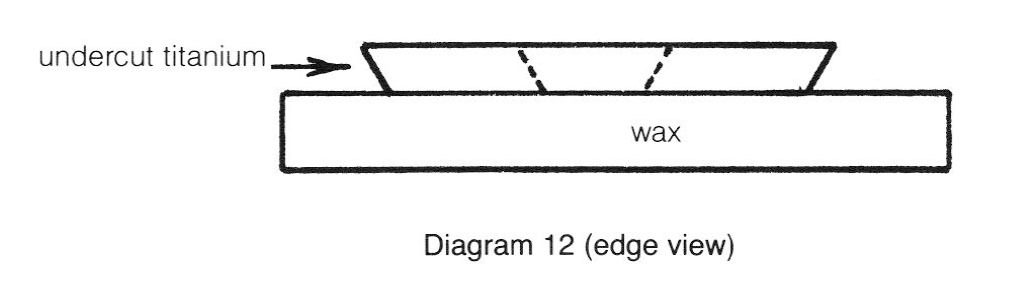
When "investment pillars" are necessary (formed by holes in the wax), be sure that spruing and investing are done in such a manner that these wax holes will not fill with air and create a void.

Spruing vertically or undercutting the titanium edges would correct the situation:
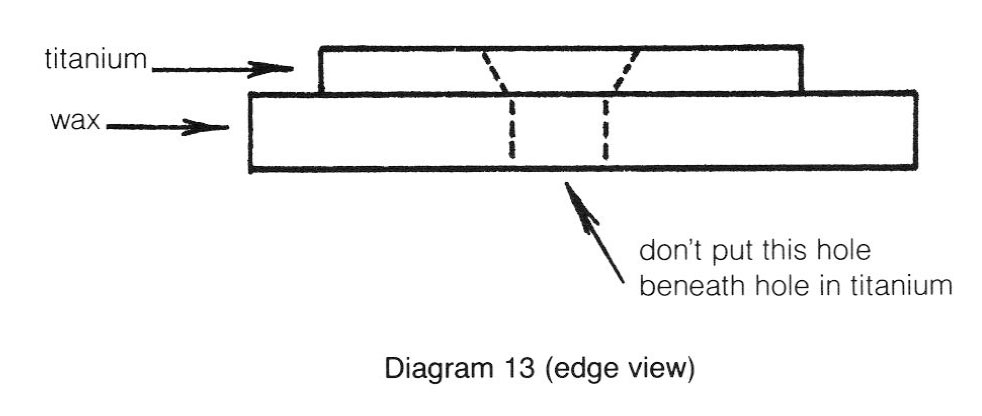
Do not put the holes in the wax directly beneath the holes in the titanium:
Spruing and Investing
Most spruing and investing procedures are the same as in traditional lost-wax casting, with the following exceptions: First, it is important to weigh the titanium before adding wax to it. This weight must be subtracted from the total weight of the completed wax/titanium model before multiplying by 10 (for silver) or 14 (for 14k gold): otherwise, you will cast with excessive metal.
Second, any very thin, delicate areas of wax that come in contact with the titanium for any distance (approximately ¼") must be "beefed-up." After casting, these areas can be recarved down to their original desired thickness. Incoming metal does not flow well over existing metal in the mold, which draws heat from the incoming metal more quickly than the investment does. You must compensate by using two or three times the normal amount of sprues. Thinner areas may need even more. If in doubt, sprue it. You could try to compensate for this problem by raising your mold or incoming metal temperature, but either will result in increased porosity.
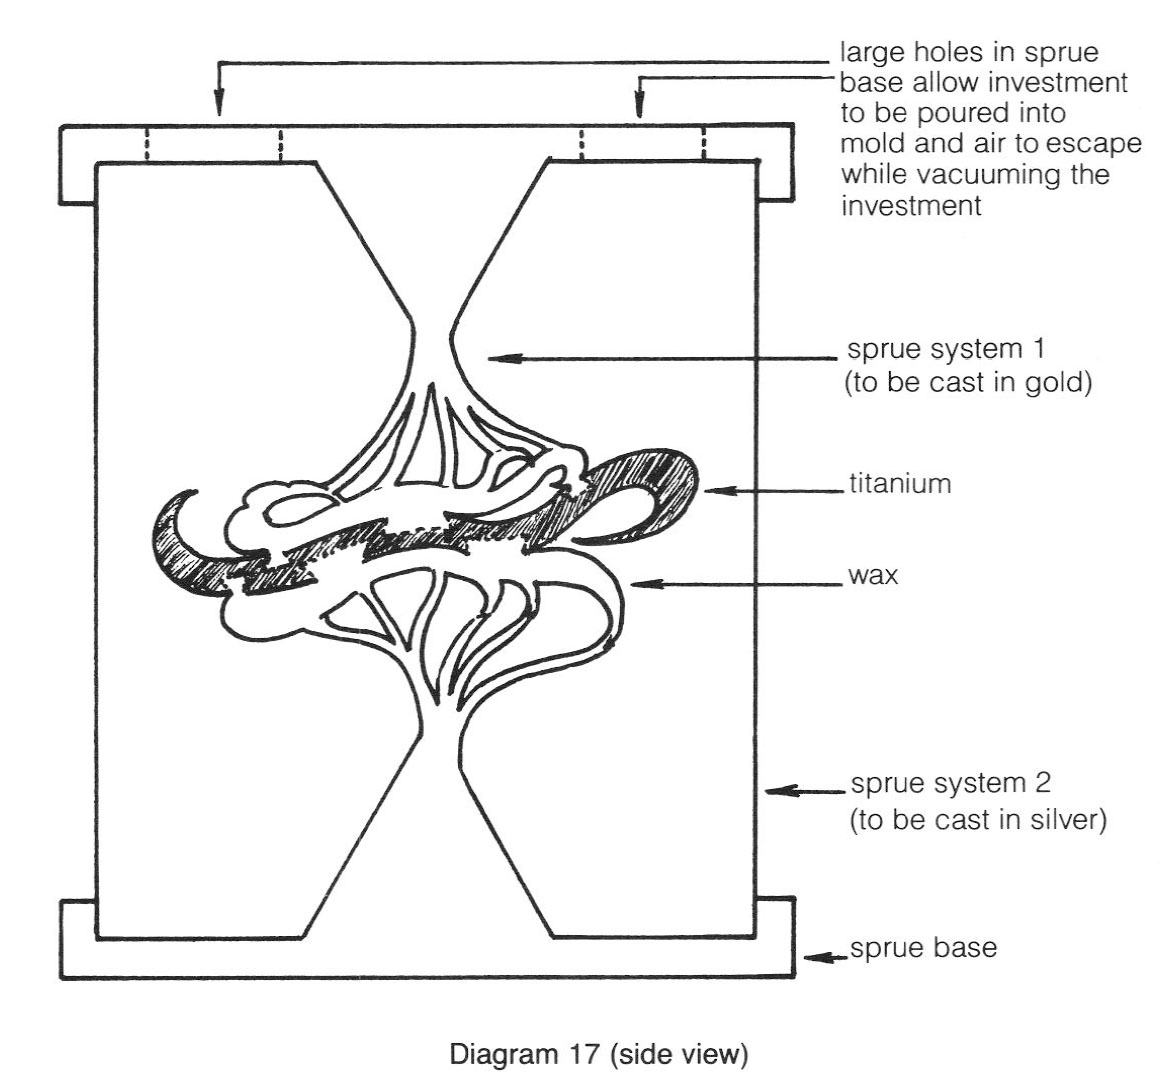
When elaborate sprue systems are needed, three important principles should be observed:
- Sprues should be as close to the model as possible in order to keep them short.
- A "trunk-and-branch" arrangement (Diagram 14, center drawing) is superior to a system in which all individual sprues originate at the sprue former (left drawing).
- In order to reduce turbulence and delay in filling, the cavity trunk and branches should run as close to parallel as possible and be oriented perpendicular to the sprue base as in the center drawing. Sharp bends and sprues lying parallel to the sprue base (right drawing) interfere with efficient metal flow.
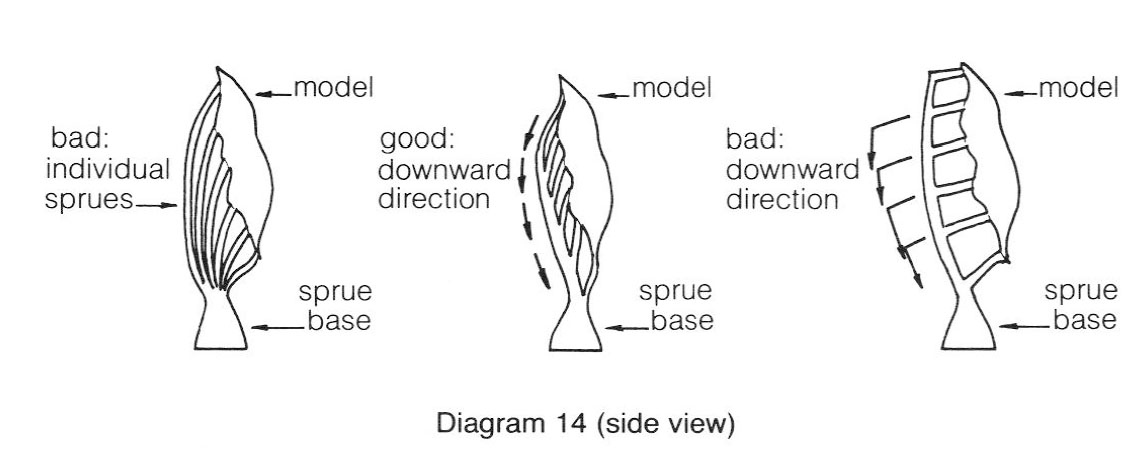
While a "trunk-and-branch" system could be accomplished by simply pushing together several smaller sprues (and filling between them), it is simpler to use a thicker sprue wire as the trunk coupled with thinner guage wires as necessary (for instance an 8-gauge wire that divides into three 12-gauge wires). These thicker sprues will keep the metal hotter and molten for longer periods than if the metal flow divides at the top of the sprue former.
Most normal investments will work well, but some contain ingredients that produce cleaner castings. However, additives may attack any metal already in the mold and cause pitting. Try a test casting on a small sample before entrusting the model of a major showpiece to an untried investment.
Burn-Out, Casting and Clean-Up
Burn-out procedures in bi-metal casting are the same as in conventional casting. You will find that you develop your own temperatures and burn-out schedules. Whatever works is fine. My suggestion is a 6 to 8 hour total burn-out that brings the flask up to 1350°F over a 3 to 4 hour period, allows soaking at 1350° for a couple of hours, then a reduction to about 1000°F for at least 30 minutes prior to casting. I am also a believer in centrifugal casting because it seems to get the metal into the mold quicker than vacuum assist.
Once the casting is completed, a bi-metal mold should not be subject to extreme temperature shocks. Theoretically, you should place it back into the kiln, which has been turned off. In practice, this may be unnecessary and you can set the mold aside to air-cool before digging out your casting. Do not plunge the hot mold into water. When you dig out your casting and remove the sprues, care should be taken not to exert much pressure against the joints. Do not utilize solutions that remove investment; they usually will attack the titanium as well, even though they do not contain hydrofluoric (HF) acid.
Tri-Metal Casting
To obtain even more variety in metal colors, consider casting a third metal. There are three ways of producing a tri-metal casting:
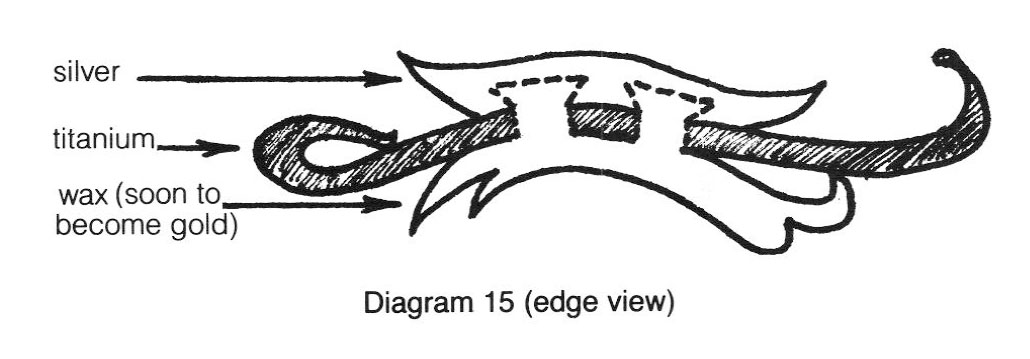
- In Diagram 15, the pre-formed gold and titanium part are joined by the wax, which eventually is replaced by silver. This requires one casting step, except for a possible previous casting step used to make the separate gold piece. If the gold piece is fabricated from wire or sheet, the no previous casting cycle is needed.
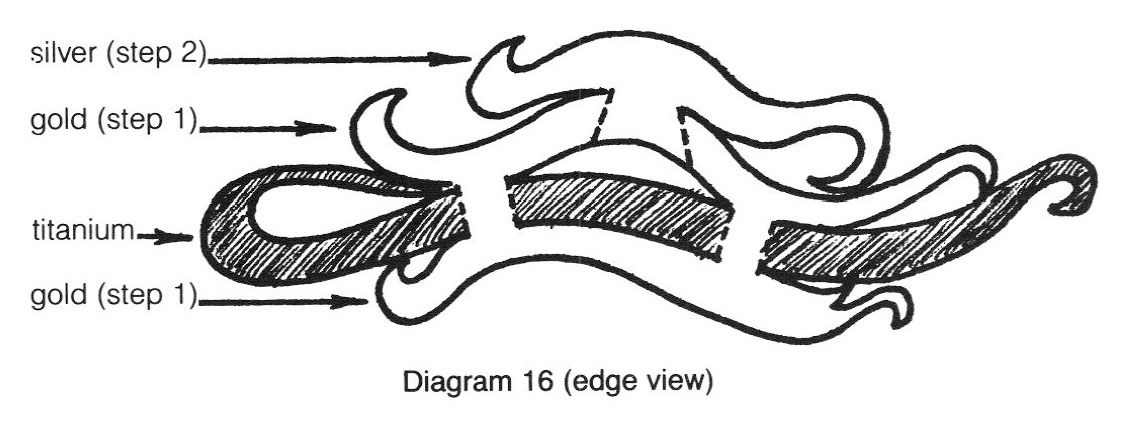
- In Diagram 16, two complete casting steps are needed: The first produces the gold-to-titanium bi-metal casting. The second produces the silver-to-gold tri-metal casting.
- A third metal could be cast in the same mold as the bi-metal casting if, and only if, independent sprue systems could be arranged. They cannot intersect and you cannot violate minimum investment standards (approximately ½" between sprues or models). If one sprue system comes too close to the other sprue system, incoming metal from the first casting could smash through and plug the other sprue system. Once the first casting is completed, simply rotate the mold in the casting machine and cast the second metal. Obviously a mold like this is harder to sprue and invest, however it can save time and provide unique results:
Other metals can be soldered onto bi-metal castings, thus expanding design possibilities. Again, it is best to heat and cool bi-metal castings more slowly than normal objects.
Casting, like other processes, should only be utilized when the design justifies the technique. Likewise, if you are utilizing bi-metal wrapping and/or rivets, remember that the reason you are using these techniques is to increase the continuity of design between two metals that are difficult or impossible to join via normal techniques. If you don't want the wrapping and rivets to look like wrapping and rivets - blend the necessary techniques into the design. On the other hand, if you like rivets, then don't utilize bi-metal casting - just use rivets.
Finishing and Coloring
Coloring is the very last step. The piece must be completely finished and cleaned. Surface treatment and preparation are very important - if the surface is dull, the color will be dull; if the surface is shiny, the color will be shiny. As you will remember, the oxidization layer formed during the burn-out and casting must be removed with hydrofluoric (HF) acid or abrasives or you will not be able to color it. Note that HF skin burns are painful and slow to heal. (Treatment for burns is different than that used for other acids. If you must seek medical help for HF burns, be certain that the doctor understands what material has caused the condition. Unfortunately, medical personnel may not be aware of the specific treatment indicated for HF burns.)
If you are carving the titanium with fine dental burrs, they will leave brilliant chatter-marks which can give beautiful iridescent effects when colored.
Wash the titanium with warm water, detergent and a touch of ammonia. Dry the piece and do not touch areas to be colored. Fingers are greasy and the grease prevents the metal from forming color. The electrolyte used to conduct electricity to the titanium will immediately oxidize (and blacken) non-titanium metals during the coloring process, so they must be given a protective coating. If painting is to be done, only border areas must be covered. Rubber cement works well as a protective covering - it dries quickly and can be removed quite easily by rubbing. After coloring the piece, rewash it in hot water, ammonia and detergent.
Coloring procedures are basically the same, except that higher voltage is required to obtain desired colors. The clip of the electrode can be attached to any part of the bi-metal casting and does not have to touch the titanium, since the non-titanium metal also conducts electricity. However there seems to be an electrical interference or resistance along all borders between the titanium and the other metal. This leaves an uncolored strip of about 1/32" wide.
Safety procedures should be strictly exercised as in all titanium coloring.
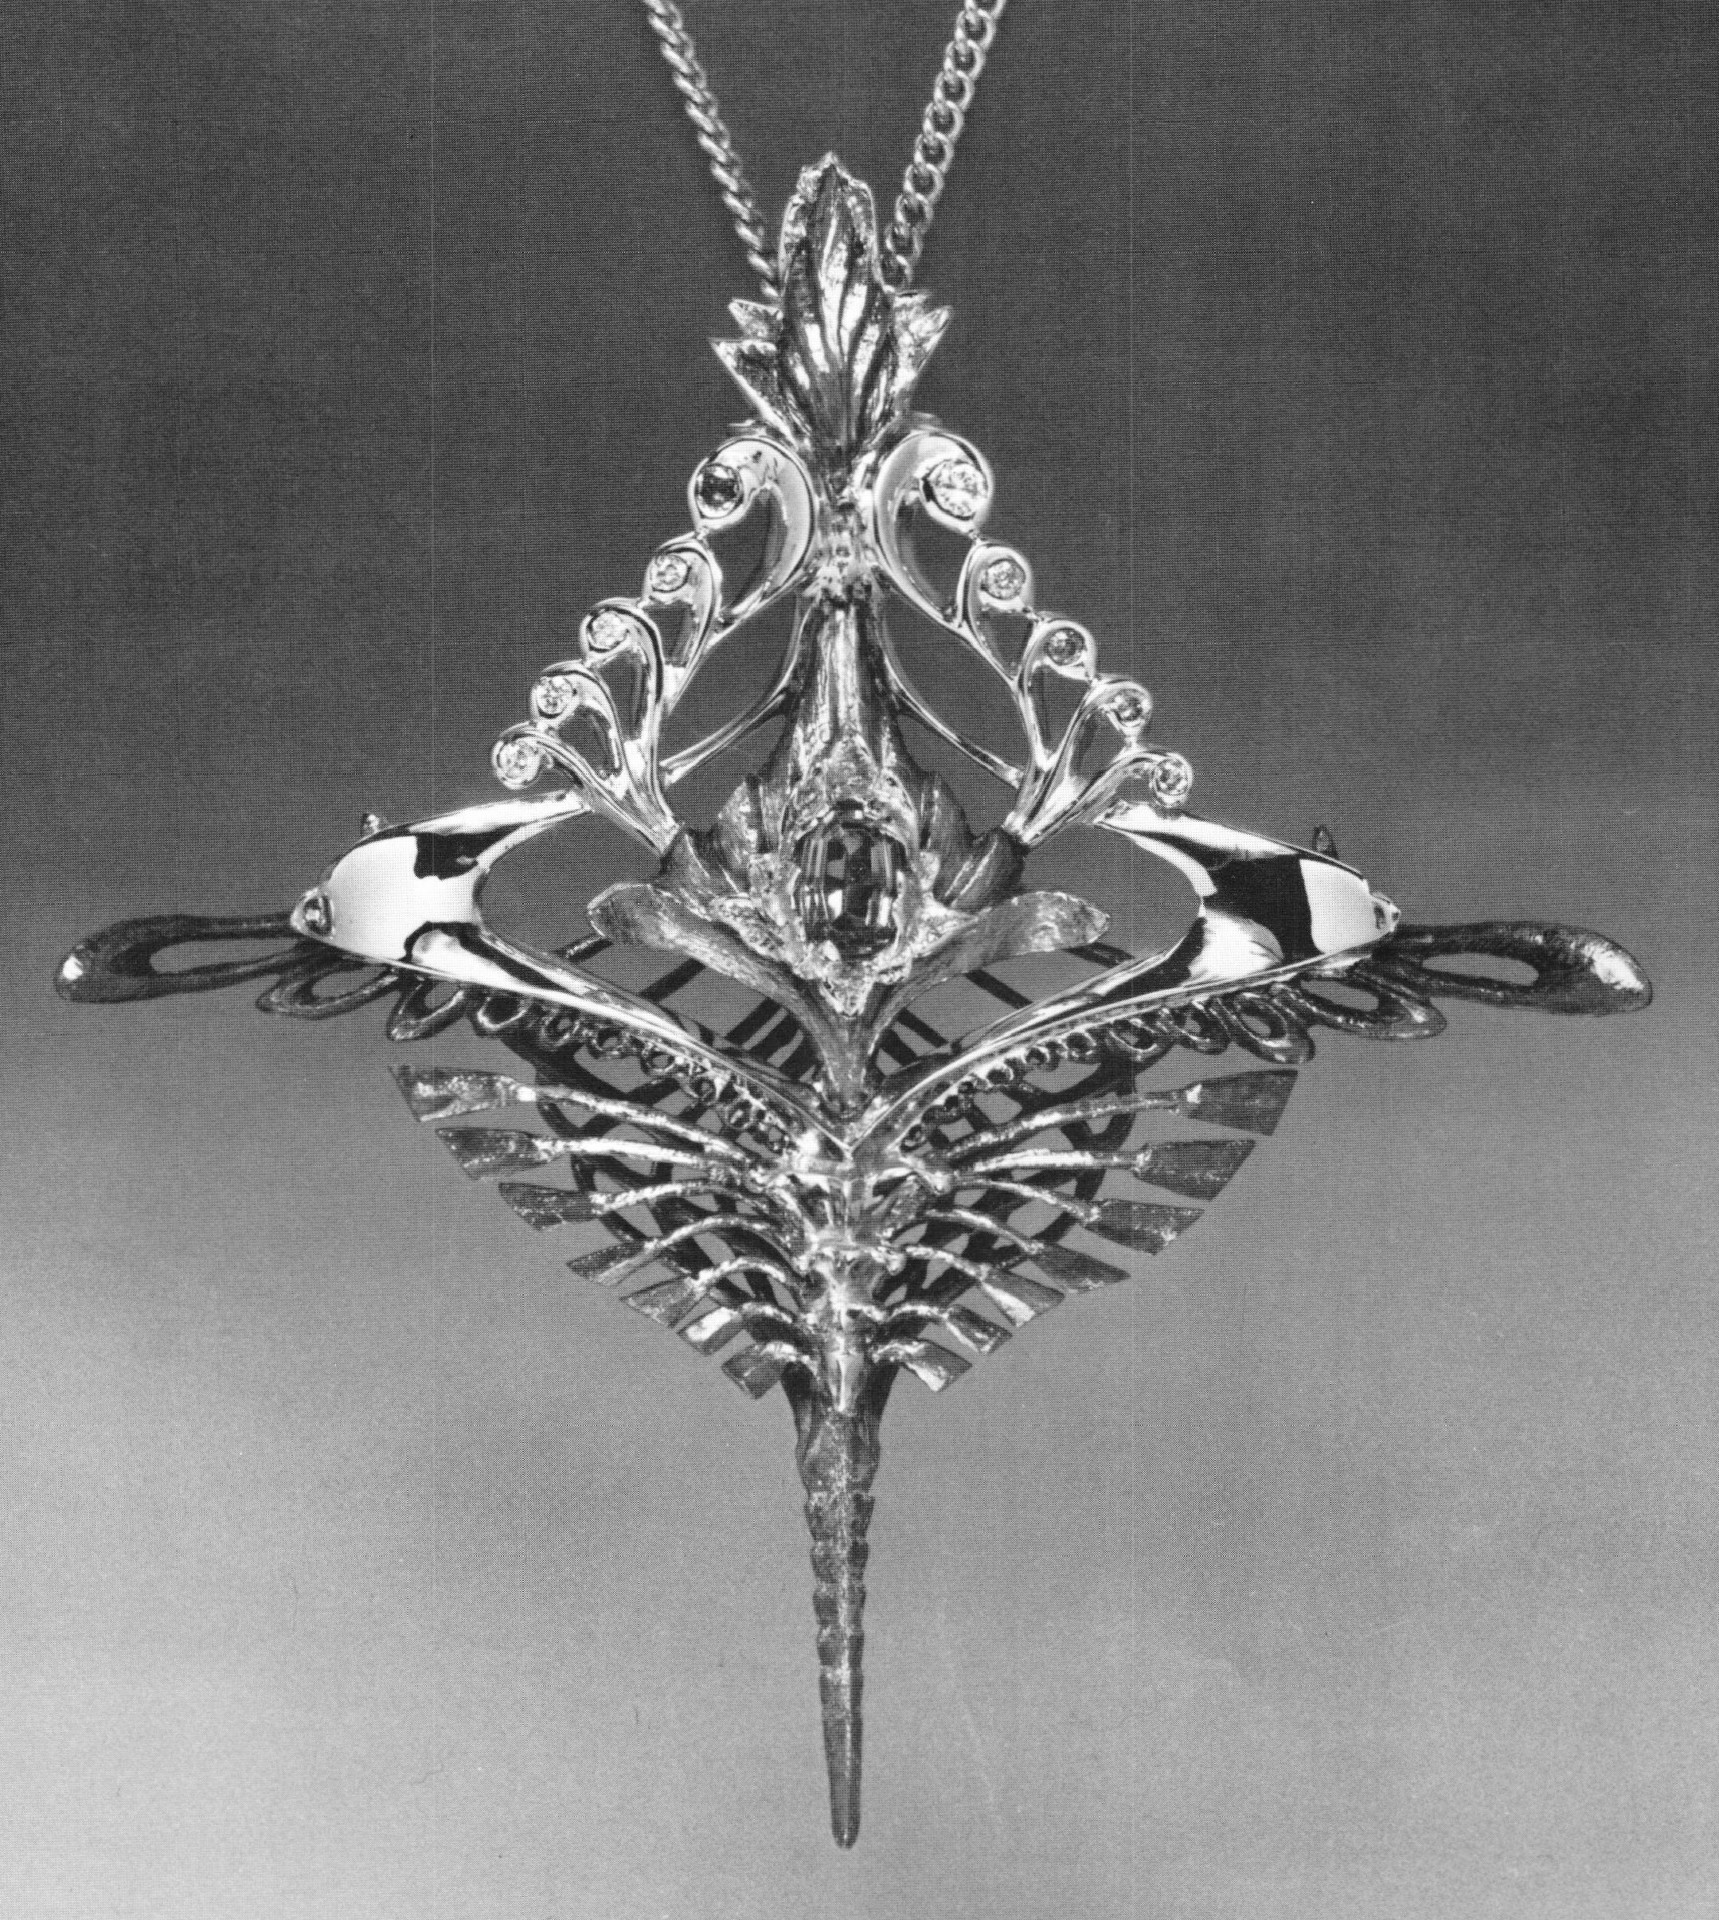
Bi-metal casting, once mastered, expands an artist's dimensional and technical possibilities. This is especially true when metals that cannot be soldered or cast are used. You are only restricted by your level of imagination and creativity.
Related Articles
The Best Jewelry Books: A Comprehensive Reading List For Craftspeople
Touchstone Method for Testing Karat Gold Purity

Platinum Alloy Applications for Jewelry

Martha Glowacki & Fields of Reference


The All-In-One Jewelry Making Solution At Your Fingertips
When you join the Ganoksin community, you get the tools you need to take your work to the next level.
