
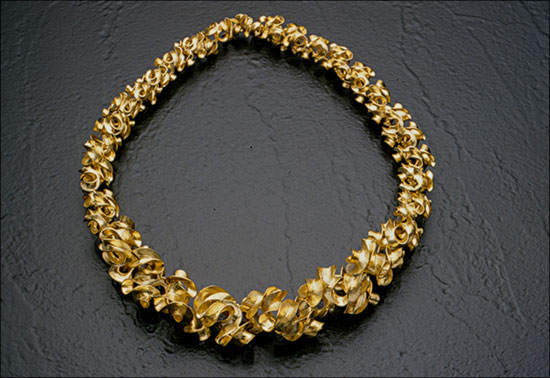
The Art of Anticlastic Raising
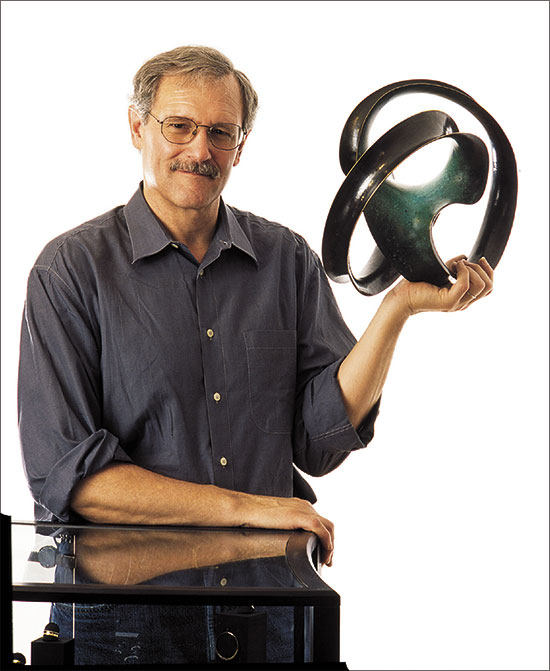
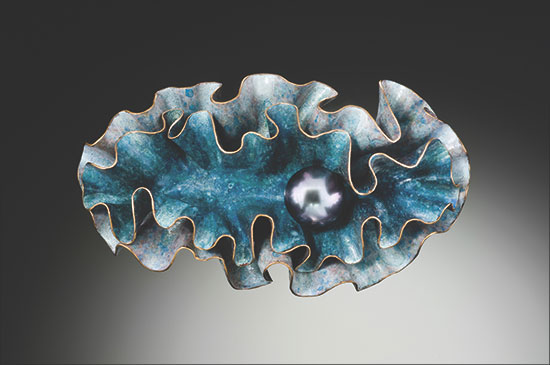
Transforming a single sheet of metal into an undulating organic form using only a hammer and stake is the art of anticlastic raising. When the hammer hits the piece of sheet metal resting on the stake, the metal rises into curves or coils, its edges stretching more than its center. It's a technique that requires skills far more complex than the tools used -- skills that Michael Good of Michael Good Designs in Rockport, Maine, has perfected since the late 1970s. With today's high metal prices, one of the greatest benefits of anticlastic raising is the ability to create structural strength in relatively thin metal sheets. The resulting shapes are very flexible and springy, making findings an unnecessary addition. A necklace, for example, has such flex that it's simply pulled open, slipped on, and closed.
7 Minute Read
Transforming a single sheet of metal into an undulating organic form using only a hammer and stake is the art of anticlastic raising. When the hammer hits the piece of sheet metal resting on the stake, the metal rises into curves or coils, its edges stretching more than its center. It's a technique that requires skills far more complex than the tools used — skills that Michael Good of Michael Good Designs in Rockport, Maine, has perfected since the late 1970s.
 With today's high metal prices, one of the greatest benefits of anticlastic raising is the ability to create structural strength in relatively thin metal sheets. The resulting shapes are very flexible and springy, making findings an unnecessary addition. A necklace, for example, has such flex that it's simply pulled open, slipped on, and closed.
Anticlastic raising is both ancient and modern, but with no history in between. In Bronze Age Ireland, someone crafted a ribbon torc (a necklace) out of a sheet of metal twisted into a double helix. The technique for metalworking was lost until rediscovered in the last half of the 20th century, in large part by Michael Good.
Rediscovery
Good has been at the center of anticlastic raising since its rediscovery. A hippie in the 1960s, he moved his young family from New York City to a remote area of Maine, where, in his spare time, he tinkered with some gold sheet he'd brought along — the melted-down remains for former projects made during an unsuccessful attempt at jewelry making in the big city. With no money for jewelry-making equipment or tools, he shaped the metal with basic tools, including a hammer, file, snips, coping saw, anvil, and torch, and unknowingly took the first step toward his life's work.
"Over a few years I learned how to do a lot of neat things, but in a convoluted way," he says. Selling at craft fairs, he stepped into the local jewelry industry and met fellow goldsmith Glenda Arentzen, who suggested he meet Heikki Seppa, a teacher and writer who was about to publish the now-classic Form Emphasis for Metalsmiths. Good took a workshop from Seppa in the late 1970s, and the two men became fast friends. "He's the light," says Good. "He's the one who discovered how to raise in reverse."
By "raise in reverse," Good describes what we know today as the process of anticlastic raising — a technique yet unnamed when the two were experimenting. They expanded the idea together. "Either he or I would discover a new way of doing something, a way of refining the process," says Good.
When taking a sauna and shooting the breeze one night as they often did in the early 1980s, Good suggested applying the topological term of "anticlastic" to the process — and the term "anticlastic raising" was born. The name has been widely accepted and is becoming part of the metalsmithing language, something that Good's quite pleased about.
Somehow both simple and complicated, anticlastic raising requires two years of practice to get to the point where a jeweler is both competent and quick enough to turn a profit on a piece, says Good. But it is an achievable goal. "Everyone can do this," he says. "This is something anyone can learn. You have to drop the normal way of looking at things and allow your mind to operate in a very different way."
Tools of the Trade
Because anticlastic raising involves moving metal, it's best suited for ductile metals such as most bronzes, silver, and gold. Good rarely works with platinum because it's soft and doesn't have much spring, and he adds that titanium wouldn't be a good choice due to its low ductility. For jewelry, metal sheets can be quite thin. He works in 22 to 27 gauge 18k gold, a metal he feels is an ideal choice. "It's by far the nicest material to work with for jewelry," he says. "You get a finished piece that is very structurally sound and resilient, and the color is great."
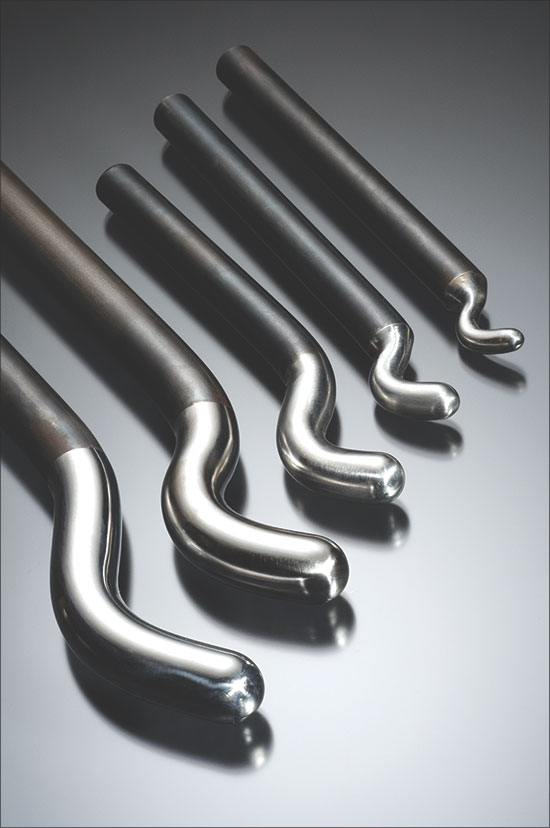
Using cross-peen hammers, the metal sheet is worked on a steel, plastic, or wood sinusoidal stake. Available in many sizes and shapes, the stakes needed will vary by project and are determined by the width of the metal being worked and the desired curves. The width of the pattern can't exceed the distance between the two crests of the sinusoidal stake; i.e., the metal must rest slightly into the dip in the stake, not simply drape across it. The deeper the recess, the deeper one of the curves; the narrower the stake, the deeper the curve in the other direction.
Shaping the Metal
Each project begins with a sheet of metal and a pattern. You begin by cutting the overall shape out of the sheet and filing the edges smooth. From that basic shape, the piece will grow and curl as you begin to raise it.
"The shape of the pattern itself will determine the overall result," says Good, who has done this for so long that he can envision the intended finished form as a flat pattern. "Shapes that arise from the flat sheet mimic nature."
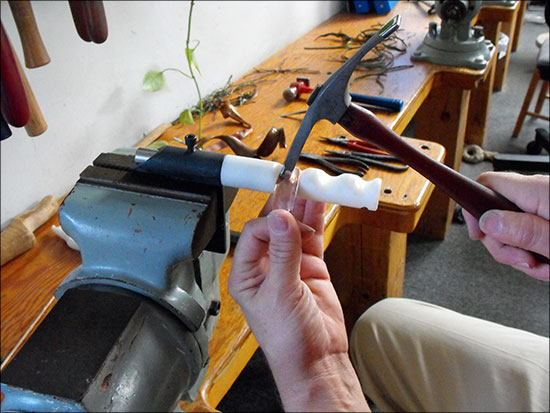
To get set up, choose the correct size sinusoidal stake for the project and secure it in a vise. Anneal the metal sheet and bend the metal over the stake. "In order to get stretch in both directions, you have to hold onto both ends of the metal when working it on the stake," says Good. This provides the tension necessary for the piece to coil into shape.
When using the correct size of stake, there will be a void under the metal just inside the outer edge, so each blow of the hammer will stretch the metal slightly. (Note: The curved end — the area that hits the metal — of the cross-peen hammer must be slightly narrower than the dip in the stake to ensure that it makes proper contact.)
Holding the ends of the metal, begin at the center of one edge with the first blow. Proper hammering technique requires blows at a right angle, which prevents distortion to the metal.
Slightly overlap the second blow over the first, moving toward one side of the piece. Continue hammering down the edge of the metal to the end, then hammer from the middle down the other side. Turn it 180 degrees and hammer the other side the same way. Work at a steady speed; if you rush, an undesired fold can develop. Hammer rows with each blow slightly overlapping that of the previous row until the piece of metal is completely hammered. Once you have finished hammering the entire piece, anneal.
Follow with a second course of hammering to compress the metal more. Be sure to begin slightly further in from the edge than where you started. At this point, you may need to use a different stake to ensure that the metal fits properly into the dip in the stake. Some pieces require a variety of ever-tightening curves, so several stakes might be needed for the process.
Begin hammering, holding the ends of the metal tightly. Coils will naturally form in the metal as work continues, and it's purely a matter of working the metal, annealing after each course, until you achieve your desired design goals.
Once the piece has taken on a shape that pleases you, planish it with a planishing hammer before polishing to smooth out any bumps so the thickness of the metal won't be compromised. "If you have any bumps on the surface, polishing before planishing will take the tops of the hills off," says Good. To planish, place the metal in uniform, direct contact on either a plastic or metal sinusoidal stake, then hammer it, but do not stretch or compress the metal: Simply flatten the metal, don't move it. (This time, don't hold the ends of the metal.) The process can be stopped at any point if a hammered finish is desired, but for a high polish, smooth out as many of the hammer marks as possible before polishing it up.
Determined to get to the bottom of the roots of this process that has consumed the latter part of his life, Good, in conjunction with Irish metalsmith Brian Clark, discovered how that Bronze Age jewelry was made: an antler took the place of a sinusoidal stake. Finding a link to the history of this art form further inspired Good to break new ground. "I try to push the envelope," he says, "sometimes to a new level of complexity I've never been to before."
![]()
In association with
![]()
The award-winning Journal is published monthly by MJSA, the trade association for professional jewelry makers, designers, and related suppliers. It offers design ideas, fabrication and production techniques, bench tips, business and marketing insights, and trend and technology updates—the information crucial for business success. “More than other publications, MJSA Journal is oriented toward people like me: those trying to earn a living by designing and making jewelry,” says Jim Binnion of James Binnion Metal Arts.
Click here to read our latest articles
Click here to get a FREE four-month trial subscription.
Related Articles

Naum Slutzky Jewelry at the Bauhaus

How to Make a Plique a Jour Fairy

CAD/CAM: Passion and Innovation

Robert Lee Morris: The Business of Marketing Art Jewelry


The All-In-One Jewelry Making Solution At Your Fingertips
When you join the Ganoksin community, you get the tools you need to take your work to the next level.

