
6/20 On Precious Metal Clay
4 Minute Read
An enameling/jewelry student of mine discovered the 6/20 on PMC process. Always an adventurer, she was experimenting with the Thompson 6/20 aqua lumps on a dragonfly she was making. The technique is exacting, but straightforward and easy.
This project assumes you have a working knowledge of PMC and basic enameling skills.
SUPPLIES
8 grams PMC+
2″ 22 gauge fine silver wire
6/20 Aqua 2520 enamel 2oz.
6/20 Gem Green enamel 2oz.
Klyr-Fire
Fine point brush
Fine point tweezers
Pencil with eraser shaped to a point or Soft Colour
Shaper
Needle or needle tool
Liver of Sulfur
Flitz paste polish
Sterling silver chain
White drawing paper
Kiln and pyrometer
Firing fork or brick laying trowel
Firing rack
Cotton gloves
Teflon sheet
Plastic bottle cap
Wire brush
Agate burnisher
Button or mold with deep recesses
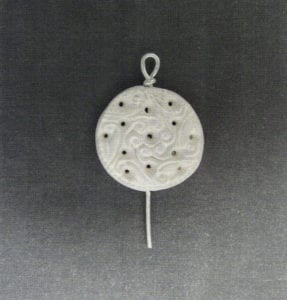
Start with approximately 2 grams of PMC+, flatten it slightly and press into an antique button mold or directly onto an antique or plastic button. Keep the PMC+ at 4mm thick, this eliminates the need to counter enamel. Keep in mind the 12% shrinkage rate of the PMC+.
Place the pressed piece of PMC+ onto a Teflon sheet. Enlarge the existing holes or add new ones with an eraser tool. (The Soft Colour Shaper is ideal for this.) Next, use a needle or needle tool to poke small holes in the eraser cavities that go all the way through the PMC+. This will allow the enamel to be backlit, similar to the way a hole is placed behind a gemstone when you set it. Gently smooth the edges with the eraser tool or your finger.
Use 20 gauge fine silver wire to add findings. Make your findings and insert them into the clay while it is still moist, being careful not to distort the design. The piece is meant to have an ancient look, therefore it is not necessary to precisely repair cracks.
Allow the piece to dry completely in a food dehydrator, on top of a hot kiln, or overnight. Fire the PMC+ according to manufacturer's instructions. Let the piece cool completely. Now it is ready to enamel. Do not clean or burnish the piece at this time. It is important to leave the clay in this state.
Spread out some 6/20 enamel on white drawing paper, at least 2 tablespoons; this provides a large selection of different size lumps. Aqua and gem green yield a beautiful result, as do other transparent blues and greens. Yellows, oranges and reds turn brown on fine silver as in traditional enameling.
Sometimes even lump enamel pieces can be too big for this process. I tried using a mortar and pestle to reduce the size of the lumps, but there is a better way…a coffee grinder. A coffee grinder is a great, fast way to get smaller enamels to work with. Place a small amount of lump enamel, U2 teaspoon, in a coffee grinder and pulse the grinder once or twice, but grinding any more than that will cause the glass to turn to powder. This technique will yield several different, but smaller size lumps to use in the enameling of the silver clay pieces. One warning - after you use a coffee grinder for grinding glass, never use it again for food. A thrift store is a great place to find a used grinder.
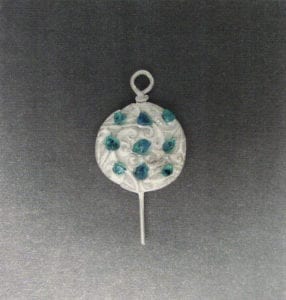
Place the fired piece on a plastic bottle cap so it can be rotated easily while adding the enamel lumps. Use a small brush and Klyr-fire to adhere the lumps to the pendant. Brush the Klyr-fire in each eraser cavity in the pendant. Place the 6/20 lumps in the cavities. Keep adding enamel until the lumps in the cavities are covered. Save any unused lumps for future projects.
Remove the piece from the plastic cap and place it on a metal rack or stilt to dry the pendant. Let dry at least 1 hour. Fire the pendant on a metal rack in a kiln at 1450°F for approximately 2 minutes. Check the piece as it is firing by opening the kiln door slightly. When the jagged lumps dome, remove the piece quickly. Allow the enameled piece to cool. Check to see that the cavities are completely filled with enamel. You may have to repeat the filling and firing process several times to achieve the gem look.
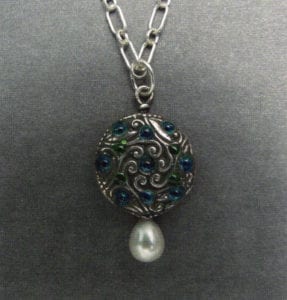
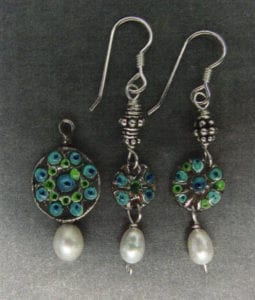
To finish, place the completely cooled enameled pendant in liver of sulfur oxidizer and the polish the highlights with Flitz polish and add a jump ring and chain, then epoxy a pearl.
Brenda and Janet are metalsmiths and enamelists who teach workshops. Visit them on the web at: www.harrimanjewelry.com, Email: harrimanjewelry@yahoo. com; Email: rajkovichdesigns@hotmail.com.
Related Articles

Barbara Nakae

The Orange Necklace by Chihiro Makio

Alberto Alessi

Book Review – Art Jewelry Today


The All-In-One Jewelry Making Solution At Your Fingertips
When you join the Ganoksin community, you get the tools you need to take your work to the next level.
