
Make Your Own Wax Tools
I make all my own wax carving tools and hot wax tools.I have done this since the early 1970's when I could find only dental tools ready-made on the market. I was told a bent nail would suffice, but thought I could do better. So my tools and techniques developed together and now the one is probably a reflection of the other.For a long, time I thought the variety in tools was endless, but now I only make modifications of a few basic shapes. They are shown below. The tools are easy to make and require no specialized equipment.
5 Minute Read
I make all my own wax carving tools and hot wax tools.I have done this since the early 1970's when I could find only dental tools ready-made on the market.I was told a bent nail would suffice, but thought I could do better. So my tools and techniques developed together and now the one is probably a reflection of the other.
For a long, time I thought the variety in tools was endless, but now I only make modifications of a few basic shapes. They are shown below. The tools are easy to make and require no specialized equipment.

Related Video
Get it on ganoksin.comMaterials
All my blades are made of piano wire, aka drill rod.This is a water-quenchng, high carbon-steel, which is available in the metals rack of many hardware stores. It comes in round, 3 foot lengths of varying diameters. I like it because it is a consistent material, it can be worked with a minimum of forging skills, and it keeps a good edge. The carving tools are of 1/16″ to 1/8″ diameter stock set into 3/8″ doweling. Thinner rod offers more visibility when you are working and requires less grinding down to size. The hot tools are of 1/8 o 5/32″ rod.The heavier material holds the heat longer.
Forming the Blank
Drill rod wire is supplied in a semi-toughened state, which is hard on your files and wire cutters. But when heated to cherry red and quickly quenched in water, it becomes so brittle it can be broken by hand.So the first step is to section it. You can control where it will break by filing a notch. Heating it red hot again, you can forge an approximate shape. This is when you establish the width and thickness of your blade. The anvil I use is 18″piece of railroad track iron from a junk shop.
Finishing the Carving Blade
To shape your blade with a file, it should be as soft as possible. So heat the blank again it to a cherry red and let it cool slowly.A small pair of vise grips makes a secure holder as you heat and shape the tool.I think you will find it easiest to work on straight rod, so wait to hot bend the offset angles until the blade is otherwise finished. Before you permanently install it in the handle, try it out to see if it cuts right and is comfortable to use. Then heat treat it for hardness and sharpen the edge.Moore discs and rubber abrasives mounted on the flexi-shaft are the right size and will make smoothly curved edges. It is more important that the edge cuts evenly, than how sharp it is.
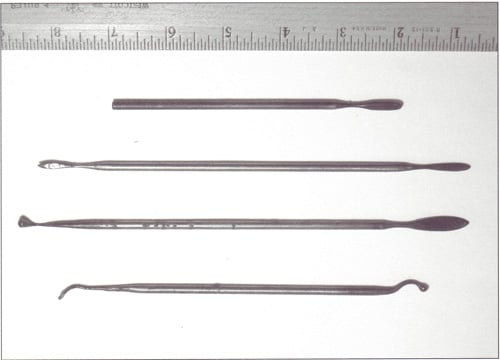
A Sampling of Carving Tools

- Blunt nosed scraper
- Point with squared sides for scraping
- Two circular blades
- Tiny curved burnisher
- Bent scrapers with one knife edge (like A.) and one spatula shaped
- Offset wide, curved edge
- Offset scrapers with one narrow V' shaped blade and one long oval blade
- Little chisel, beveled on both sides
Hardening the blade:
The heat-treating of steel is a interesting subject, doubtless explained with more expertise elsewhere in Orchid files.Briefly, in its annealed state, steel is relatively bendable, soft, and tough. When it is heated to red hot and quenched, steel becomes brittle, hard, and delicate. Good tools are a compromise between these two extremes. So after you heat treat for hardness you must "draw temper." A little heat turns steel straw colored, more heat turns it dark straw, then brown, purple and finally blue. Light straw is appropriate for a graver, and dark straw is better for wax carving. You must buff the steel for these colors to show up well. The proper color is best attained by gently heating the shaft and watching the color move up the blade.You quench as soon as your blade reaches the desired color.
Hot Tool Basics
My hot tools are good for inlay and injection waxes. (A wax pen is necessary for plastic carving waxes because of their higher melting temperatures.)They are not hardened.First, the blade shape is hammered hot and shaped with a file. Then the tools are necked down between blade and shaft to reduce the transfer of heat up into the shaft. My blades are either spatula shapes for trailing wax and attaching sprues, or pear shaped for daubing the wax on.
Tools for Hot Wax
- Drop shaped tips for depositing wax
- Large flat tip for sprues and large drop shape
- Flat willow-leaf trailing tips
- Heavy found tip for smoothing the inside rings
Molten wax is cohesive in that a small amount will pull into a round drop; adhesive in that it will stick to wax already laid down. Too much wax or too much heat and it will just dribble off due to gravity. To control molten wax you must balance these tendencies.
When almost solid, if you blow on the wax as you pull it away from a model, you can draw an unsupported strand off the surface of the model into the air. The ends of the tools are not sharp because the molten wax will pull back from the point and be harder to apply. The drop shaped tools deposit a little dollop and are good for spreading and filling in wax.
So the hand tools are not nearly so easy to manage as a wax pen, but they transfer a lot more wax and are good for spontaneous work. I use a Bunsen burner off my propane tank because the alcohol lamp is too slow. Serra Red Wax from Otto Frei responds very well to a hot tools and scrapers. It finishes nicely with acetone on a Q tip. My hot tools were originally inspired by Ray Allen of Ponchatula LA, who used them with great delicacy.
In Summary:
Carving tool for all kinds of waxes can be easily made.Hot tools will not work well with Karvex and its descendants. Like everyone else, I have a lot of store bought stuff in my studio that is very useful for wax.I use my mold cutting scalpel, a coarse half-round file, a barrett needle file, and my flexishaft.But the bulk of my work is accomplished with a modified Giles Precision Waxer and the tools I described, above.
Related Articles

Customized Mini Clamp Tool

Jewelry Designs: Raindrops Pendant

How to Make Foredom Handpiece Shield

Magnesia Blocks Myth Debunked


The All-In-One Jewelry Making Solution At Your Fingertips
When you join the Ganoksin community, you get the tools you need to take your work to the next level.
