Victoria Lansford on the Art of Filigree
14 Minute Read
Victoria Lansford on the art of filigree—Russian or otherwise
BOX: The Art of Handcraft
Every jewelry designer can pinpoint the thing that first called her to the art. It may have been seeing something in a museum, or finding a delicate heirloom piece in her grandmother's jewelry box, or even a simple wire-and-bead kit she got as a birthday present. For Atlanta-based jeweler Victoria Lansford, it was a board game.
The Voice of the Mummy was an Egyptian-themed game featuring an intricately illustrated board with a detailed, 3-D sarcophagus as its centerpiece. "I was five. I became obsessed with the style of art, and particularly the metalwork," Lansford says. "As I got older, I kept getting books on it. I read Howard Carter's account of discovering King Tut's tomb and preserving the artwork, and for me the metal was always the draw. That's what got me into studying jewelry later on."
That, and an injury that made her put aside her dance studies. She considered going into visual art, and chose Georgia State University because it also had a metalsmithing program. "There weren't any other ways for me to learn it in Atlanta at that time," she says. "While I was there, there was an artist in residence, Gia Gogishvilli, from the Republic of Georgia, who came over right before the USSR fell. He was only a year older than me, but he was like this way-back machine I could tap into and see how all these things that I had been studying all my life were done. I thought it was lost. Nobody in the States that I could find understood these things. I couldn't find books in English. It was a huge opportunity for me to delve into that. From him, I learned Russian filigree."
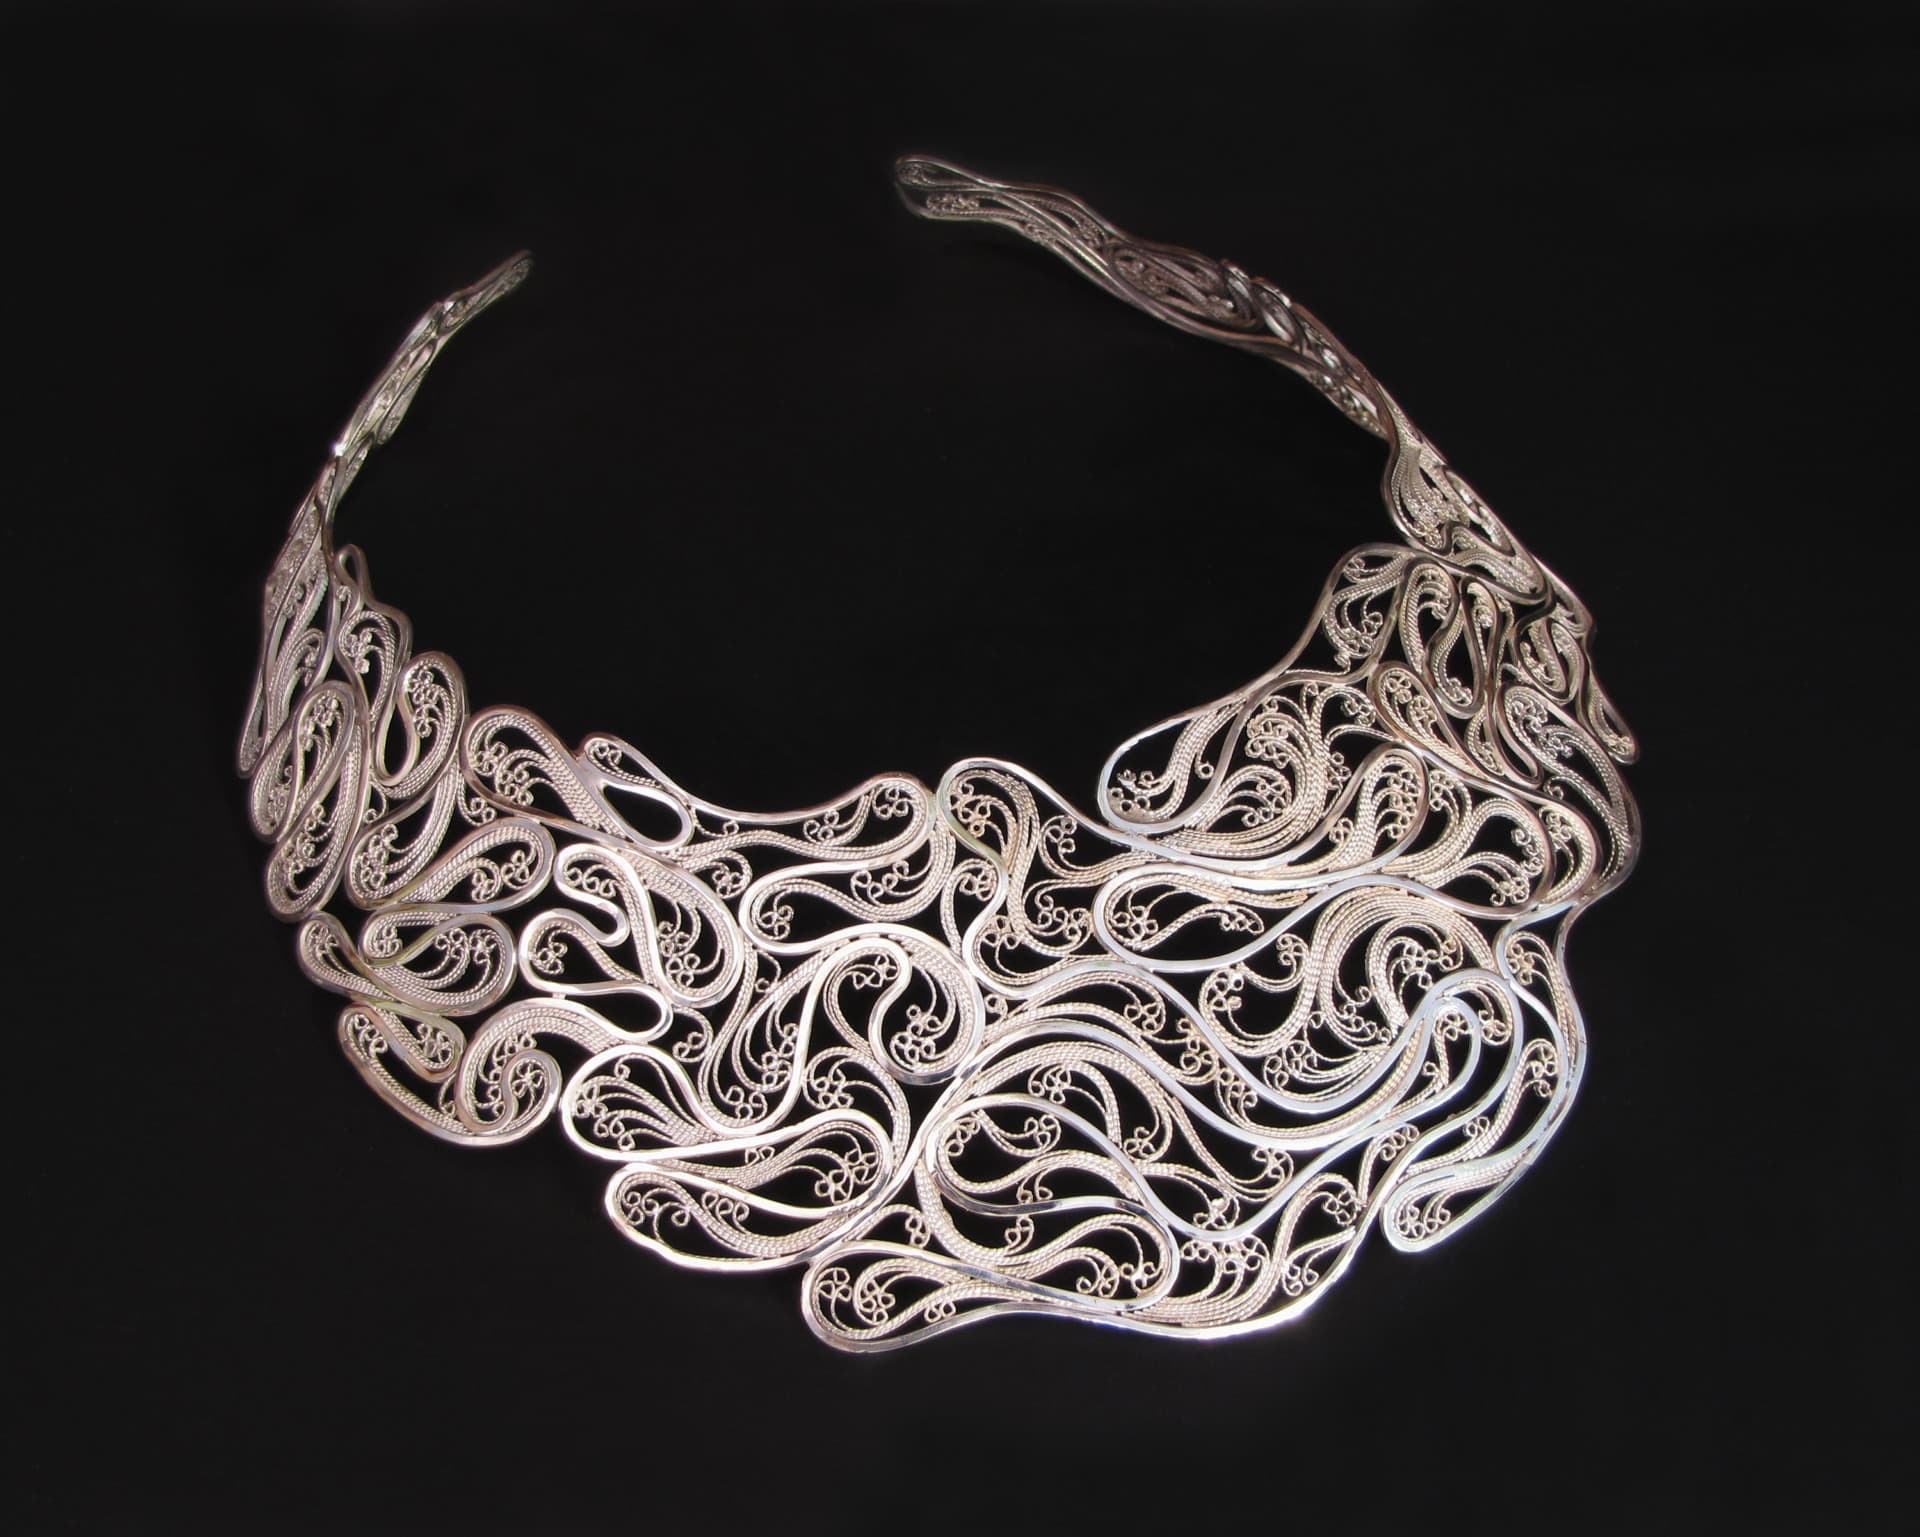
Filigree is something of a world traveler. Dating back as far as 3000 B.C., variations of it are found in Greece, India, Asia, and even Scandinavia. The name we know it by is a variation on the Italian filigrana, or "thread and grain," a description of how it traditionally combined granulation and the delicate, curved wires that create its graceful look. In traditional styles, the filler wires are set into an open-faced framework and soldered onto a solid base. Russian filigree is done in a backless style, using a frame made of sterling or 18k gold wire. Inside the frame the smaller filler wires, usually made from a softer metal such as fine silver or 22k gold, are kept in place by a combination of solder and tension. Another difference from other types of filigree is that the fillers in the Russian style are made of twisted wire that's been run through a mill, giving it scalloped edges.
As much as the she loved the idea of doing filigree, it wasn't an art form that came easily to Lansford. "I had a hard time with it at first. It was kind of fuzzy and I couldn't figure out the trick to it. I was sick the day the instructor did a demo of it, and he didn't speak much English. So I tried it on my own, totally messed it up, and put it aside. I figured I had done the required project and wouldn't be revisiting it any time soon. Then I saw another student who didn't like small, fussy things totally getting into the technique. I thought maybe she had figured out some tricks along the way. So I jumped back into it and once I figured out a few things about the process, I fell in love with it."
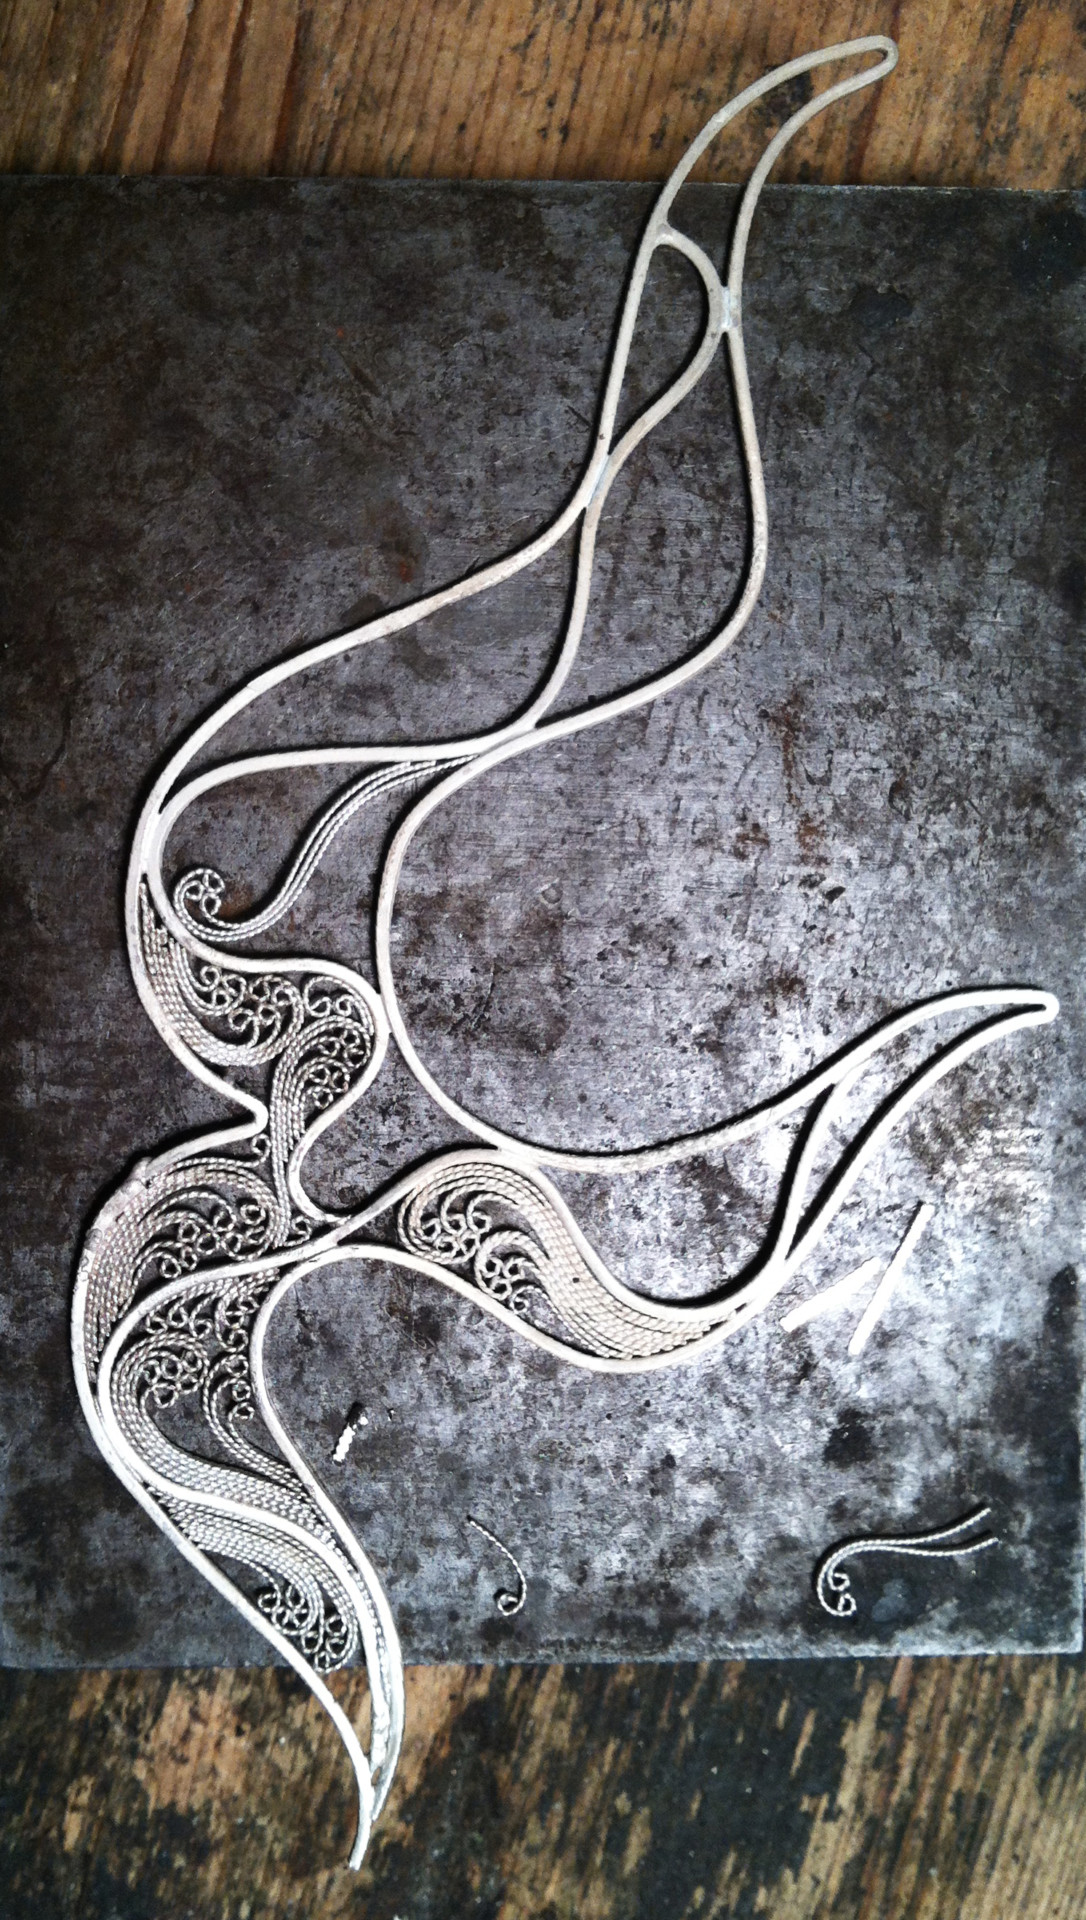
The most important of her discoveries became one of the basic tenets she passes along to her students. "The key to doing it is to have the edges of the frame completely flat and perpendicular to the steel block. I hadn't realized was how critical it is to have the frames straight up and down." Working on a steel block is essential, she says, because it ensures that the surface is completely flat and has no give. This helps keep the tension-fitted filler wires from popping through.

"When I conquered that technical problem, I could play with it and get the wires to stay in." She admits that after her eureka moment, it still took another two weeks of dedicated work and study before it became something she could do in a reasonable time frame.
"I can't emphasize enough how important it is to have the frame flat and wires straight," she says. "There's an outer frame, but there's also a lot of structure with your inner frame wires. Making sure the cells that are created by those inner frame wires are straight up and down makes or breaks whether those wires stay in there."
Lansford's metals of choice for her sculptural work are 18 gauge square wire for the frame, with the fillers made of 26 gauge fine silver wire that's twisted and milled. "The frame wire can be square, or you can take round wire and flatten it through a rolling mill, which has a more traditional look," she says. "I twist and mill my own filler wire, and I make it commercially available through my website. At this point there is no other filigree wire on the market that is twisted enough or fine enough. There also isn't any other filler wire that is made from fine silver, which is critical to the process. Filler wire made from sterling doesn't form easily, and it's a fight to get the wires nested next to each other."
Deciding on round or square depends a bit on how accomplished you are and what you intend to make. "Round wire is lovely, it's forgiving, and it's easy to work with. It's what I start people out on. Flattened round wire naturally twists less than square wire. But you can't fight physics, so if you want something to bend significantly or to bend in multiple directions, then you have to go with square wire."
Where Positive Meets Negative
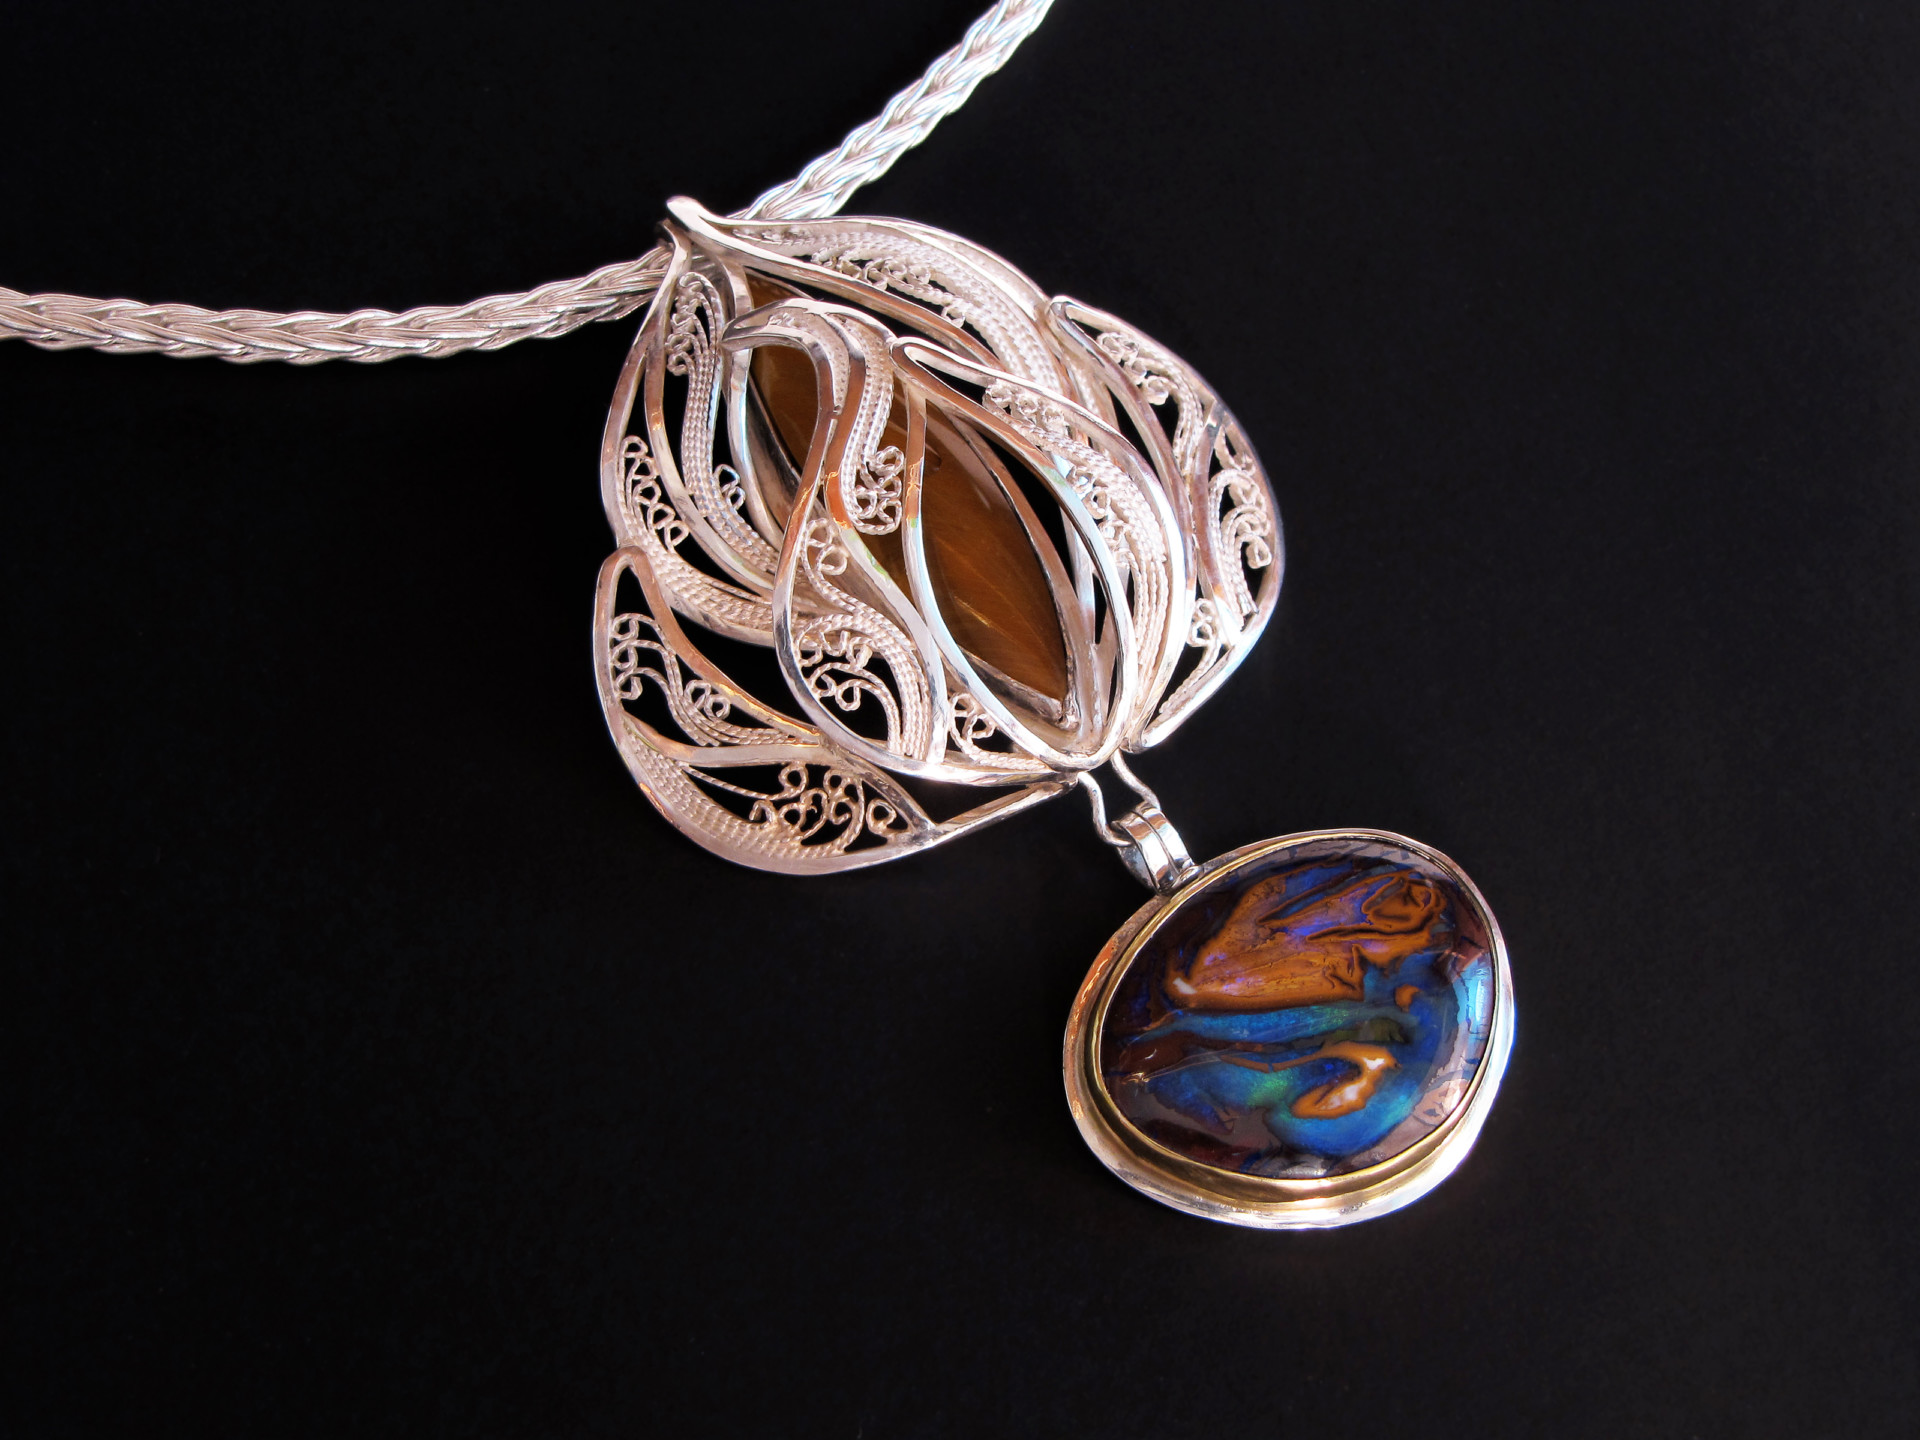
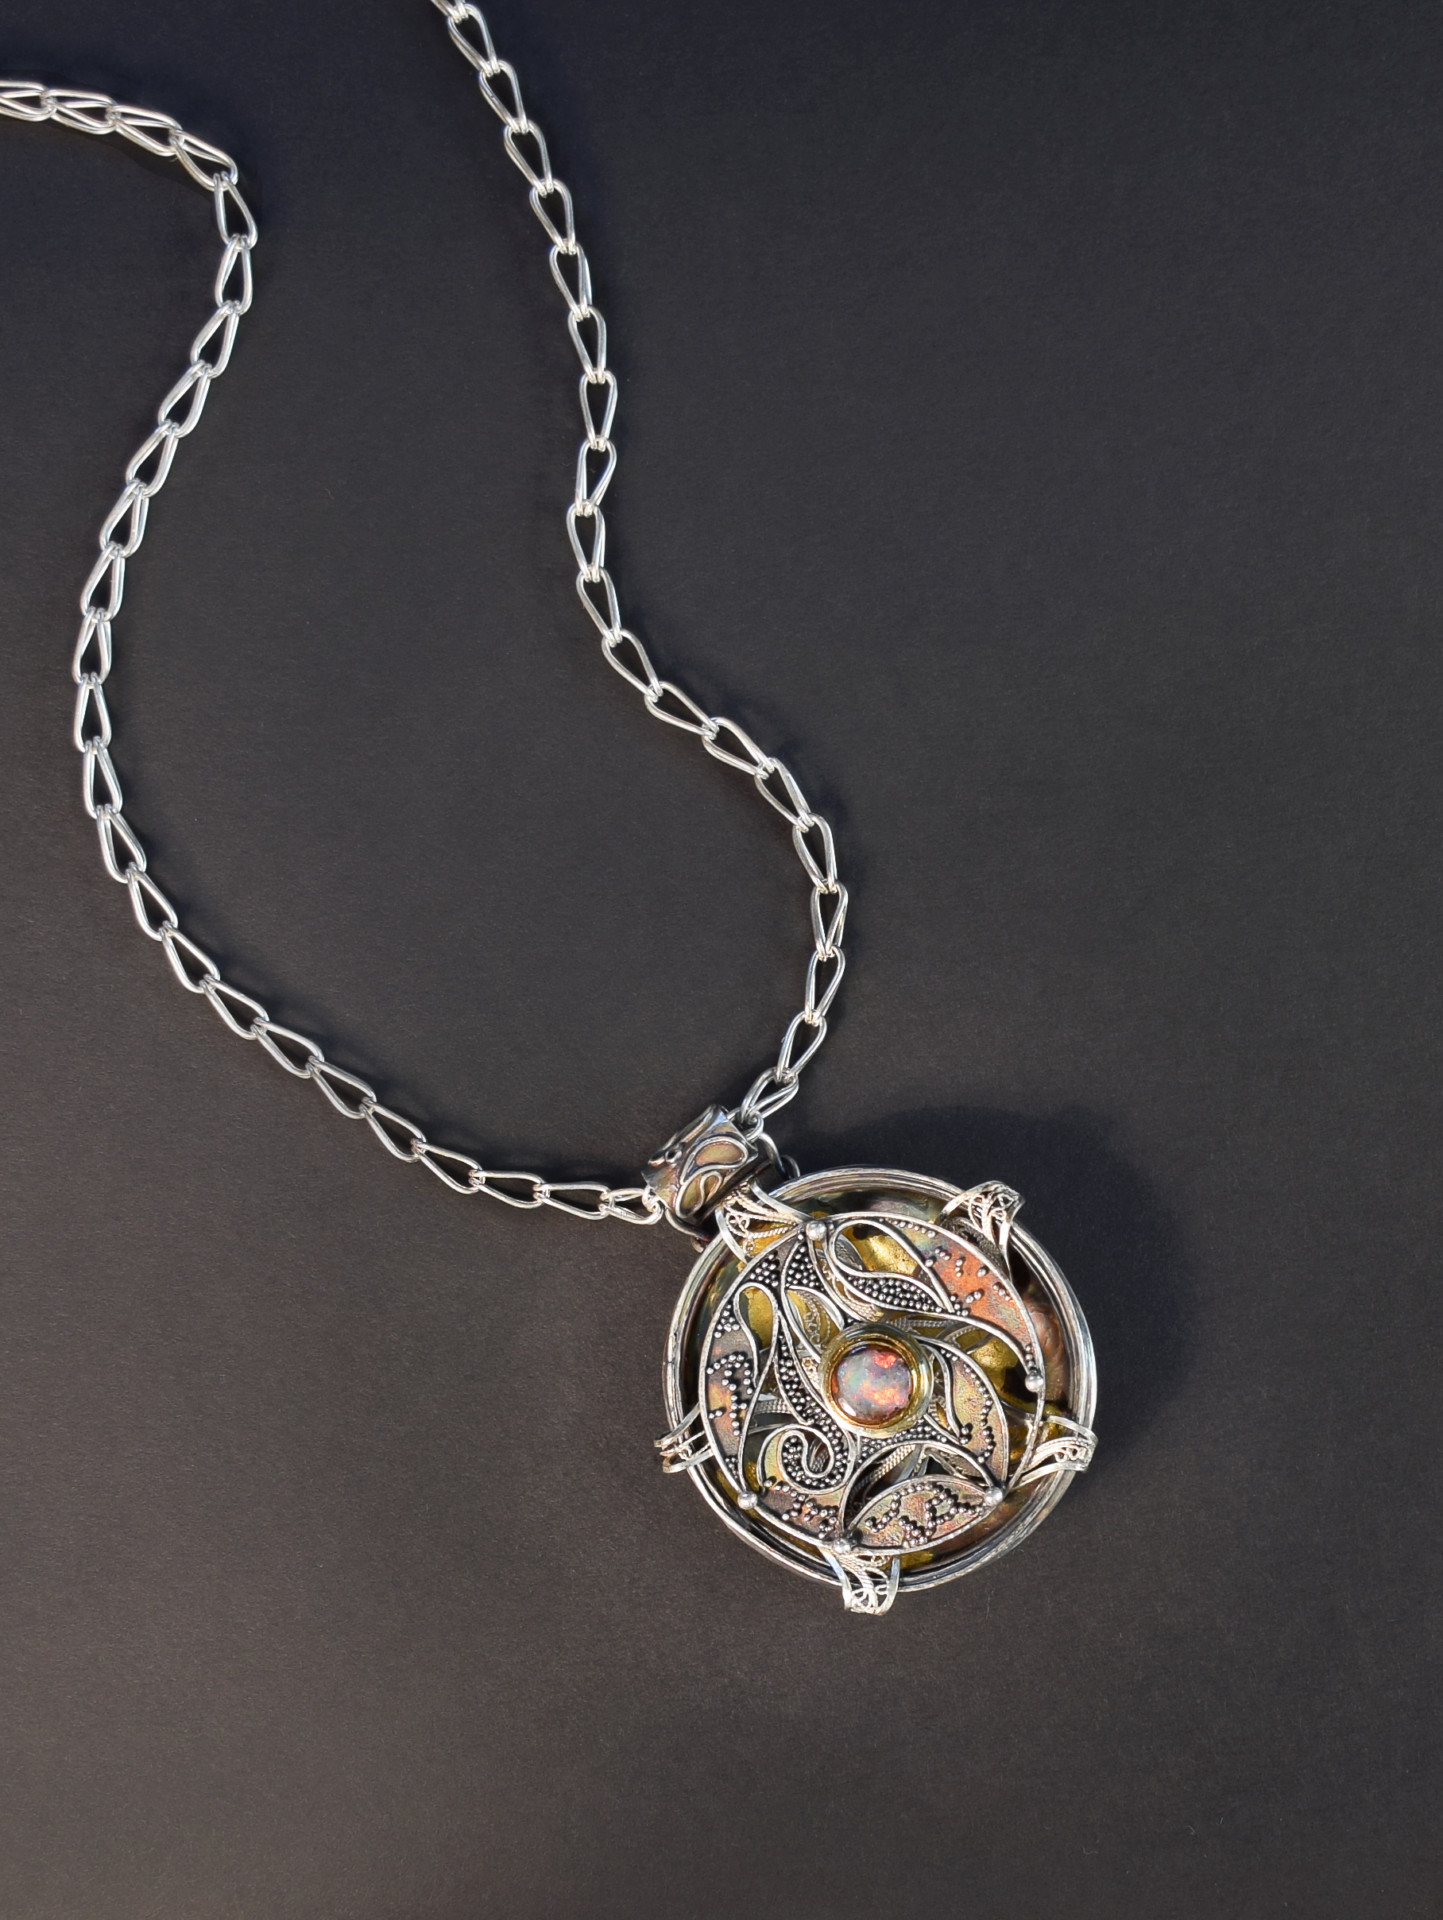
For Lansford, much of the allure of Russian filigree is its lightness. "I love the way you can have a really large, bold piece that is still physically lightweight and has a lot of airiness to it. By tension fitting and using the two different types of wire, there are limitless possibilities for shading and making a piece sculptural, as compared to just tack soldering plain or twisted wire together."
In her work, that airiness and lightness find definition in the use of positive and negative space. She frequently uses the openness to play with the visual aspects of a piece. "That's a huge thing in my work, as metaphor and as a literal design element. When I'm tension fitting all those wires, rather than filling them evenly, which has a very traditional look, I will nest the wires and create more shapes. The positive elements add texture to the piece, and the negative open spaces become just as important as the positive."
In a piece like her stunning Relativity Navigator pendant, the negative spaces act as windows through which can be seen a patinated 23k gold finish on the inside bowl of the pendant. The filigree elements of this piece also rotate independently of one another, so that the view through those negative spaces changes.
"Those negative spaces create a shading and a distinctive look when you step back," she says. "It's a huge contrast, which I really love to play with. Also, doing it that way so that the piece has some serious structure to it allows me to shape it and mold it and sculpt it in ways that are anything but flat."
When designing, Lansford usually sketches the outline of the piece but lets spontaneity take over when it comes to the filler wires. "I like to play with the unexpected aspect of it. It isn't as much fun when it's all drawn and planned out. How can I make them look a little different, maybe give them a traditional spiral look but make them less predictable?"

As with a lot of jewelry art, the best way to answer that question is to play.
"After I come up with an idea of how I want something to bend, I create it with paper models," she says. "I can bend those and see if something will wrap the way I want, or fold back and forth like fabric the way I want it to, and so forth. For new designs I probably make four or five models before I get it right. Plus, when I unfold it, it's a template for what I need my frame to look like. It's not foolproof, because paper and metal bend differently, but it's a good jumping off point. You can probably get a more accurate model with foil, but I like the unexpected things that happen along the way. It's more interesting for me than something that looks exactly like my original drawing."
Agree to Filigree
If you've been thinking about trying your hand at filigree work, the good news is that the tools required are quite minimal. "Pliers, tweezers, a steel bench block, a flex-shaft, and sharp scissors," Lansford says. "My go-to tools are round nose and chain nose pliers. Those, and really good tweezers. I bend the frame wire with pliers, but for the small filler wires, I use the tweezers."
A "key trick" she recommends is to hold the wire with the tool, and bend it between your fingers. "It gives you nice continuous curves rather than plier marks and elbow curves from trying to bend with the tools. Being aware that most pliers are tapered and watching how the frame wire moves as you bend will help keep the sides of the resulting cells straight up and down," she says. Nylon pliers and pliers made of Delrin (a thermoplastic) let her create those curves quickly, and she finds them gentler on the wire than metal pliers. "They help with bending the filigree because there is more surface contact between the pliers and the metal." Also, she notes, when you bend using your fingers, there tends to be less snapping and popping. "Sometimes when you bend them, the joints do pop. The metal might have become work hardened or you're asking it to bend it in a place where there's a little too much stress on the solder joint, even if it was a good joint. So you stop, solder it back together, and keep bending."
When it comes to soldering, Lansford recommends using a charcoal block. There are two major reasons for this. The first is that the charcoal creates an oxygen-reducing atmosphere. The second is that the black background makes it easier to keep an eye on the delicate wires. "I do all soldering on a charcoal block with an air acetylene torch. If you use a different kind of torch, you can put a rosebud tip on it to get a nice diffused flame."
A tool she's recently come across and won't do without is called Now That's A Jig by Brenda Schweder (now-thats-a-jig.com). This set of threaded pins and a hole-gridded anodized aluminum block not only holds wire in place for bending, but allows for quick repeatability. "I use it for things I want to make multiples of," Lansford says. "For example, the insides of my earrings are completely different. I don't try to make them mirror each other because it never works and it takes three times as long. But the outside frames are identical or opposite. I use Now That's A Jig to create the outer shapes much faster."
Hoping for No Ping
When you're dealing with thin little wires and asking them to accept being mostly tension set, there are bound to be some challenges. One is to avoid what Lansford calls "the worst sound in the world." Ping.
"You think, 'I'll just get one more wire in right here,' and they all jump out," she says, adding that it's accompanied by that dreadful sound. "I always tell my students that you can't fight physics. They ask if they have to do spirals, and I say yes. There are certain ways that the filler wires want to fit into the frame. It's like a spine. If the human spine were straight, it couldn't absorb shock. Because it has a compound S curve to it, we can walk and jump and move. It's the same with the filler wires. The curves and compound curves allow the wires to stay in there by meeting enough contact points."
Another issue is that when the heat of the torch is applied to the metal, if the wires aren't fitting as tightly as they should, the metal is going to expand with the heat and cause things to shift and move. There goes your hard work. Lansford reminds her students that soldering as you go is the best way around this. "You don't have to fill the whole piece before you solder it. If you get three wires in, great, go solder it. The more adept someone is at it, the more they can do in one pass before the ping happens. There's usually a place that I say, okay, I've gotten X number of cells filled or the space is broken up well, and I should stop and solder. It's a lot of filling and soldering, filling and soldering." For the best results, she says, be sure whatever wires you're about to solder are firmly tension-fit into the frame before soldering.
If the idea of trying to solder all those tiny wires worries you, have no fear. Much of Russian filigree is done by soldering the piece from the back using a powdered solder. Although the powdered solder is designed to flow like an easy solder, much of the zinc content of it burns off once it has flowed, making it behave like a medium solder during subsequent rounds of soldering.
For quite a while, Lansford stuck to the traditional method of making the solder, which involves alloying an ingot of the material and then filing it into a powder. "It would take a long time," she says, putting plenty of emphasis on long. Knowing that no pre-made powder was available on the market, she decided it was time to make her own. "I found a way to have that recipe already in a powdered form that gets mixed with flux. You can mix it into a paste and paint it on or you wet the piece and put the powder on and activate the flux." The powder is available through her website (victorialansford.com) and several other suppliers. "It's been good for me in my work, but it's also made the technique a lot more accessible and palatable to more people."
As you might imagine, if you've looked at filigree, finishing presents still another challenge. It is somewhat mitigated by the fact that only the outside frame ends up receiving a high polish. It is part of the art for the filler wires to have a matte finish for contrast. Still, there are things such as leftover solder to consider and, as with soldering, the best way is to clean as you go. "With sculptural pieces, I stop and do cleanup at key points because I'll never be able to get wheels in there to clean up any excess solder, or get the frame the way I want it once the pieces are folded and bent around."
Her tools of choice for this are knife-edge silicon wheels that have dulled slightly. "I use the knife edge to get into tight spaces and corners on the outside of the frames," she explains. "Once the wheels are a little dull, they are the same width as the top edge of the frame wires. The goal when cleaning up is to get a consistent clean line or curve of light across the frame wires, which is what makes them high polished in contrast to the filler wires. If I were to dig in the tops of the frame wire with the knife edge of a wheel, there would be gouges in the frame wire, and the light would not move across it consistently."
Intricate, demanding, and likely to ping at a moment's notice, filigree's risk is balanced with the reward of its flowing beauty. While it may seem daunting, as Victoria Lansford's journey through the art has shown, once you've taken the time to figure out its secrets, it's game on.
Editor's Note: This is the next article in a periodic series, "The Art of Handcraft," in which traditional metalworking techniques will be explored and explained. In this installment, Victoria Lansford of Atlanta delves into mastering the ancient art of filigree.
![]()
In association with
![]()
The award-winning Journal is published monthly by MJSA, the trade association for professional jewelry makers, designers, and related suppliers. It offers design ideas, fabrication and production techniques, bench tips, business and marketing insights, and trend and technology updates—the information crucial for business success. “More than other publications, MJSA Journal is oriented toward people like me: those trying to earn a living by designing and making jewelry,” says Jim Binnion of James Binnion Metal Arts.
Click here to read our latest articles
Click here to get a FREE four-month trial subscription.
Related Articles

Making a Filigree Wire

A Modern Method of Creating Enameled Filigree Jewelry

Platinum Wire Filigree

Filigree Remake


The All-In-One Jewelry Making Solution At Your Fingertips
When you join the Ganoksin community, you get the tools you need to take your work to the next level.

