
Techniques for Popular Finishing Touches
16 Minute Read
Precious metals are beautiful on their own, from the rich glow of yellow gold to the dense white of platinum—and everything in between. Take that as a starting point and add the kind of patterning and textural elements that come with applying a finishing treatment, and that beauty goes to a whole other level. Whether it's the tonal matte of a satin finish or the eye-catching colors of a patina, properly finished metals take on a layer of true personality.
We asked a number of top jewelers to tell us their best practices, techniques, and tips for creating satin, brushed, and hammered finishes as well as patinas on jewelry. Take notes—you'll want to test these techniques when you're done reading!
SATIN
The first three finishes we'll be looking at are well within the same family: satin, brushed, and wire brushed. Where they differ is the end look, as they range from a smooth matte to a more dramatic textured surface. Of satin, brushed, and wire brushed, the most subtle is the satin finish.
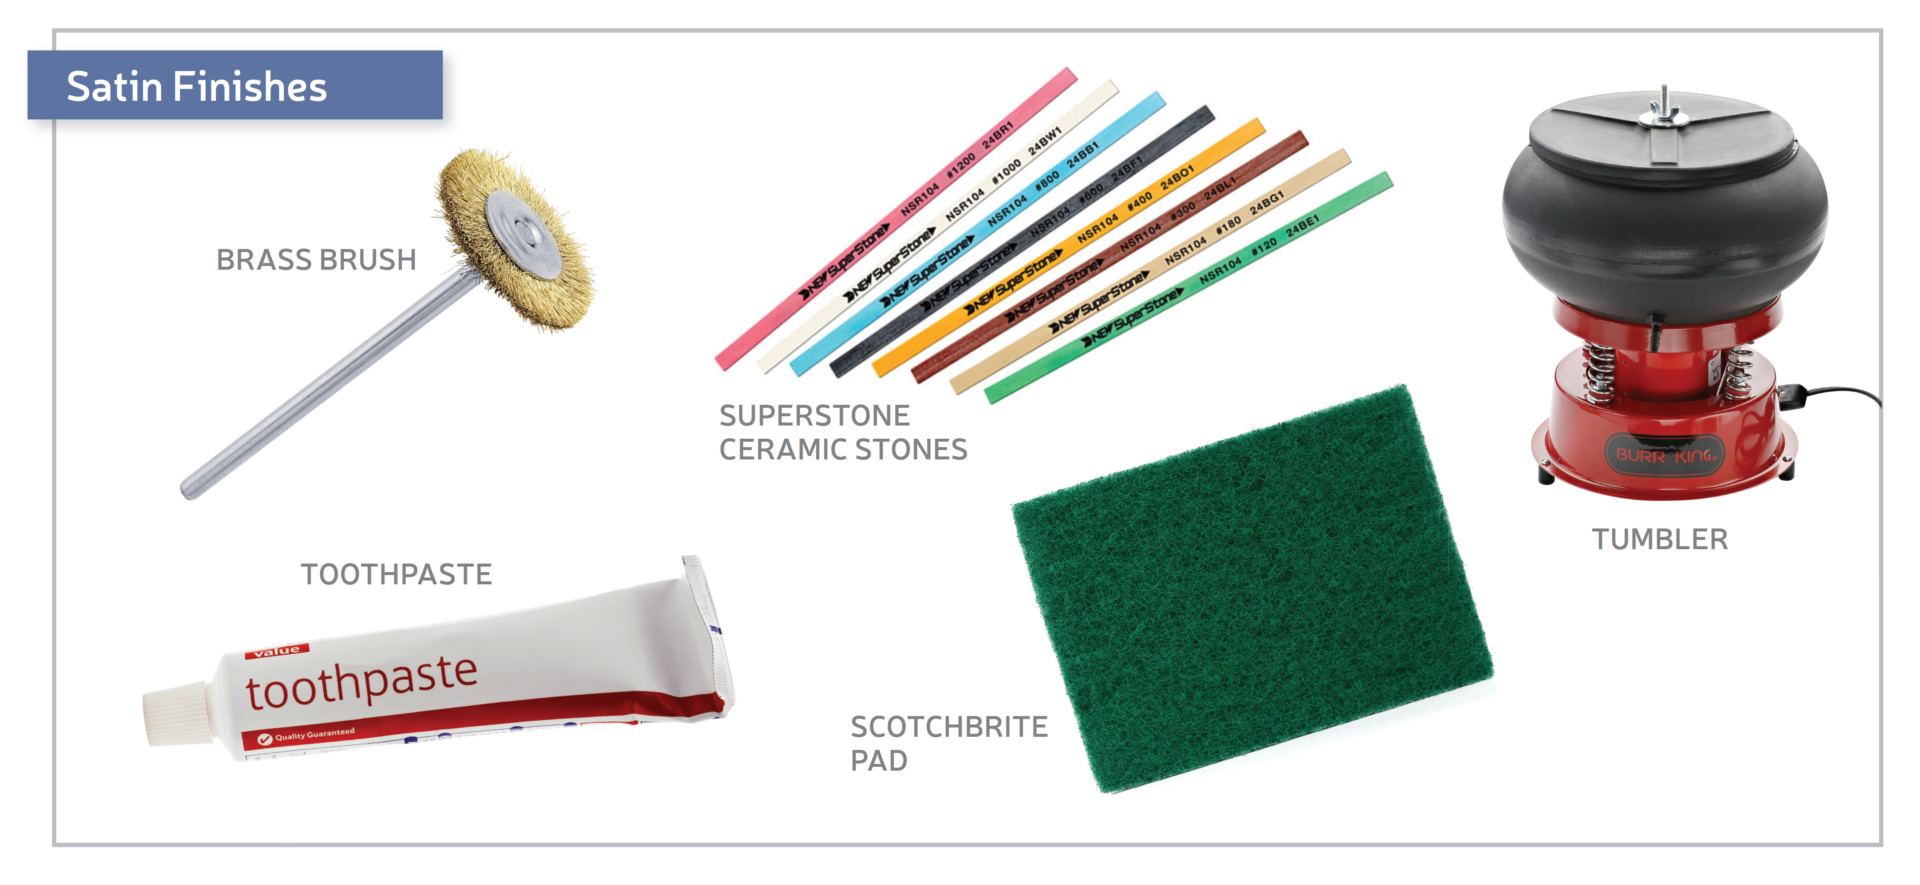
"A satin finish is a finely textured, non-reflective finish that does not have obvious scratch lines," explains jeweler and teacher Charles Lewton-Brain of Calgary, Alberta, British Columbia, Canada. "Usually it is made by scratch brushing. On silver and gold alloys, a brass brush with soapy water from a detergent or hand soap works well. It is essential to use soapy water; otherwise, the brush can transfer brass to your metal's surface."
The lines you create in the metal can be circular, straight, or in whatever pattern you choose. Lewton-Brain notes that on a satin finish, the lines are so small and subtle, they're really not notable as such.
As with any technique, ask a number of jewelers and you'll get a number of answers. To Gary Dawson, owner of Gary Dawson Designs in Eugene, Oregon, "For a true satin finish nothing used to beat a Scotch stone with the finish applied in a small circular motion."
The Scotch stone is a naturally abrasive stone typically used for sharpening knives. It came in a form roughly the shape of a pencil, except that it was square and the end could be shaped with sandpaper, enabling it to get into the smallest spots. "I like the finish left by the Scotch stone as a background texture," Dawson says. "It's not great on a forward surface as the finish is not deep, and an area textured by Scotch stone needs to be protected or on a piece that will not get much wear-related damage."
Finding Scotch stones difficult to source these days, Dawson has turned to SuperStone ceramic stones. "Originally intended for casting cleanup, they make excellent texturing tools, too!" he says. "The advantage of SuperStones is that they come in eight grits (from 180 to 1200), and they are available in several sizes, from 1 mm square to much larger." And, like Scotch stones, they can be shaped to reach into the tightest spots.
Regardless of the tools you're using to apply a satin finish, Dawson says it's important to work toward evenness. "It can be difficult. Whether applying the texture in one direction or in a circular pattern, work for consistency in the finish." Luckily, Dawson says, because satin isn't a deeply embedded finish, it's easy to fi x if you think it's gone wrong. "The best tip I can give is persistence. Keep at it until it looks right."
Consistency is also a vital consideration for Judy Hoch, a jeweler and instructor from Salida, Colorado. She likes the satin finish for the way it can improve a piece's everyday wearability. "It's a friendly finish," she says. "It survives fingerprints and daily use. It has no particular pattern. It isn't shiny enough that if you get oil on it, it changes. If you scratch it, it just looks like more of the same."
To get the consistency of finish she demands in her work, Hoch largely relies on her six-quart vibratory tumbler rather than applying the finish by hand. "I'm a big fan of Rio Grande's Clean Cut aqua cones. They give me a 3 to 5 micron brushed finish."
Another tool often used in creating a satin finish is a ScotchBrite pad. "They come in various grits," Lewton-Brain says. "They can be used dry or with a lubricant on metal. The strokes can be parallel or randomly circular. The finer the grit of the ScotchBrite used, the less obvious the marks. Pressure is also a factor in what the finish looks like." The lighter the pressure you apply, the lighter your finish will be.
If you ever find yourself completely in a pinch, Lewton-Brain says, head for the bathroom cabinet and break out the toothpaste. Rubbed on with a cloth or just your finger, the fi ne abrasives in it can help create a satin finish. And don't worry—even this unorthodox approach will create a finish that lasts as much as any other satin technique. "Any uniform finish will get larger scratches and dents from the user bashing the jewelry on things," Lewton-Brain says. "It is just that a satin finish is consistent, and takes longer to visually damage than a high polish finish."
Lewton-Brain adds that any jewelry finish will be damaged or altered through use and wear. Satin finishes and their kin tend to appear to last longer than polished finishes because they are "pre-bashed-up"—you're imparting a sense of wear to the piece as it is created.
BRUSHED & WIRE BRUSHED
A brushed finish uses many of the same tools and techniques as the satin finish. The difference is in the zegree of texture imparted, and the more obvious lines left by the brush. With a wire-brushed finish, the contrast between finishes is greater still.
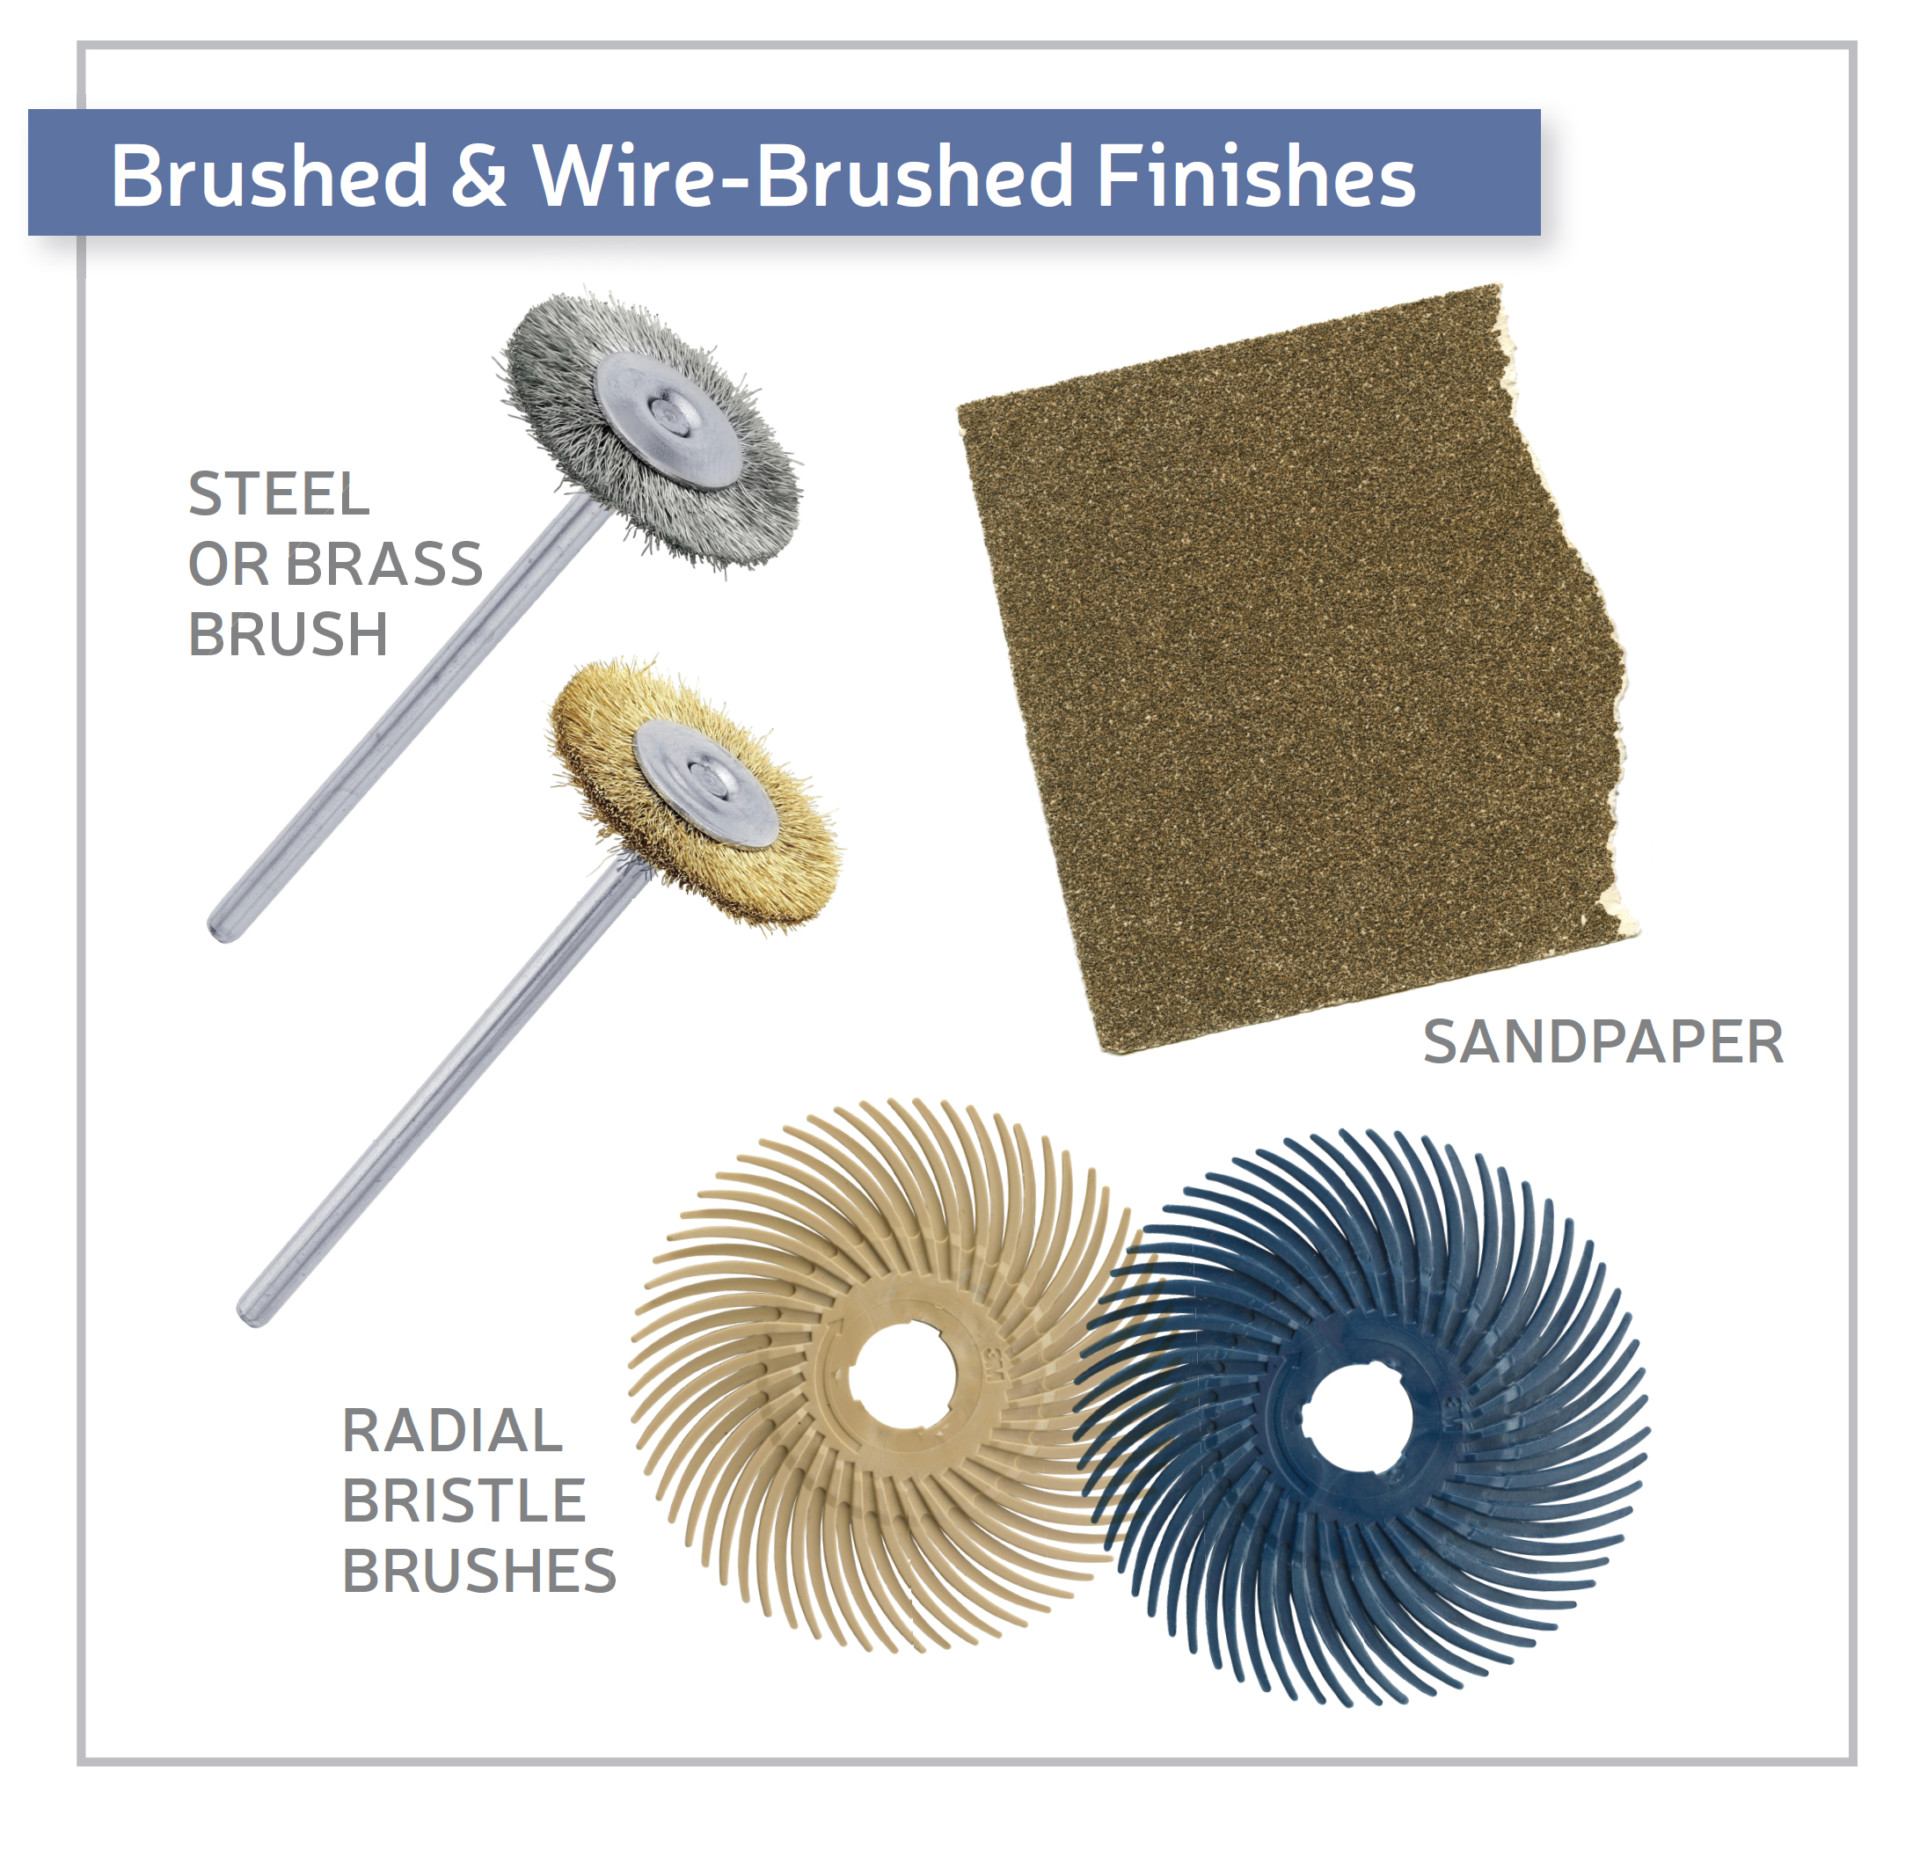
"As I understand it, the consensus is that if you can discern the individual scratches, then it is a brushed finish," says Lewton-Brain. "The scratches are often parallel to each other, say along the shank of a ring."
With a wire-brushed finish, the final texture will also depend on the wire in the brush and the metal you're using it on. As Lewton-Brain notes, a wire-brushed finish on stainless steel looks different than on fi ne brass. "A fi ne brass finish with soapy water can be termed a satin finish," he says. "A steel wire brush leaves actual small grooves and is definitely coarser."
As with the satin finish, there are many techniques and tools useful in making a brushed look. One common tool is a flex-shaft set with 3M radial bristle brushes. "The tools come in a range of grits, from aggressive to fi ne," says Mark Maxwell of Maxwell CAD in Oceanside, California. "It's mostly done with a rotary hand tool, but you can also set the brushes up on a buffing machine if you want a broader surface texture." For example, to create straight lines on a plain wedding band, you can set the brushes on your buffer, put the ring on a mandrel, and then spin the mandrel slowly to create a directional look.
Dawson likes to use sandpaper or steel or brass brushes to create his version. "The difference is primarily the grit," he notes. "Where satin is a very fine grit, brushed is more coarse." He recommends trying a pen-style brush in either steel or brass. These brushes are most often used to prepare a surface for enameling but will work well to texture softer metals. In addition, the stiffness of the bristles on these pens can be adjusted to vary the texture created.
"One could use a sandpaper of a grit large enough to leave marks, or a paste of coarser particles and water or oil rubbed on with the fingers," adds Lewton-Brain, noting that a pair of latex gloves is a good idea for that latter suggestion. "Sand, silicon carbide, or other abrasives are options. The coarser the particle, the more evident the mark."
Switching from the bristle brush to a wire brush is the last difference in these finishes. Like the bristle brushes, wire brushes are typically used in conjunction with a polishing motor or flex-shaft, and can be used with or without lubrication. Using a lubricant will create a smoother, less coarse finish. "If the brush is brass or nickel silver (called a nickel brush), it needs lubrication," Lewton-Brain says. "Otherwise it leaves brass or nickel silver on your jewelry. Stainless steel is the only one you can choose to lubricate or not." The brushes vary in coarseness for differing levels of texture.
Unsure which way to go with the brushed looks? Maxwell suggests busting out a piece of test metal and trying each one. "To get a feel for what the look will be on, say, a white gold ring, do each and see what you think."
SAND-BLASTED
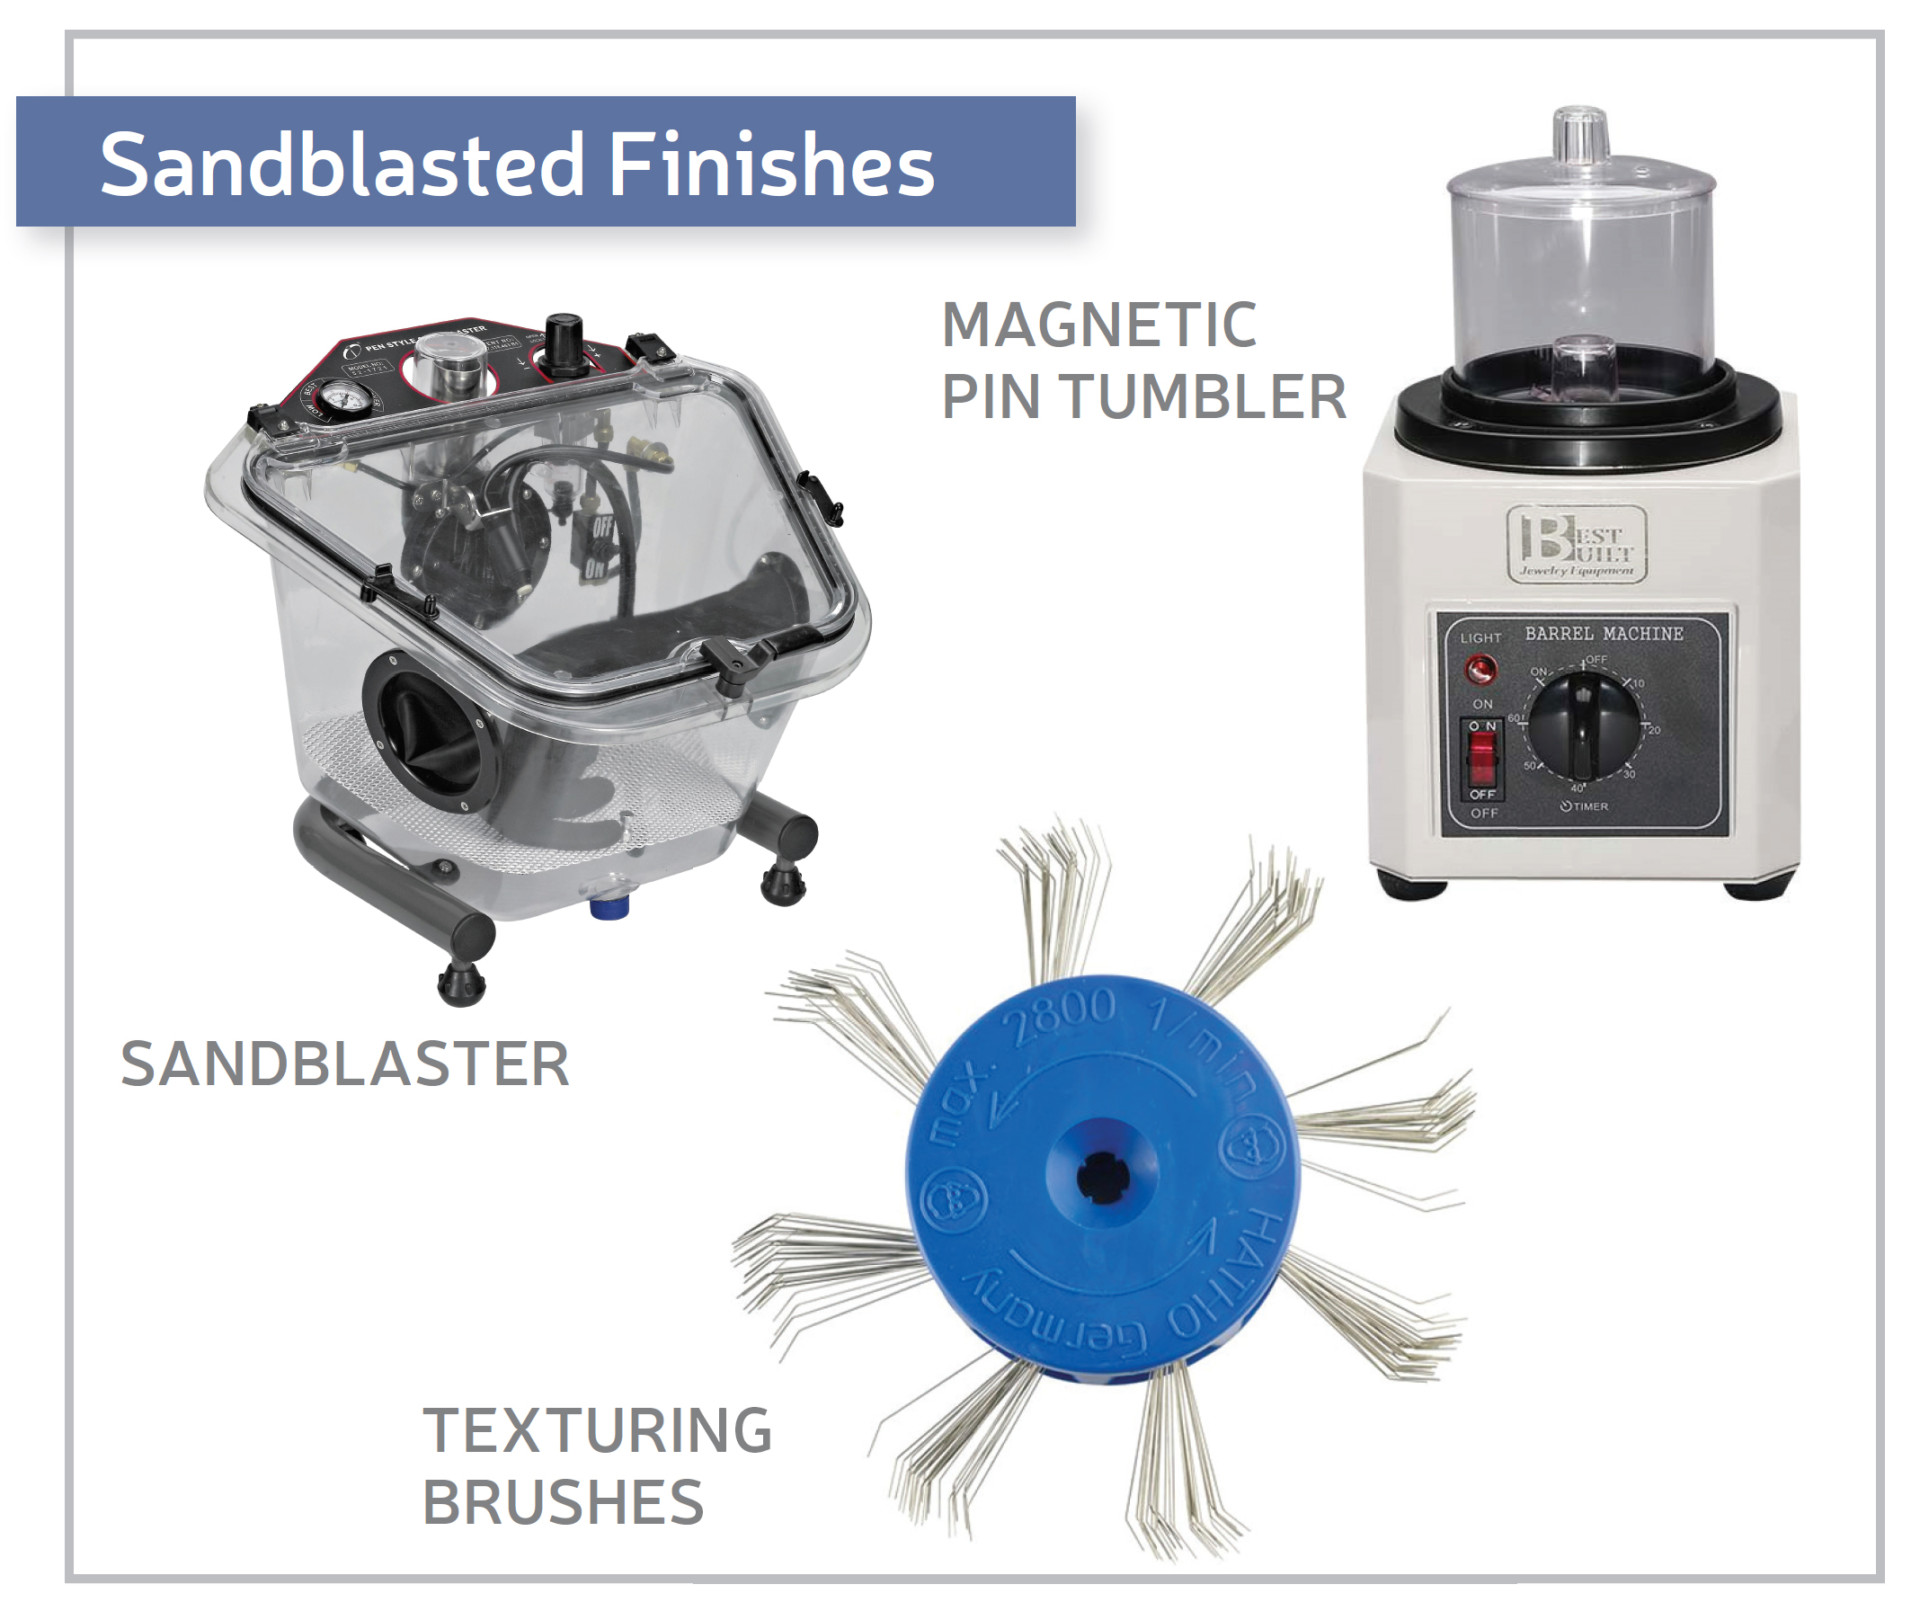
"Sandblasted" is something of an archaic term for this bombardment-style finishing technique. Because of the risk of silicosis from actual sand, a variety of media have been developed to replace it, from silicon carbide and aluminum oxide to tiny glass beads. The work is done in a chamber designed to contain the abrasive medium for operator safety, and avoiding the inhalation of airborne particulates.
"With sandblasting, you can use levels of aggressiveness," Maxwell says. "You can go from really hard silica carbide grits up to glass beading, which is one of the fi nest. They're exactly that: perfectly spherical, tiny, tiny glass beads. When they hit the surface of the metal, they hammer it—but the spots are so small, it gives a kind of soft, gentle-yet-shiny surface. It's a high polish versus silica carbide, which has coarse edges and textures."
Maxwell also likes to use glass beading on pieces with "nooks and crannies" and detailing such as undercut wires. "The glass beads can get in there and brighten up the area instead of trying to reach it with point tools to polish or burnish it by hand."
The beads, which range around 70 to 140 mesh (3 to 4 mm) in diameter, are shot from a pen-shaped tool. It is not particularly precise, Maxwell says, so masking off any areas you don't want sandblasted is a good idea. He suggests using tape or nail polish as a mask. "Anything you can easily remove later," he says.
In lieu of bombarding the metal surface, Lewton-Brain achieves a similar look using texturing brushes. "A sandblasted surface is very fragile unless it is protected by walls or is recessed," he says. "Even a fingernail can damage it. I much prefer swinging matting brushes. They are like a small, lighter version of a paint stripper—the kind you'd use with a power drill."
These tools, which affix to a rotary hand-piece, feature swinging steel wires that strike the surface. The wires range from coarse to extra fine. "They leave a texture very similar to abrasive blasting," Lewton-Brain says. "And, because they strike hard, the surface is work hardened and difficult to damage." The look achieved is the same as with traditional sandblasting, but the hardening means it will stand up to wear better.
He adds that these brushes work better on harder alloys, and that when using them you should not push hard against the metal. "You can destroy the tool," he says. "Plus, you have better control of the finish by starting light and altering pressure, or even bunching the wires together by pressing on their side while spinning to vary the look. If you are losing the steel wires off the brush, you are pushing too hard."
Alternatively, Dawson likes to use his magnetic pin tumbler to apply texture. "Unlike a swinging matting brush, the needle-like stainless media can go pretty much everywhere on the surface," he says. "The texture is a lot like glass-bead blasting media and can be used as a final finish or as a background."
When working with sandblasting media, start with a fine grit, then work your way up to coarser, more aggressive grits. This way, you can avoid doing damage to the metal that you'd just have to fix or remove later.
While the look of a sandblasted finish may be your desired result, Lewton-Brain also notes that because of the way the process activates and cleans the surface of a metal, it makes it more receptive to follow-up treatments such as oxidizing or metal coloring.
HAMMERED
While a traditional hammered finish is created by striking the metal with the round end of a ball peen hammer, there are options for achieving this wavy, organic effect as well.
"This finish normally looks best when applied to a prepared, even surface," Dawson says. "I'll often take a surface to polish prior to peening. But you can vary the look. Using a polished ball peen hammer on a prepared, polished surface creates a very dramatic, bright effect. Taking an unpolished hammer to an unprepared surface creates a 'rough-hewn' sort of look. Using a flat hammer can create a sort of 'faceted' look that can also be striking, particularly on convex surfaces."
For speed, Maxwell likes to replace the traditional hammer with a reciprocating head on his flex-shaft—with a little additional work on the bit. "You can sand, file, or shape it into a gentle or sharp dome, a bar, whatever pattern you want to recreate over and over," he says. "The beauty of using the flex-shaft is that it's very quick. You can draw or shape with it, and really control the texture because however you finished out the tool tip determines what the look is."
Another tool he likes to use in his reciprocating hammer hand-piece features an inverted bezel-set diamond, such as the Diamalite Pavé Tip sold by Rio Grande. "It is attached to a normal flex-shaft motor," he says. "The tip is screwed into the tool. The diamond is bezel set upside-down in steel. It's a little one pointer with the culet sticking out of the end of the hammer piece. You use the diamond to hit the metal and create the negative space of the culet. It makes an aggressive, stippled hammered type of texture."
While you've got that flex-shaft out, mount it with a small round bur and take Lewton-Brain's advice for an alternate method of making a hammered finish. "A small round bur can be used to make a series of divots in a surface, which, when polished, produces a lookalike for a hammered surface. This is often used when carving waxes on the inside surface of a ring, since it lightens the metal while adding structural strength."

PATINAS
Patination is the art of encouraging and accelerating a metal's natural tendency to oxidize. Whether through a chemical reagent or just through heat, patination can bring out colors ranging from jet black to red to a traditional blue-green.
"The type of metal, the temperature of the metal, as well as the temperature of the solution that you are using, the length of time that the solution is in contact and working with the metal, all determine the color," says Jim Dailing of Jim Dailing Designs in Portland and Bend, Oregon. "Typically, the deeper, richer colors involve heat in some way, either by heating the solution or the object being colored. Heat patinas tend to be more browns and reddish browns using higher temperatures and then either air cooling or quenching the hot metal. Lighter, more pastel-like colors tend to appear with lower heat and quenching. The quenching tends to stabilize or stop the coloration from continuing to change."
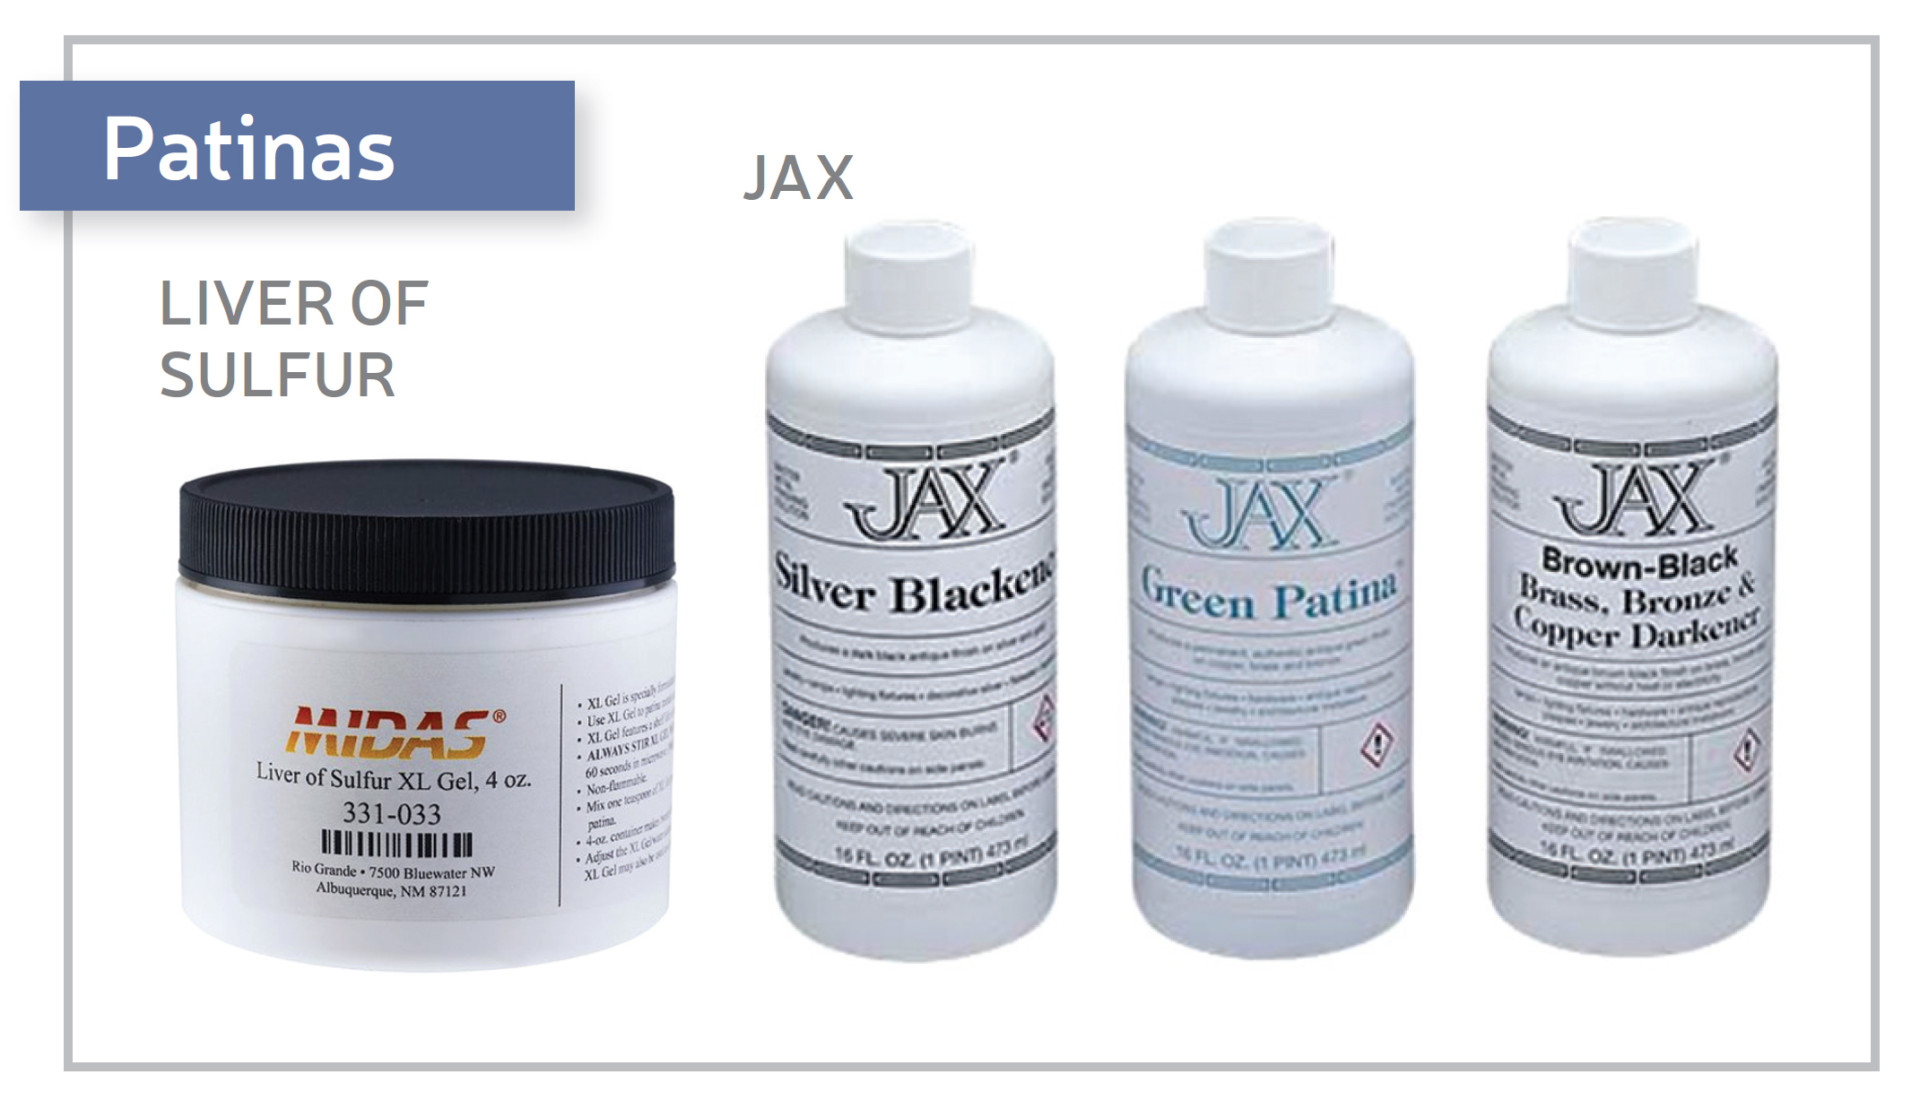
"You can get purples, golds, and straw colors with liver of sulfur on traditional sterling silver and Argentium," notes metalsmith and artist Helen Driggs of Colingswood, New Jersey.
"Patinas are usually for added contrast, introducing a broader color range than just the base metal itself," says Dailing. "It can create a more visually powerful piece."
Patination works best on alloys with a higher copper content, such as brass, bronze, or sterling silver. "The purer the metal, especially in gold, the less you're going to be able to actually patina it," he says.
Applying a patina to metal is typically the last treatment made to a piece, and the metal must be very clean prior to starting. "Some people use powdered pumice and a toothbrush to clean it," Dailing says. "That also gives it sort of a 'tooth' for the patina to really bond onto."
For Driggs, the go-to is an abrasive cleaner such as Barkeeper's Friend applied after pickling. Then it's "a brass brush and some elbow grease," she says. "For brass, you will spend a career at the sink scrubbing, but it's essential to get every single bit of grease off the metal. Grease or oil will cause a resist and the patina will not 'take' in those areas. That can really ruin your day."
With the metal cleaned, a patinating solution can be applied. The piece may be dipped into it, or it can be applied more judiciously with a paintbrush or even a spray bottle, which Driggs uses to create spots and dots. It all depends on intent and the solution used. Driggs notes that Jax Green gives the classic verdigris, while Jax Brown on bronze will create a "gorgeous rich milk chocolate color."
However you apply it, Driggs recommends taking your time with it. "Building up the color slowly before you get to the fi nishing is important, especially with liver of sulfur," Driggs says. "Don't go for jet black in one drop! Instead, dip and rinse, dip and rinse—you'll get a richer black that way."
For painting a solution onto a piece, Driggs prefers Japanese bamboo paintbrushes. "The steel ferrule on a traditional paintbrush has the potential of interfering with or fouling the results with some commercial solutions," she explains.
Once the piece has been patinated, it needs to be sealed. Otherwise, leaving the compromised metal open to the air will allow it to continue to oxidize. "Keep in mind that any patina, either created by chemicals or from heating, is simply speeding up and enhancing oxidation which will take place naturally over a period of time," Dailing says. "If the coloration is not sealed, the metal's color will continue to oxidize and slowly fade into a more earthy brownish tone. There are a number of processes or products to use. One is called Renaissance wax. Some people use a spray fi xative, shellac, or varnish. One of my issues with using spray products is that if they ever get worn or scratched, it looks like scratched plastic."
His preferred solution is to apply a paste wax, such as butcher's wax, to the surface of the piece. "I rub it on with my hands or a cloth, but not too thick. You don't want to alter the surface texture you've created. I'll let that set for 10 minutes or so to let the wax harden. Then I go in with a separate cloth and, almost like waxing your car, buff it very lightly. It protects the metal but also gives it a very soft sheen."
Typically, Dailing says, a sealed surface will last as long as it is not abraded or worn off with wear. "Objects that get less wear, like earrings and pendants, will tend to wear better longer. Rings that have been patinated will wear better longer when the coloration is contained within recessed areas."
This article scratches the surface (pun quite intended) of these fi nishing techniques. While some of the information may seem a bit Jewelry 101, in talking with each of these jewelers, one theme recurred: Try stuff. Take what you know, change something about it, and try it. You may fi nd a fresh way to create a familiar look, something that is more you. And, when in doubt, it's good to have the basics close at hand.
![]()
In association with
![]()
The award-winning Journal is published monthly by MJSA, the trade association for professional jewelry makers, designers, and related suppliers. It offers design ideas, fabrication and production techniques, bench tips, business and marketing insights, and trend and technology updates—the information crucial for business success. “More than other publications, MJSA Journal is oriented toward people like me: those trying to earn a living by designing and making jewelry,” says Jim Binnion of James Binnion Metal Arts.
Click here to read our latest articles
Click here to get a FREE four-month trial subscription.
Related Articles
Handling Stakes and Anvils

Engraving Machines

Homemade Engravers Ball

Perfect Hand Polishing Tips


The All-In-One Jewelry Making Solution At Your Fingertips
When you join the Ganoksin community, you get the tools you need to take your work to the next level.

