
Stone Setting Considerations
One of the most challenging and technically difficult of the activities involved in the creation of jewelry is the setting of gemstones. Setting the gemstones is often the final step in the entire process of making a piece of jewelry. Not only is this procedure exacting and critical in its application, it is also both taxing and stressful to the body and mind of the setter.
11 Minute Read
Most goldsmiths and makers of jewelry perform a wide variety of tasks utilizing vary diverse skills to accomplish their work. Many of these skills can require a great deal of patience and diligence to learn, and many years of practical application to master.
One of the most challenging and technically difficult of the activities involved in the creation of jewelry is the setting of gemstones. Setting the gemstones is often the final step in the entire process of making a piece of jewelry. Not only is this procedure exacting and critical in its application, it is also both taxing and stressful to the body and mind of the setter.
By the time any piece of jewelry is ready for the stones to be set there is an appreciable investment of time and material expense involved in the production of the item. At this point we want the setting process to be as problem free as possible, and we certainly don't want to damage the item being set or injure the setter. Causing any further work to be necessary, aside from the setting itself, through improper technique or the careless application of setting tools will complicate the process and add to the cost of the item. Likewise, causing injury to the setter, also through improper technique or the careless application of setting tools, will most assuredly slow down the process besides adding to the cost. Cyanoacrylate glues, bandages, gauze, and disinfectants all increase the overall expense of the studio overhead. Not to mention the downtime if an injury prevents the setter from continuing with the work.
A good approach to setting stones is to make the process as "setter friendly" as possible, beginning with the design and the construction of the item. By doing this, when the jewel gets to the setting bench the setter can proceed with confidence and not be overly hindered by anxiety over whether the work will go smoothly. Any apprehension at this stage of the work isn't conducive to making the task any easier, so a well designed setting along with the practical choice of setting style, proper tools, and applied technique are essential to the successful outcome of the project.
The gemstone in any article of jewelry will likely be the single most valuable or expensive component in the piece. Unlike precious metals, gemstones are decidedly fragile, particularly unforgiving, and not highly recyclable. If gold, silver, or platinum objects fail or are damaged in the construction process they can quite likely be repaired and resurrected. In the worst-case scenario they can at least be melted down and reused, albeit at a considered loss of time and material. The precious metal can be reclaimed and eventually become another item of jewelry. Gemstones, by comparison, cannot generally be reused if damaged and quite often they are not easily replaced.
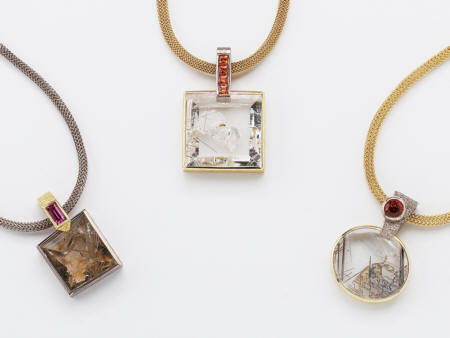 |
| Munsteiner Quartz Pendants |
Aside from the choices in setting style and the applied technique used in any item of jewelry, there are several other preliminary considerations to be addressed. Two of the most important issues involved in this process are adequate lighting and proper visual aides. Being able to see the work clearly is one of the most important factors for safe and effective setting.
An optivisor or other system of magnification is essential. Most setting will be done with a 5 power or 7 power lens. Using less than this level of magnification is usually insufficient for most gemstone setting procedures. Often the work will be monitored occasionally with a 10 power loupe to determine the progress. Having adequate magnification will produce less eye strain and allow the setter to work at the task for longer periods of time. Additionally it allows the setter to see the work in close detail and precisely control the action of the tools and the positioning of the stone and the setting.
As the magnification factor increases, the focal distance of the lens decreases, so a stronger lens requires that the work be closer to the eye. Many stone setters today use a microscope for certain applications of their craft. In this situation the work will be accomplished with the hand position closer to the bench tray, perhaps just above the lap. In more traditional stone setting procedures using an optivisor type headset or glasses most of the work is accomplished while holding the item at the height of the bench pin.
Proper illumination is equally as important as adequate magnification. For the detail of the work to be visible, even to the well aided eye, having plenty of light is crucial. Eliminating strong shadows in the working area when setting stones allows us see the work and the tools more clearly. The better we can see what we are doing the more we can control the movement of the tools and the position of the gemstone. Sometimes a single light source or single type of light is not enough. I use three swing arm type bench lights on my setting bench. Two of them have incandescent bulbs and a third has both incandescent and florescent light sources. I find the swing arm lamps are very functional due to their mobility. I can position each of them to whatever angle best serves my purpose as I approach the work. Sometimes it is necessary to illuminate the item being set, other times it is preferable to illuminate the stones. By placing the lamps directly above as well as on both sides of the work I can flood the entire area with light and reduce any shadowing.
A third area of great importance to the process of setting stones is having reliable tools to work with, and using them correctly and safely for both the stone and the setter. One of the most important tools used in stone setting is an engraver's ball. Also called an engraver's block or setter's block. This device is a heavy metal sphere which opens and closes like a vise. The sphere is divided in two halves, a top and bottom, which allows the top half to rotate while the bottom remains stationary. The Engraver's ball sets on a donut shaped base usually made of horse hair, rubber or wood, similar to the pad used under a pitch bowl. This allows the ball to be swiveled to any angle in addition to rotating.
The main feature of the engraver's ball is that it allows the work to be secured in place and held in a steady immobile position. Being able to hold an item securely is essential to most setting applications. There is a set of attachments for the engraver's ball which can be used to clamp nearly any shape of object into the vise. In addition to using the attachments an item can be affixed to a shellac or dop stick or secured in thermoplastic material and then clamped in the ball.
The ball allows the object to be positioned at any angle to make it easily accessible to the tools while keeping both hands free to accomplish the work. It is easy to reposition the work as necessary by rotating and swiveling the ball without having to remove and re-clamp the object in the vise jaws for each change of position.
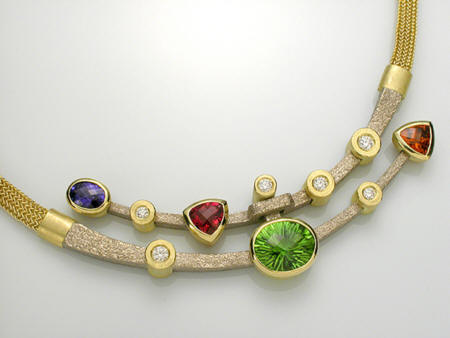 |
| Constellation Necklace |
Microcrystalline wax, also known as setter's wax or sticky wax, is also widely used in stone setting applications. It can be applied to the end of a dowel to make a wax pen for picking up and moving stones about with ease. It is also used to hold the stone itself securely in position in the setting while beginning to tighten the stone in place. A thin snake of wax can be rolled out and applied over the stone, like a piece of tape to hold it in place. Additionally, once the stone has been positioned in the setting the wax can be applied in-between the stone and setting to keep the stone from moving as the work of tightening the setting is accomplished. In this instance it is often necessary to periodically remove the wax by gently brushing with warm soapy water and a soft toothbrush and check the progress of the setting. If the stone is not entirely secure in position and tightened sufficiently it may be necessary to reapply the wax and continue the tightening procedure.
When setting a bezel using this technique of applying a small amount of the wax between stone and bezel, the wax will squeeze out from the bezel as the metal moves down onto the stone and becomes tight. Once the stone has been secured in place the excess wax is removed by cleaning as described above, or by running briefly in the ultrasonic if the gemstone allows it, and then rinsed and steamed.
The majority of the setting work I do requires the use of a hammer and punch. The metal is pounded down onto/over the stone by hand to accomplish the setting. A reciprocating hammer attachment for a flexshaft can also be used in place of a hammer and hand held punch. Personally, I prefer the latter as it allows me to feel the movement and compression of the metal through the punch as it is being applied. Using a hammer and punch also allows me better control of the force and direction of the strike which provides more accurate effect upon the metal being moved. There are many sizes of chasing hammers available with differing weights and face size. It is advisable to have a few to choose from to allow using the right tool with the right amount of force, rather than striking too firmly with too light of a hammer which reduces the control of the punch and the effectiveness of the tool.
Virtually any kind of punch can be fashioned into a setting tool and quite often it is necessary to make or amend a tool for a specific setting job. Setting punches should be neither too long, which makes them unwieldy, nor too short, which makes them difficult to strike. A good length for most applications is 3 to 4 inches. If the punch is too short it will result in repeatedly hitting the index knuckle with the hammer when striking the punch. Not only is this uncomfortable and annoying, it also does little to enhance the accuracy of the hammer strike. Chasing tools can be fashioned into good punches provided they are not too slender nor lightweight. The tool needs to be heavy enough to persuade the metal being addressed to move under the strike of the hammer. The face of the punch should be well scaled and shaped to suit the particular application. The end being struck should have sufficient surface area to allow it to be struck soundly and without a tendency for the blow to glance off the punch. Tape can be applied to the shaft of the punch to make it more comfortable in the fingers and to promote a better grip. At all costs we want to avoid having the tool slip as it is being struck with the hammer, as well as avoiding fatigue in the fingers and hand from holding a tool which is unwieldy.
 |
| Ring to Brighten a Rainy Day |
My favorite and most frequently used setting punches are a trio of nail setting punches I bought at a hardware store. The nail sets have a textured tapered shaft and a larger square end which makes them easy to strike. They also have substantial weight which is helpful in encouraging the metal to move when working with a heavy bezel or thick walled tubing. By flattening and smoothing the faces I have three punches with varying size of round faces. This gives me an adequate tool selection to suit whatever surface of metal I need to address. I also find that the round flat face is far less likely to mar the surface of the metal as a square or rectangular face with sharp sides and corners. The round face can be ever so slightly beveled or chamfered at the edge to make it even less likely to leave an unwanted mark on the metal being struck. It should be mentioned that this adjustment to the punch can also make it more prone to slippage if not used with appropriate caution.
When I am pounding down the metal on a thick walled bezel I can achieve a planished and burnished surface on the tope edge of the bezel as the metal compresses under the punch. By moving the tool steadily and sliding it along the bezel as the punch is struck it leaves a very smooth even face which is relatively free of punch marks that need to be filed or otherwise removed. This is quite beneficial when working with gemstones which are particularly susceptible to scratching as it eliminates the need for running a file along the bezel edge to correct it.
If there are marks from the punch which do need to be removed it is best to use a fine cut safety file which has at least one polished face to avoid marring the stone. It should be kept in mind that even a polished file can make a mark on a facet junction if used carelessly or with too much force. Many setters rely on the flexshaft and silicone discs and wheels to dress and polish the bezel edge after setting. If this is done it is best to be aware that incorrect application of the rotary tools or excessive pressure can result in a wavy or rippled surface to the metal. I feel it is best to use a file only when necessary to keep the bezel flat and even, and to polish a finished setting as minimally as is possible.
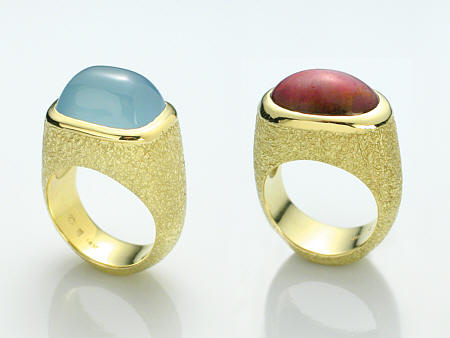 |
| Aquamarine and Star Ruby Cabochon Rings |
A professional approach to setting gemstones is one which encourages familiarity with the appropriate tools and techniques and allows sufficient time devoted to achieving proficiency. This promotes confidence in one's abilities and helps to ensure the work is both effective and efficient in its application.
As with most other aspects of goldsmithing and jewelry making, caution and patience are the artist's most reliable companions.
Related Articles

Basic Gypsy or Flush Mount Setting

Modifying Beading Tools

Modified Split Mandrel to Bezel-Set Round Stones

The Basic Techniques of Shell Inlay


The All-In-One Jewelry Making Solution At Your Fingertips
When you join the Ganoksin community, you get the tools you need to take your work to the next level.
