Sand Casting Method
Though sand casting has been largely replaced by centrifugal casting in recent decades, for hundreds of years it was the most popular of all casting methods. It still plays an important role in the production of large metal forms, and can offer the advantages of low cost, quick results and ease of duplication to those goldsmiths who take the time to master it. Though sometimes thought of as coarse, sandcasting can yield results that are as fine and true to detail as any other casting method.
5 Minute Read
Though sand casting has been largely replaced by centrifugal casting in recent decades, for hundreds of years it was the most popular of all casting methods. It still plays an important role in the production of large metal forms, and can offer the advantages of low cost, quick results and ease of duplication to those goldsmiths who take the time to master it. Though sometimes thought of as coarse, sandcasting can yield results that are as fine and true to detail as any other casting method.
Mold frames or mold bottle
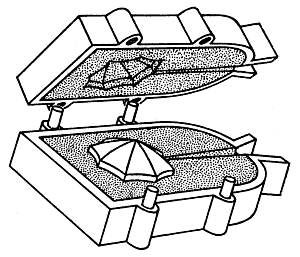
There are many variations possible, but the most common mold frames for small scale work are made of steel or aluminum and consist of a pair of almost identical rectangular frames; boxes with neither a top nor a bottom. Each has an opening cut in one of the narrow sides, usually enlarged by a range that creates a funnel when the frame halves are put together. The only difference between the parts is that one unit, called the cope, has registration pins projecting out from it, while the other half, the drag, has tabs to receive those pins. These hold the frame together and make it possible to line up the sections perfectly.
Preparation of the sand
Dry molding sand is passed through a fine sieve into a bowl and slowly moistened with water, kneading aggressively to insure even distribution of the moisture. The sand is worked until it is pliable and easy to shape. The consistency is correct when a lump squeezed in the hand retains its shape even when it is tossed into the air and caught.
Preparation of the mold
The octagonal chased brooch illustrated in figure 4.27 will be used here to describe the process of sand casting. The drag (the mold half without the pegs) is placed on a piece of plate glass with its inner edge facing down. The model is set onto the glass in the lower third of the frame and both model and frame are dusted with parting powder. Traditionally this is a yellowish, fine-grained powder derived from plants of the Lycopodiaceen group. Talcum or cornstarch can be substituted. Whatever the powder, a tablespoon or so is placed in the center of a small patch of linen or cotton fabric, whose corners are then pulled up and bound with a cord. The idea is to make a bulb of the powder that will shed a fine dust when it is shaken or tapped against an object.
 |
| Figure 4.27 - Mold frame for sand casting |
The prepared sand is sprinkled over the model and into the frame until it is perhaps a centimeter thick. This is then pressed down with the fingers, starting gingerly but progressing until it is compacted under considerable pressure. The degree to which the sand is pressed against the model will affect the detail achieved in the casting. More pressure will yield a better result.
The frame is filled to overflowing with more sand, which is again pressed into place, starting gently but continuing until it is packed under great pressure. Use a block of wood as a ram to pound the sand against the model, continuing to add sand as necessary to insure that the mold is filled to its top edge. This ramming explains why it is important for the model to be made of a sturdy material. The top surface is made level in a process called "striking off" by running a piece of wood or a steel bar along the top of the mold.
A second piece of wood, glass or Plexiglas is set on top of this piece of the mold frame and held in place while the whole unit is flipped over. The top piece of glass (the one that was originally on the bottom) is removed and the other half of the mold frame is lowered carefully into position, aligning the pins to insure an accurate fit. The exposed surface of sand is dusted with parting compound. As before, sand is sprinkled into the frame and packed, starting lightly but ending with a ramming stroke from a block of wood. Enough sand is added to be certain the mold is completely filled, then it is struck off to make a smooth flat surface.
The mold halves are then separated by gently lifting off the top half. The model itself is pulled from the sand with tweezers, taking pains that the sand is disturbed as little as possible. A casting gate or sprue is cut into both halves of the sand, using a blade or needle to scoop sand out, starting at the model area and moving to the open section of the mold wall. One advantage of starting at the model is the lower chance of spilling sand into the model cavity. The passage thus carved is smoothed and strengthened by brushing it with a fine paintbrush dampened with water. This will improve the flow of the liquid metal and prevent loose sand particles from being torn off and carried along with it.
The casting gate should be as long as possible to allow the weight of the metal trapped there to exert its push against the casting as it cools. This increases the likelihood of creating a dense casting, which is desirable. Because the porosity of the sand allows whatever air is in the cavity to escape in advance of the in-rushing metal, vents are not usually necessary for jewelry scale objects. As a last step before casting, the mold is checked carefully to be certain that no loose sand has fallen into the cavity, and that the gate offers a wide smooth entrance for the pour. One section of the frame is then lifted carefully, inverted and slowly lowered into position on its mate. Flat boards are placed on either side of the mold to hold the sand in place. These are clamped to secure them, but not so tightly that the sand is collapsed.
Preparing to cast
The mold is slowly dried by indirect heating, for example in an oven. If the drying goes too rapidly the mold can crack. To determine whether all of the water contained in the mold has been driven off, hold a mirror close to the pouring gate. A telltale mist on the glass will indicate the presence of moisture, indicating the mold is not yet ready for casting. If no moisture remains in the sand, the mold can be heated with an open flame until it is hot enough for casting. The metal is heated to a temperature about 150oC over the liquidus temperature and poured into the hot mold.
Excerpts from the book:
The Theory and Practice of Goldsmithing
By: Prof. Dr. Erhard Brepohl
Translated By: Charles Lewton Brain
Edited by: Tim McCreight
Brynmorgen Press
ISBN 0 9615984 9 2![]() Get your own copy of The Theory and Practice of Goldsmithing
Get your own copy of The Theory and Practice of Goldsmithing
Related Articles
Sand Casting Safety Notes

Ador: Professional Arts Guild

Turkish Jewelry Industry

How to Make Foredom Handpiece Shield


The All-In-One Jewelry Making Solution At Your Fingertips
When you join the Ganoksin community, you get the tools you need to take your work to the next level.
