
Revising Milled CAD/CAM Models
I have great respect for the capabilities of CAD/CAM technology, and Ive seen some absolutely amazing pieces generated by it. Ive also seen some pieces that miss the mark; they need some simple revisions to make them easier to produce and aesthetically pleasing. I asked Marc Williams of MarcCo Jewelers in Luzerne, Pennsylvania, for an assortment of CAD castoffs -- pieces with "issues" that I could use to demonstrate how to resolve production and design problems. Ill evaluate and revise the first of these pieces here, and others will follow in subsequent issues..
5 Minute Read
The process involves examining, evaluating, revising, and repeating until the piece is done. If you have time, you can make these adjustments on the computer and mill a new model. But sometimes it's quicker to make the changes by hand — and it's really helpful to know how. Finessing the models by hand helps you to see, feel, and understand form and construction — leading to a greater understanding of the design process.
Author's Note: I have great respect for the capabilities of CAD/CAM technology, and I've seen some absolutely amazing pieces generated by it. I've also seen some pieces that miss the mark; they need some simple revisions to make them easier to produce and aesthetically pleasing. I asked Marc Williams of MarcCo Jewelers in Luzerne, Pennsylvania, for an assortment of CAD castoffs — pieces with "issues" that I could use to demonstrate how to resolve production and design problems. I'll evaluate and revise the first of these pieces here, and others will follow in subsequent issues.
While examining the piece, ask the two magic questions: Where is my eye being pulled? and Why? Ask these two questions continuously when designing on the computer or on paper, and keep asking the same questions while you are working on the milled, grown, hand-carved, or fabricated pieces. When something is out of whack, disproportionate, or incongruous, it creates a visual tension that is compelling. Adjust, repair, and rework the area that causes the visual tension, then keep looking around the piece, asking the questions repeatedly, and modifying. When all the visual tensions are resolved, you (and your customer) will look at the piece and be pleased.
Revising a Bypass Ring | |
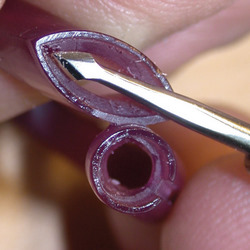
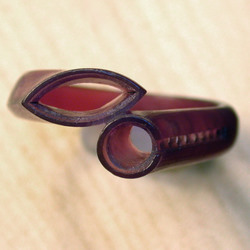
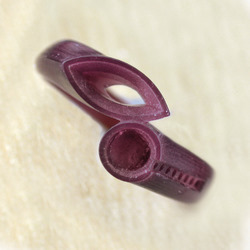 | Start by evaluating this bypass ring for production issues, aesthetics, and wearability. This is a right-hand ring. (Most bypass rings are hand-specific; if worn on the left hand, this ring will sit crooked.)Notice that the seat for the marquise is too wide. It's nearly impossible to match every facet of the pavilion and girdle — and if the seat is wide and not fitting the stone properly, the pavilion facet junctions will be under a lot of pressure, and the points of the stone will have added stress. The setting will need to be modified. Next note that the surface of the wax is textured from the milling tool. It will take just a few minutes to refine the surface by hand. |
 | Upon examining and measuring the ring with a spring gauge, you will see that the wall thickness provides reason for concern. It tapers abruptly from 5 mm to 0.4 mm. This could cause shrink tear porosity at the thin areas. It will cast and inject better if the wall thickness tapers gradually. For a ring like this, you can make the bottom of the shank 1.6 mm thick and gradually taper it to 0.9 mm at the thinnest area at the top. |
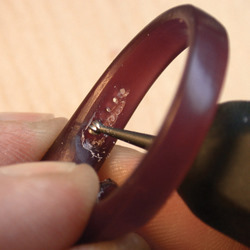
 | Inspection of the channel reveals that the holes are 0.6 mm in diameter, and some are 4.5 mm deep. These look problematic. If you can get the mold material to fill the holes (creating thin rubber rods), the wax that is injected into the mold will most likely push the thin rubber rods around, resulting in a very funky injection. Hollowing the ring will make the holes 0.6 mm (inner diameter) by 1 mm long. You should also countersink the holes from the back. |
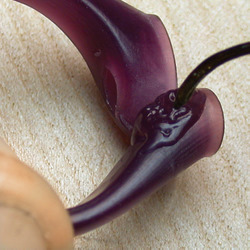
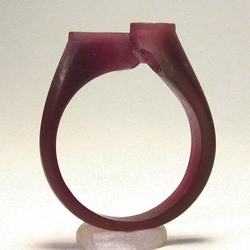 | Examining the side view, check where your eye is being pulled. The ragged hole under the round setting is distracting here; it looks abrupt and it interrupts the S curve that your eye wants to follow from the left side of the round bezel to the inside of the shank. |
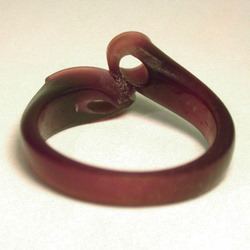
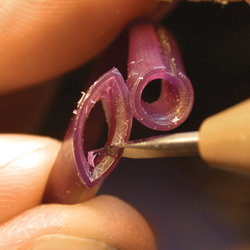
 | Fill in the raggedy hole and hollow the ring out in a way that will inject and cast better. |
 | With a wax pen or a dental pick heated over an alcohol lamp or torch, pick up the same kind of wax from which the piece was milled. To achieve a good, clean bond, melt the surface of the repair area while depositing the new wax.This figure shows the ring being built up, but the surface is lumpy. If you look closely, you'll notice strings of wax coming off the model and air bubbles trapped below the surface. That's because the wax pen is not hot enough. The proper temperature is between smoke and string. If the molten wax is smoking, it's too hot and getting close to the flash point. If the wax is stringy and mixed with air bubbles, the wax pen is too cool. Find the right temperature and build up the wax until you have enough. |
 | File the built-up area a bit if necessary or skip to the next step — scraping with the back edge of the carving knife. Blend in the repaired area until it looks visually pleasing. |
 | Use a wax bur to hollow the back of the shank. |
 | To continue hollowing and refining the inside of the ring, use whatever carving tools match the desired surface. Check the wall thickness with a spring gauge. |
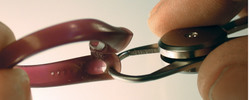
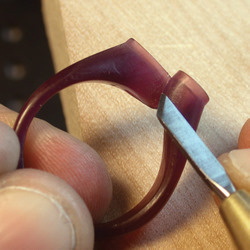
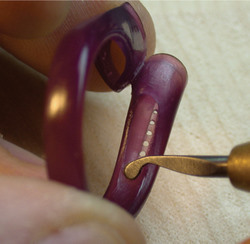
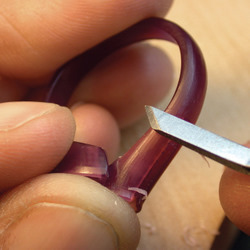
 | Now you're ready to adjust the setting. The most fragile parts of a marquise are its points. Blaine Lewis of New Approach School for Jewelers in Virginia Beach, Virginia, has a method for modifying settings that reduces breakage significantly. In the wax, use a diamond point carver to remove material from where the girdle of the stone touches the corner, down past the edge of the seat.Now the stone is not supported at the points. |
 | The seat of the setting is approximately 2 mm wide. It should be narrower (0.5 mm is plenty) to prevent excess pressure on the facet junctions. Use the back edge of a carving knife or a tapered triangle carver to shave the seat. |
 | To finesse the piece, use the back edge of the carving knife, and, with light, overlapping strokes, scrape over the surface to remove tool marks. I also rounded the outside of the shank. |
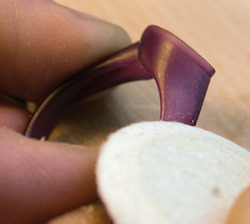 | Use a knife-edge felt wheel (the one you'd use to polish metal, but without polishing compound) to rub over the surface of the wax to smooth it. |
 | The piece is finished. |
To continue honing your model-making skills, flip through trade magazines, look at the jewelry, and ask the questions: Where is my eye being pulled? and Why? And be sure to keep these two important questions in mind when designing or working at the bench. Asking and answering them will improve your work and make your processes more enjoyable.
![]()
In association with
![]()
The award-winning Journal is published monthly by MJSA, the trade association for professional jewelry makers, designers, and related suppliers. It offers design ideas, fabrication and production techniques, bench tips, business and marketing insights, and trend and technology updates—the information crucial for business success. “More than other publications, MJSA Journal is oriented toward people like me: those trying to earn a living by designing and making jewelry,” says Jim Binnion of James Binnion Metal Arts.
Click here to read our latest articles
Click here to get a FREE four-month trial subscription.
Related Articles

Low-Cost Rapid Prototype Systems
Platinum Fabricating & Stamping

Optimising Gold Alloys for Manufacturing

Hard 22 Carat Gold Alloy


The All-In-One Jewelry Making Solution At Your Fingertips
When you join the Ganoksin community, you get the tools you need to take your work to the next level.

