
Restoring a Hollow Link Bracelet
This 14 karat white and yellow gold two tone bracelet has hollow wire
 links. The link near the clasp which receives most of the wear on the
 bracelet is broken and several of the other links are cracked or
 smashed and need to be refurbished. To repair the broken link, begin
 by using the point of a fine watchmakers tweezers to spread the link
 open to regain the original round shape of the link. Then make sure
 that the link fits back together tightly. Select a piece of 14 karat
 yellow gold wire that will fit snugly inside the link.
4 Minute Read
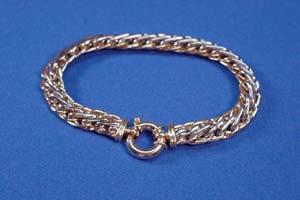
This 14 karat white and yellow gold two tone bracelet has hollow wire links. The link near the clasp which receives most of the wear on the bracelet is broken and several of the other links are cracked or smashed and need to be refurbished.
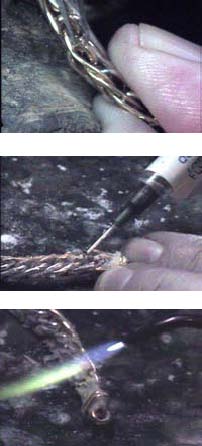 | To repair the broken link, begin by using the point of a fine watchmaker's tweezers to spread the link open to regain the original round shape of the link. Then make sure that the link fits back together tightly. Select a piece of 14 karat yellow gold wire that will fit snugly inside the link. |
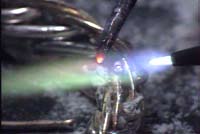
| Then use 14 karat easy flow paste solder and using the needle point of the syringe insert some paste solder into each side of the link. Then place a small piece of the wire inside the link and close the seam together. By placing the wire inside the link provides a larger surface area to solder and will create a stronger solder joint. | |
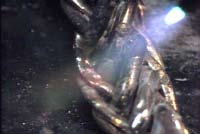
| To make a nice smooth joint you may have to add a little bit of 14 karat easy flow solder. Use a fine tip on your torch solder with a slightly reducing flame; you want a bushy flame not a real tight cone to the flame as that would melt the link. Using a pick place the solder on the joint and flow the solder. Use the pick to help shield the heat from the other links. Because the center links are white gold and have a higher melting temperature it's a little easier to solder the outside yellow links without melting the adjoining links. When cooled, repeat the process on the other side of the link. | |
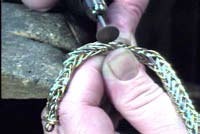
 | Next we need to repair some of the other links. This link is split lengthwise and we need to re-solder the seam on the outside of the bracelet. Notice the wire lying on the solder pad which points to the link that needs to be repaired. This helps us find the damaged link after we lit the torch and are ready to solder. |
Place a small ball of 14 karat Easy Flow yellow gold solder on top of the seam that needs to be soldered. Then gradually heat the seam until the solder flows down into the joint. If the solder flows to one side of the joint adding another ball of solder to the opposite side and then using the pick to smear the solder across the joint will help in closing the joint. Continue down the link just adding a very small ball of solder and heating it until it melts into the seam and then place another ball of solder next to it until the seam is completely closed. Because the gold in the link is extremely thin, using several small pieces of solder placed along the seam will be easier to keep the gold from melting than using one larger piece of solder and trying to flow it down the seam. | |
 | On the link that is smashed flat, we're going to use solder to build it up. Throughout this project we are using 14 karat plum solder, if you used a repair solder on this bracelet the solder would tarnish in time and would not provide a satisfactory repair. By using plum solder it will not darken or tarnish as it is worn. So, much like an auto body repairman would use body putty to fill in dents on a car, we use the solder to fill in the dents on the hollow link. |
Karat gold is an alloy and the metals in the alloy melt at different temperatures. All gold solders list two temperatures, one is the melting temperature, and the other is the flowing temperature. When one alloy begins to melt you have reached the melting temperature, when all the metals in the alloy melt you have reached the flowing temperature. We use this to our advantage in this repair. Heat the solder until it melts but not so hot that it actually flows. It is in this state that we can use the solder. Because it has begun to melt it will fuse to the metal in the link, but because some of the alloy is not melted it will retain its shape and build up on top of the link. After all the soldering is completed we need to clean up the bracelet links. Begin by using a gray silicone abrasive wheel. This is slightly courser than a pumice wheel. This allows us to grind away just a slight amount of the solder and blend it into the gold link but not so abrasive that it aggressively cut the gold. If you used any courser rubber wheel, it would be very easy to grind away too much of the gold link and actually cut holes into the hollow link. | |
 | Once the outside of the link is smooth, use a brown knife edge silicone wheel, which is a finer abrasive than the gray. The knife edge allows us to get down in between the links to clean up the sides of the link, and the finer abrasive makes it easier to polish when we're done. Carefully go over each of the links that were soldered smoothing out any of the solder that's left on the link and shape the links to form a nice round surface on the outside. |
 | Next polish with a bristle brush using Fabulustre or White Diamond Compound. These are abrasive enough to take out any of the marks left by the rubber wheels, while leaving a nice bright polish on the bracelet. Work down in between each of the links and polish them to a high shine. After cleaning in the ultrasonic the bracelet restoration is complete and it's ready to be delivered to your customer. |
Related Articles

Craftsmanship Improvement Method

The Enameled Murals

Fads and Fallacies: Melancholic Designs

The Metallum Gallery and Showroom


The All-In-One Jewelry Making Solution At Your Fingertips
When you join the Ganoksin community, you get the tools you need to take your work to the next level.
