
PMC and Faux Bone Project
It is easy to forget that when we remove PMC from the kiln, what we have is a piece of metal and we can bring to bear on that piece any and all of the myriad techniques employed in regular metalworking.
 With our standard PMC tools and not much more than an additional file, hammer, and a drill, we can incorporate other materials into our PMC and our PMC into other materials. I am using for this project Faux one, a PVC product that is easy to use, extraordinarily durable, inexpensive, and safe. It can be hammered, filed, sanded, polished, heated, molded, drilled, and carved. The PMC can be pushed around or into it and it is so tough you can hammer on it, which I do in the project presented here.
7 Minute Read
Robert Dancik has been an artist and teacher for more than 30 years. He teaches workshops at art centers in the US and abroad and his work is found in numerous collections. He is a partner in the gallery "zoe & floyd" in Seymour, Connecticut, near his home in Oxford, where he is an avid cook and collector of toys, maps, and compasses.
The malleability of PMC in its wet state makes it easy to form, mold, and connect. After firing I have found the resulting fine silver pieces (which are fully annealed) just as malleable, although in a different way. It is easy to forget that when we remove PMC from the kiln, what we have is a piece of metal and we can bring to bear on that piece any and all of the myriad techniques employed in "regular" metalworking. (Or sculpture or collage or printmaking, for that matter.) This does not mean we need a host of tools or an elaborate workshop. With our standard PMC tools and not much more than an additional file, hammer, and a drill, we can incorporate other materials into our PMC and our PMC into other materials.
The other material I am using for this project is Faux one®, a PVC product that is easy to use, extraordinarily durable, inexpensive, and safe. It can be hammered, filed, sanded, polished, heated, molded, drilled, and carved. The PMC can be pushed around or into it and it is so tough you can hammer on it, which I do in the project presented here.
For this project I have sawn the Faux Bone®, filed, sanded, and polished it (all by hand — it's quick work), and then riveted on a fired strip of PMC. Two eye pins and a chain and you're done!
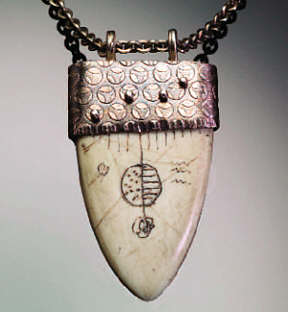 |
Completed piece. |
Materials
- PMC (Original, PMC+, or PMC3)
- 1⁄4″ white Faux one® sheet (available at Crackerdog esigns)
- 2″ 16 gauge sterling silver round wire 2″ 14 gauge sterling silver round wire
Tools
- Texture plate or stamps
- Needle tool or blade for cutting PMC
- Saw (jeweler's saw or similar such as coping saw, band saw, jig saw)
- Files
- Silicon carbide (wet/dry) sandpaper: 320, 400, and 600 grit
- #52 and #55 drill bit
- Drill or flex shaft machine
- Round face hammer
- Metal block to hammer against (a regular hammer clamped in a vice with the flat face up is fine)
- Burnisher
- Round nose pliers Awl or needle tool Wire cutter
- Zap-a-Gap (or other cyanoacrylate glue)
Optional
- Patina solution (liver of sulfur or similar)
- Tweezers
- Mallet (rawhide, plastic, dead blow, bone)
Procedure
Step 1.
On a prepared texture sheet, roll out a 5-card-thick strip of PMC that, when fired, will yield a strip approximately 21⁄2″ long and 5⁄8″ wide. (With Original PMC, you will need a strip 31⁄4″ x 1″, for PMC+ a strip 3″x 7⁄8″, and for PMC 3 a strip 23⁄4″x 3⁄4″.) If you prefer, you can roll out the strip on a flat surface and texture by stamping from the front, or texture after firing.
Step 2.
Trim one long edge straight while leaving the other edge wavy. The edges may also be cut in a design or trimmed any way you like. (Figure 1)
 |
Figure 1 |
Step 3.
Fire the strip using a standard firing. For PMC+ or PMC3, I recommend a two-hour firing to increase the malleability and strength after firing.
Step 4.
While the piece is firing, cut the tongue shape from the Faux one® sheet. The piece pictured here measures approximately 1″ wide by 2″ long. (Note: If the size of the tongue is altered, the length of the PMC strip must be altered accordingly.)
Step 5.
Using the files, round and shape the tongue on the sides and at the point, leaving the top flat, with rounded edges. (Figure 2)
Note: Silicon carbide (Wet or Dry) sandpaper, used in the next step, is designed to be used with water. So before filing, cut a 2″ x3″ piece of each of the grits of silicon carbide sandpaper and place them in a cup of water to soak.
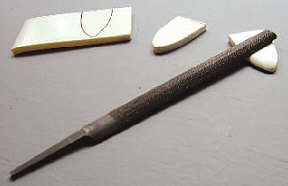 |
Figure 2 |
Step 6.
Beginning with 320 grit silicon carbide sandpaper, sand the piece thoroughly, including the flat top. e sure to sand out all the file marks. Finish the sanding process by progressing through the 400 grit and 600 grit sandpapers, rinsing the piece after each sanding. To impart an even smoother, polished finish, turn the 600 grit sandpaper over and rub the piece briskly with the back of the sandpaper. Rub the piece in the palm of your hand and then briskly on a soft, clean cloth, and you will see a soft sheen appear on the piece.
Step 7.
Finishing the Faux one® includes an almost infinite number of possibilities. It is so durable that it can be stamped with metal or leather stamps; scratched with tools, sandpaper, or electric engravers; carved with burs, files, grinding wheels, or chisels; or embossed after gentle heating. It can also be drilled and sawn, and inlaid with epoxy or other materials. For this piece, I scratched the surface and rubbed with acrylic paint.
Step 8.
When the PMC strip is cool, refine the shape with files, a jeweler's saw, or any other means you choose. Sand the strip and finish as you like. For this project, I oxidized the piece in liver of sulfur, brass brushed it, and burnished all edges and high spots.
Step 9.
To bend the strip around the tongue, lay the strip on one flat face of the tongue with the straight edge toward the wide end of the tongue. Next, line up the center of the strip's straight edge with the center of the flat edge of the tongue. (Figure 3)
Pick the piece up, hold the strip and tongue with thumb and forefinger, and bend one end of the strip around the side onto the back of the tongue. Repeat for the other side. The silver should fit snugly around the tongue. If it is loose or uneven, tap it lightly with the mallet until it fits tightly.
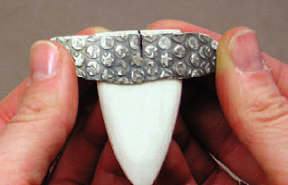 |
Figure 3 |
Step 10.
Look at your piece from the front, and decide where you want the rivets to be placed. The rivets must go through the front of the strip and the tongue, and come out somewhere near the ends of the strip in the back of the piece. Mark where the rivets will go. Do not drill any holes yet!
Step 11.
Cut the 16 gauge wire into two 1″ pieces. File one end of each wire flat and square, and remove the slight burr around the filed end.
Step 12.
Make sure the silver is positioned where you want it on the tongue. Use an awl or center punch to press (not hit) a small dent into the silver where the first hole will be drilled. Working on a scrap of wood, and starting in the dent you made, use a #55 drill bit to drill one hole through the silver, the tongue, and the back of the silver.
Step 13.
From the back, insert the filed end of one of the 16 gauge wires until it protrudes out the front about 0.5 mm. Cut the wire protruding from the back and leave a length of wire about 1 mm long sticking out. File the wire in the back to about 0.5 mm, making sure to file the end square. This wire will form the rivet. (Figure 4)
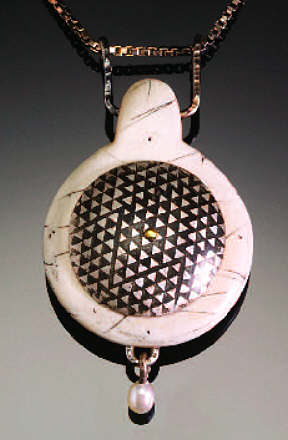 |
Figure 4 - A Robert Dancik pendant incorporating Faux Bone and PMC riveted together |
Step 14.
Place the piece on a metal block with the front up and the back end of the rivet supported on the block. Hold the piece so that the end of the rivet is on the block but the rest of the piece has a space of 0.5 mm beneath it. (If the piece is pushed flat against the block, the wire will be pushed through and there will be no wire protruding from the back for riveting.) Using a round-faced hammer, begin to strike the rivet around the outside edge of the wire to make it mushroom over. (Figure 5)
Continue hammering around the rivet wire until you have formed a low dome. The goal is to form a rounded rivet head rather than hammering the end of the wire flat.
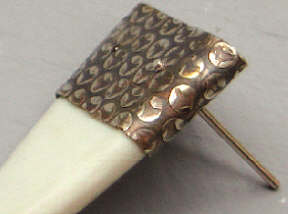 |
Figure 5 |
Step 15.
Turn the piece over and repeat for the other end of the rivet. The only difference in this step is that you needn't leave any space beneath the piece.
Step 16.
Repeat steps 12 through 15 for the other rivet.
Step 17.
Hammer the other 2″ piece of 14 gauge wire with a metal hammer to impart a slight texture. Using the round nose pliers, form a 1⁄4″ "eye" at each end of the wire. Cut the wire in half, yielding two eye pins. Oxidize to match the silver strip.
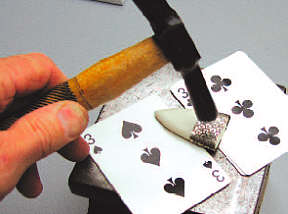 |
Figure 6 |
Step 18.
On the flat top of the tongue, drill a #52 hole 1⁄4″ from each end along the centerline of the flat top.
Step 19.
Dip the end of the eye pin in a bit of glue and insert fully into one of the holes, keeping the seam of the eye pin toward the back of the piece. Repeat for the other eye pin. (Figure 6)
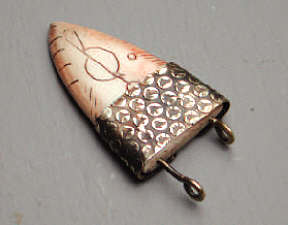 |
Figure 7 |
Step 20.
Hang your piece on a chain and enjoy.
Related Articles

Molding Multiples with Metal Clay Models

Precious Metal Clay

The Work of Steven Ford and David Forlano

Enameling On Fine Silver Metal Clay


The All-In-One Jewelry Making Solution At Your Fingertips
When you join the Ganoksin community, you get the tools you need to take your work to the next level.
