
Perfect Hand Polishing Tips
3 Minute Read
Though mass finishing procedures continue to improve, it is nearly impossible to match the beautiful polish obtained through hand finishing. The following are a series of procedures, suggestions, and products that should help you achieve the perfect polish.
Eliminate surface inconsistencies. Every surface (whether cast or fabricated) is going to begin with some inconsistencies: scratches, gouges, and pits, or wavy, irregular contours. Your first step is to eliminate these inconsistencies and create a uniform surface. This is achieved by selecting tools that best match the contours of your project. Working from coarse to finer abrasives in multiple steps will always give you the best results. Files and/or rubberized abrasives are used to correct a surface, allowing you to see the finer inconsistencies. Once the minor imperfections are revealed, a rotary hammer, laser welder, or other tool can be used to true up these problem areas.
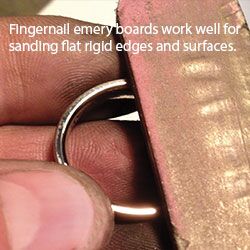
Sanding sticks, including fingernail emery boards, work well for flat rigid edges and surfaces. Handheld sandpaper, or sandpaper wrapped around any surface that matches the metal's contour, can be used. I have even wrapped sandpaper around a coffee mug for large soft curves. Lap wheels and solid felt buffs work perfectly for flat surfaces, as well as on the sides of rings.
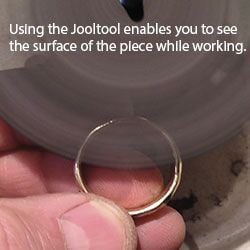
One of my favorite tools for this type of work is the Jooltool. Using the Jooltool or other lap wheels, you can actually see the surface of the metal as you are working. The various wheels created for these devices have slots that you can see through as they rotate. There are also an endless variety of cotton polishing wheels that vary in coarseness, diameter, and width, and an equally wide range of polishing compounds that can be used with these polishing wheels for the perfect polish.
Sand to Smooth
I typically begin with 320 grit sandpaper, using sanding sticks, sanding pads, or small pieces of sandpaper, and work down to at least 600 grit for gold and silver—and even finer when prepping platinum and palladium. I would suggest sanding down any of the platinum group metals to 1,200 to 2,000 grit before polishing. (Keep in mind that the finer abrasive will have a higher number.) 3M's Trizact Polishing Papers, which were developed for polishing contoured surfaces and interior shapes, work well as sanding sticks. They are available from 400 to 8,000 grit.
Sanding in a circular motion or working cross-grain to a previous step will result in a smoother, more perfect surface. Keep in mind that every abrasive that you use will create its own set of grooves that need to be eliminated. Though each progression will create finer and finer grooves, you should continue to work cross-grain or in a circular motion (similar to waxing a very small car).
I like to relate this to the surface of a phonograph record and its grooves. If you continue to work in the same direction it will be nearly impossible to eliminate the surface grooves or irregularities. As you get closer to completing the pre-polishing, be sure to rotate the piece that you are working on under a light and examine the project's surface using the reflected light. This will show you any surface inconsistencies or scratches that might remain. When you are satisfied with the pre-polished surface, you are ready for the final polish.
Final Polish
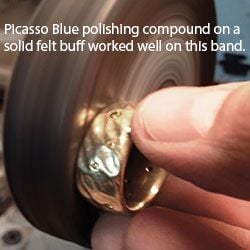
The final polish is actually a series of steps that should make full use of the many polishing compounds that are currently available. For many years, most jewelers started with tripoli and bobbing compound, which were used first in the polishing process as cutting compounds to remove any remaining scratches, followed by red rouge for the final polish. Today there are many options designed for specific metals and desired finishes. One of my current favorites from Japan is called Picasso Blue, which is formulated for platinum, though it works beautifully on white golds and palladium as a final polish. Try what's available to see what you prefer.
Always use separate storage containers for each polishing compound and the wheels and buffs to be used with only that particular compound. This will help to eliminate cross contamination from the other compounds—and it will take you a long way on your quest to obtaining a perfect polish.
![]()
In association with
![]()
The award-winning Journal is published monthly by MJSA, the trade association for professional jewelry makers, designers, and related suppliers. It offers design ideas, fabrication and production techniques, bench tips, business and marketing insights, and trend and technology updates—the information crucial for business success. “More than other publications, MJSA Journal is oriented toward people like me: those trying to earn a living by designing and making jewelry,” says Jim Binnion of James Binnion Metal Arts.
Click here to read our latest articles
Click here to get a FREE four-month trial subscription.
Related Articles

Beading Tool Tips

Restoring a Jewellers Vulcanising Press

Recycling High Speed Steel Burs

DIY Metal Shaping Tools: How To Make Your Own Jewelry Hammers Or Mallets


The All-In-One Jewelry Making Solution At Your Fingertips
When you join the Ganoksin community, you get the tools you need to take your work to the next level.

