
Organizing a Jeweler’s Studio
For Howard Woods of Eagle, Idaho, a jewelers studio should be a place of beauty - organized beauty - that fuels creativity. An inspiring painting of a Southwest landscape by one of his favorite artists, Lon Megargee of Arizona, hangs above the studio door. The layout and design area of the studio faces a window with northern exposure that overlooks the garden. Music that suits Woods mood of the day can be played on the CD player. And a sense of order and calm emits from his impeccably organized tools. Below Woods describes his bench setup in detail.
4 Minute Read
For Howard Woods of Eagle, Idaho, a jeweler's studio should be a place of beauty - organized beauty - that fuels creativity. An inspiring painting of a Southwest landscape by one of his favorite artists, Lon Megargee of Arizona, hangs above the studio door.
The layout and design area of the studio faces a window with northern exposure that overlooks the garden. Music that suits Woods' mood of the day can be played on the CD player. And a sense of order and calm emits from his impeccably organized tools.
Howard Woods' bench setup in detail:
- I store all of my acids and oxidizers in a high cabinet on the left side of my bench, and my bases and organic chemicals in a high cabinet on the right side of my bench. Chemicals are stored in collectible bottles with ground glass stoppers. For safety purposes, all chemical containers are labeled with the chemical name, a Mr. Yuk sticker, and, when appropriate, a flammable warning.
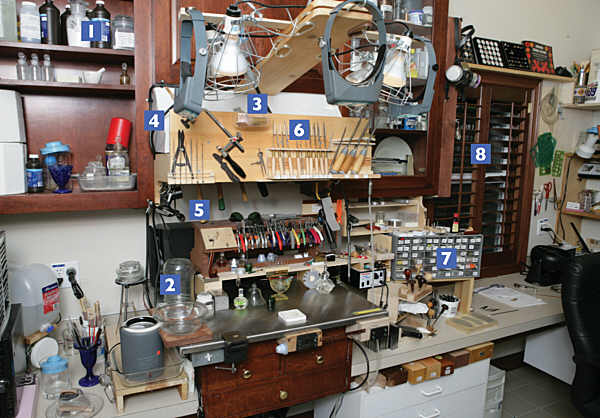
- The pickle pot is lower than my bench top. I place a Pyrex cake dish under it to catch any drips. Neutralizer and rinse bowls sit on the bench top beside the pickle, stabilized by a mahogany jig cut out to cover the space between the containers and catch drips. (I boost my sodium bisulfate pickle with an ounce or so of concentrated sulfuric acid, so drip containment is essential for safety.)
- I keep my beeswax in a container mounted at the top of my tool rack near the four floodlights that shine down onto the center bench pin. The heat from the lights keeps the beeswax warm and soft.
- My bench is equipped with an ordinary range hood adapted with a high velocity exhaust fan. This provides a measure of safety by moving air away from my face. However, since the moving air will not overcome close fumes or filings directed at my face, I have a vacuum cleaner attachment affixed to a BenchMate bench pin, providing a stronger current of air to draw in debris.
- To utilize as much space as possible, I hang my hammers inside the fume hood. I arrange the hammers in such a way that the handles are propped toward the front of the bench for easy reach.
- Because my hands can reach in three dimensions, I keep my tools available in three dimensions, keeping smaller tools closer at hand and larger tools further away. I store my needle files on a tool rack above the bench pin. Note the separators I use to keep the sharp edges isolated, preventing the files from rubbing one another and dulling.
- These organizer drawers are the perfect place for solder, scrap metal, and works in progress. I also use them to hold bezels, shanks, circles, sawblades, templates, and other little odds and ends.
- Since beauty inspires creativity, I designed my bench so the layout and design area faces a window with northern exposure into the garden.
- To help keep things clean and prevent contamination, the cherry wood top on my bench succumbed to practicality. It is covered with easy-to-clean stainless steel.
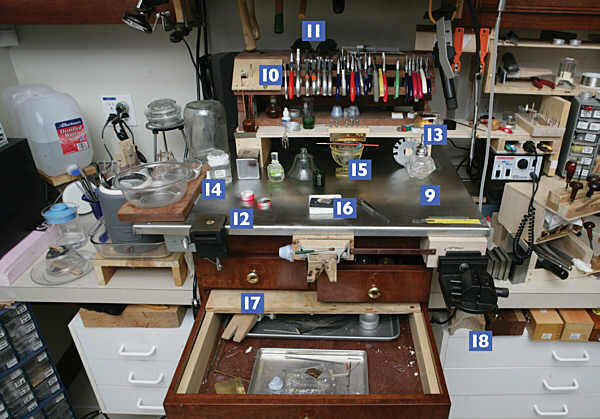
- On an elevated level, I keep a flux brush rack made of birch plate and designed with holes to hold the brushes. To the right is a pliers rack that is shaped to hold pliers straight up. This arrangement keeps the markings on the pliers handles visible for easy identification.
- Since my entire studio is packed into an 8 by 12 foot room, I try to utilize every square inch of space. I use a CD player in my shop and keep the speakers in the hard-to-reach space behind the pliers rack.
- My bench has two mounting plates for BenchMate tools to allow tool interaction and to reduce the need for changing tools.
- To prevent singeing my arm when reaching for objects around the Bench-Mate ring vise, I installed a homemade triple insulation heat shield over the alcohol lamp I keep on my bench.
- One of the biggest fire risks in the shop is an accidental spill of a borax/ alcohol slurry mixture. To reduce the risk, I keep my slurry (2 oz. or less) in a broad-based bottle with a lid. I keep it on the left side of my bench, away from the alcohol lamp and any tools for which I might reach.
- I use this antique ice cream dish for my flux brush rinse. Note how the brass plate on the shelf above traps the flux brush between it and the eyedropper that leans forward in the dish. This keeps the flux brush from rolling off and becoming contaminated with any residue on the bench top.
- All of my soldering pads are cut to various sizes to fit the job. I renew my pads by rubbing them on flat sandpaper and then "seasoning" them with a torch.
- Within my sweeps drawer I have a work surface that can slide forward as needed.
- I utilize these drawers for supplies and larger tools. The space between the drawers and my bench is used to store boxes containing drilling accessories, stone setting burs, twist drills, HSS bits, and more.
![]()
In association with
![]()
The award-winning Journal is published monthly by MJSA, the trade association for professional jewelry makers, designers, and related suppliers. It offers design ideas, fabrication and production techniques, bench tips, business and marketing insights, and trend and technology updates—the information crucial for business success. “More than other publications, MJSA Journal is oriented toward people like me: those trying to earn a living by designing and making jewelry,” says Jim Binnion of James Binnion Metal Arts.
Click here to read our latest articles
Click here to get a FREE four-month trial subscription.
Related Articles

Large Scale Enameling at The Enamel Foundation
Metalsmith ’84 Summer: Health Hazards Q&A’s
Electroplating Safety Precautions

Sansone Studio: Ancient Enameling Techniques


The All-In-One Jewelry Making Solution At Your Fingertips
When you join the Ganoksin community, you get the tools you need to take your work to the next level.

