
Making a Yellow Gold and Platinum Ring
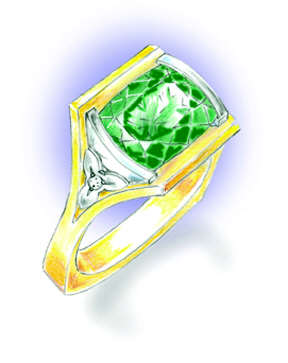
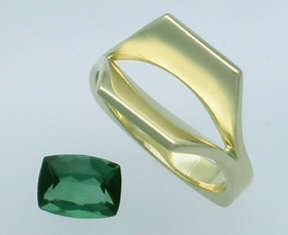
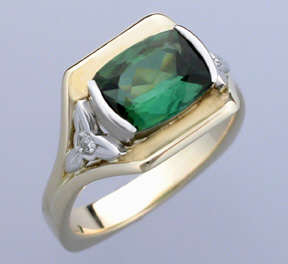
This two-part series highlights tips and techniques, tools and accessories and procedures for custom making the 18 karat yellow gold and platinum ring featured in the counter sketch for a green tourmaline and diamonds.
7 Minute Read
Updated on
This two-part series highlights tips and techniques, tools and accessories and procedures for custom making the 18 karat yellow gold and platinum ring featured in the counter sketch for a green tourmaline and diamonds.
Making a Yellow Gold and Platinum Ring | |
 | The yellow gold ring portion is cast and will be assembled. The platinum accents will be hand fabricated and installed after the ring is made. Among the final steps covered is the setting of the center stone and side diamonds. |
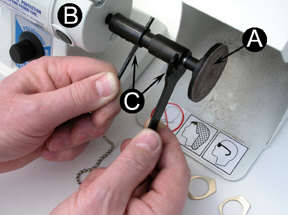 | To pre-finish the castings, I use progressively finer aluminum oxide resin-bonded PSA backed abrasives mounted on 2 inch PSA disc holders with 1/4 inch shanks (A) in the Foredom Bench Lathe (B). Installing the PSA abrasive disc into the 1/4 inch collet is simple using the wrench and tightening rod (C) provided with the kit. |
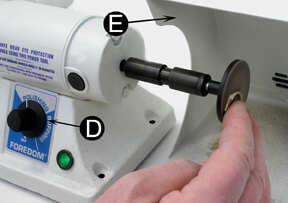 | With this process, I use a light touch and quickly accomplish a smooth dead-flat surface on the flat sides. The variable speed dial (D) allowed me to adjust the motor speed as needed through the operation. The dust collector hoods (E) have hose adapters on the back side that allowed me to easily include them in my dust collection system. They are heavy duty with rubberized pads on the bottom and sit stationary while the lathe motor is operating. Because they are not fixed to the counter top, I can move them around to suit a variety of dust and waste collection requirements for various wheels and accessories. |
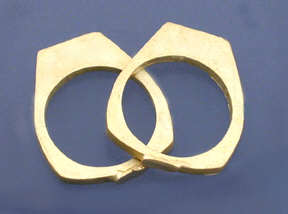
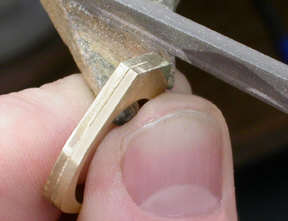 | To obtain the best alignment, I glue the rings together using a super glue gel product. Next I true inside the ring shank with abrasives and file the outside edges so both rings match in all dimensions. |
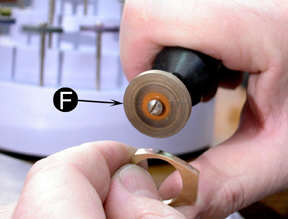 | After truing and filing, I use Foredom Rubberized Ceramic Abrasive Wheels (F) and the #52 Quick Change Handpiece to remove the file marks and to smooth. These ceramic impregnated rubberized abrasive wheels come in a 10 piece assortment with six different color-coded grits. (The packet contains wheels with grits ranging from the blue coarse 120 grit to a white super fine 1,500 girt or you can get packets containing 10 wheels of the same grit.) I prefer these ceramic abrasive wheels as they are long lasting and remain cool during operation. Since using them is progressive from coarse to fine, using the quick change handpiece takes less time to change the wheels. |
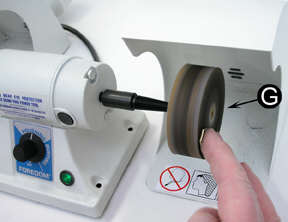 | After separating the two shanks, I use a buff and polish wheel (G) with Foredom Platinum Blue compound to lap both sides of each ring. The platinium blue compound is drier than other compounds while not excessively dusty. It does not streak making it ideal for the lapping process and it yields a highly reflective yellow finish. |
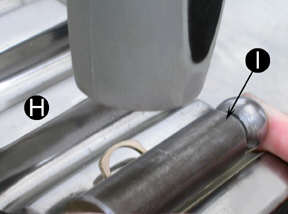 | After pre-polishing, I use a forming block (H) to bend and form the top portion of the ring. I use the side of a dapping punch (I) and a soft hammer to tap the open shape onto the rings top portion. The side of the dapping punch and the recessed area of the forming block are both protected with a protective layer of masking tape. |
 | After forming the shanks, I used the ABI Tack II tack-welder and double-pole tweezers with leads to both the positive and negative terminals to tack-weld the shanks. This is a temporary working weld to check the alignment. If the alignment is off, I can pull them apart and repeat the process. |
 | Next I used the ABI Pulse-arc-Welder to create a stronger tack-weld for holding the rings together for soldering. |
 | With the rings firmly tacked together, I solder the rings together using 14 karat hard yellow solder. No additional holding devices were required for the soldering procedure. |
 | Next I'll form the platinum accents, solder them to the ring, set the center stone and side diamonds and do the final polishing and finishing. |
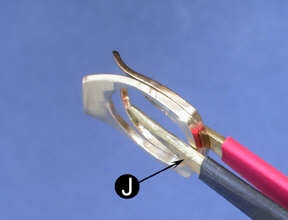
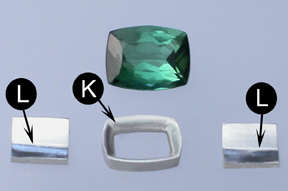 | The modified cushion shape tourmaline measures 9.50mm by 6.75mm. The lower gallery wire (K) of the platinum partial bezel assembly should be about 0.50mm less in both dimensions so it won't be seen from a top view after the tourmaline is set. I pierced and filed the lower gallery wire from platinum stock 1.75mm thick. I cut and formed the two portions of the partial bezel (L) from 1.00 millimeter sheet stock. |
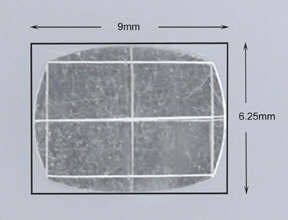 | This photo shows the lower gallery (K) in progress. I started with sheet stock measuring 9.00mm by 6.25mm. Next, I scribed guide lines on the surface of the platinum and filed away the excess. After piercing the central portion, I filed an angle from the base to the top completing the form. |
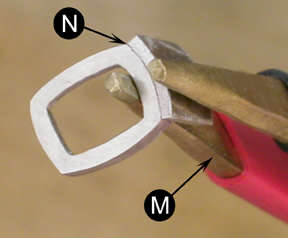 | After pre-finishing and pre-polishing the pieces, I tack-weld them using double-pole tweezers (M). The joint (N) is clean and free of debris. The ABI Tack II was set on 35 volts on the high energy setting. A single pulse of energy tacks the pieces. |
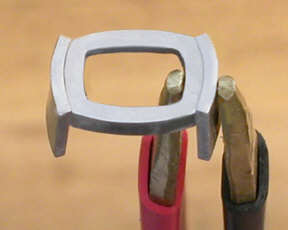 | Using the same settings on the equipment, I tack-weld the other side. It is now ready for soldering. |
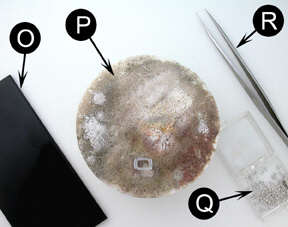 | Platinum soldering and welding requires specialized tools. A rated welding lens (#5 or darker) (O) to view work when soldering, an aluminum oxide soldering block (P) that will withstand the heat required to complete the soldering joint using platinum solder, 1500 platinum solder (Q), and fine tweezers (R). Also shown is the tacked partial bezel unit on the soldering block. |
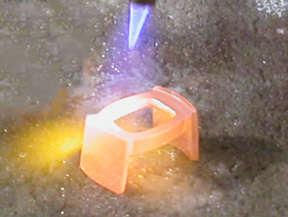 | Because the unit was tacked together, no additional holding devices are required for the soldering process. Here I'm using 1500 platinum solder to join the assembly. After soldering, I pre-finish and polish the assembly. |
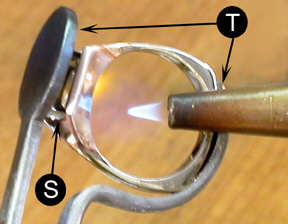 | On each side of the partial bezel assembly (S), I filed angles to fit the top portion of the ring. Using head and shank tweezers (T), I solder the bezel to the ring using 14k easy yellow solder. |
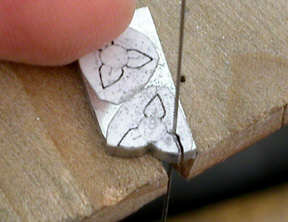 | I used a super-glue gel product to adhere the design (laser printed on bond paper) to the platinum sheet stock measuring 1.40mm thick. When piercing the pattern, I saw just outside of the line. |
 | After piercing the two side pieces, I file, pre-finish and pre-polish them. In this photo I'm using PSA backed 1200 grit 3M Imperial micro-finishing film (U). The film is attached to a 1/8th inch mandrel with a sturdy rubber platform (V). This unit is available from Rio Grande , Albuquerque . |
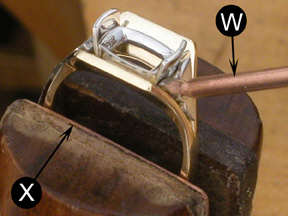 | After pre-polishing the ring and platinum side pieces, the pieces are ready for final assembly. Using the ABI Tack II, I tacked the side pieces using the probe (W) and ring clamp leads. The ring clamp lead has a wire to the Tack II and a copper plate (X) to conduct the energy. With the welder set at 40 volts on the high energy setting, I use a single pulse of energy and tack each side piece. |
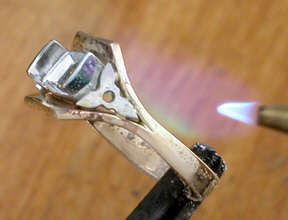 | Because the side pieces are tacked in place, no additional holding devices are required for soldering. I used 14k easy yellow gold solder. |
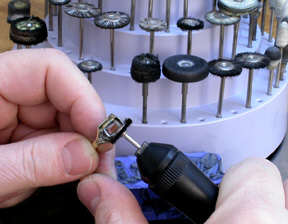 | With the ring assembly complete, I use Foredom's Platinum Blue polishing compound and a medium natural bristle brush to pre-polish the ring. To eliminate contamination of polishing compounds, I dedicate a Foredom burr carousel (shown in the background) for the polishing accessories I use with the platinum blue compound. |
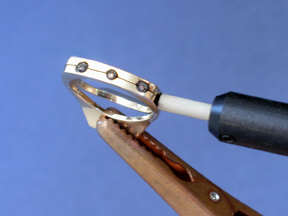
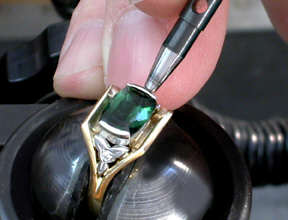
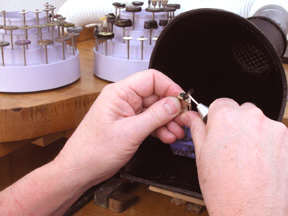
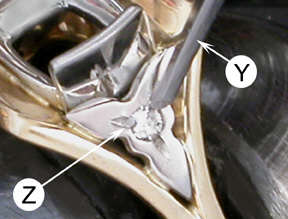 | The diamonds I'm setting measure 1.60mm. I used a 1.55mm high speed setting burr to create the bearing for each diamond. After seating the tourmaline with a brass pusher, I check to insure that the top of the diamond (the table) is even with the top of the platinum. In this photo, I'm using a #52 round bottom graver (Y) to raise three small metal prongs (Z) to set the diamond. I then use a small beading tool to shape the prongs. |
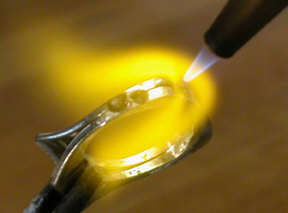
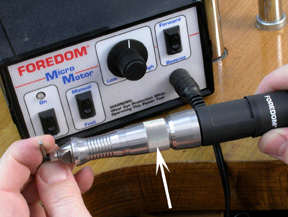 | After both side diamonds are set, I create the bearing for the tourmaline. I scribed guide lines on the partial bezels at the height I want the girdle of the tourmaline to be set. I used a 2.50 millimeter high speed 90 degree bearing bur to create the bearing. I remove about 30 percent of the wall thickness and fit the tourmaline. I check it for level, and finished cutting the bearing to a depth of 45 per cent of the walls thickness. After the tourmaline is fit to the partial bezel, I use the Foredom Micro Motor with the hammer handpiece to bend the bezel wall. In this photo, I'm screwing in the tip for bezel setting. The arrow indicates a impact control adjustment. |
 | As the first step I secure the tourmaline by bending opposite corners of the partial bezel. Then using the Foredom Hammer Handpiece at a 45 degree angle I go from the center outward a few times. Then repeat the procedure on the other side until the tourmaline is partially set. Impact from the hammer handpiece is generated by contact so you can place the setting anvil at the precise location for optimum control. |
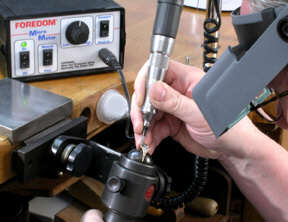 | After securing the tourmaline, I finish the setting by using the hammer handpiece at a 90 degree angle and impacting the top portion of the bezel. For the hammering process, I use the manual switch function, not the foot pedal to control the handpiece. |
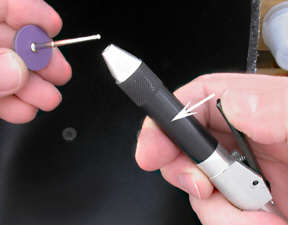 | For pre-finishing and polishing, I use the Foredom No. 18 quick-change handpiece. It's ideal for pre-finishing and polishing as tool and brush changes are efficiently made by depressing the lever to remove and replace accessories. |
 | For the final polishing of the bezel, I use the Foredom Platinum White polishing compound and a medium natural bristle brush followed by a loose muslin buff. I use a bench dust collector mounted on my bench pin during this part of the process to collect the waste. |
 | All that's left is the final preparation for the customer. |
By Mark B. Mann – Copyright © Mark Mann 2004
Sketch: Lainie Mann
Photographs: Mark B. Mann
All rights reserved internationally. Copyright © Mark Mann. Users have permission to download the information and share it as long as no money is made. No commercial use of this information is allowed without permission in writing from Mark Mann.
Related Articles

The Search for Modernist Style Jewelry
It was about seven years ago, I was living in Paris, spending a typical Sunday afternoon scouring the flea markets...
Read More
Working with Platinum & Platinum Designing
My skills as an artist combined with my years of experience at the bench have given me a practical approach...
Read More

Funk Art Jewelry
In Objects: USA, the chapter on jewelry bears witness to the hallowed names of modern history. The collective effort of...
Read More

Love Among the Ruins
The fine and fascinating enamel plaque shown here [Pic. 1] is a copy in enamels after a painting by the...
Read More


The All-In-One Jewelry Making Solution At Your Fingertips
When you join the Ganoksin community, you get the tools you need to take your work to the next level.
