
Introduction to Basic Concrete Jewelry
Concrete is a wonderful, hard, neutral, unprecious material with a real presence. And it can be successfully adapted to jewellery. This is an introduction to basic processes and materials. Uncured concrete is difficult to handle. It usually needs some kind of form or structure to control the shape. This leads to three completely different fabrication methods.
10 Minute Read
Concrete is a wonderful, hard, neutral, unprecious material with a real presence. And it can be successfully adapted to jewellery. This is an introduction to basic processes and materials.
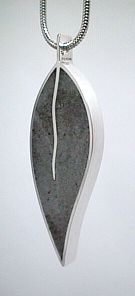 | Leaf Pendant: Grey portland cement with limestone dust, in sterling silver. 2.5″ (6 cm) long. Silver chain. © 2000 Andrew Goss |
Uncured concrete is difficult to handle. It usually needs some kind of form or structure to control the shape. This leads to three completely different fabrication methods:
- casting into a form — and later removing the form
- applying to an armature — expanded mesh, for example
- or carving a solid block — which can be partially cured
Concrete is a mix of portland cement, an aggregate, water and other additives that give the mix certain characteristics. Aggregates vary depending on scale, colour, strength:
- large: stone or gravel
- small: sand
- fine: stone dust (e.g. limestone or marble)
- extremely fine: silica fume, metakaolin
The dry materials are mixed first. Water is added to the dry mix. Do not add too much water; the drier the mix, the stronger the final product. (Excess water stays trapped in the cured cement.) How wet to make the mi x is a function of the process: casting in a mold will need a wetter mix that slumps into place. Applying the mix to a wire mesh will need a drier mix that feels more like clay and stays in place until it sets.
Concrete will get somewhat hard after 4 to 12 hours, depending on the mix and temperature, and can be worked with coarse files or carved at this stage. In one or two days it becomes harder still, but it is possible to wet sand to refine the shape. After that it becomes comparable to working with stone. It is best to add layers of new concrete within the first day or two after the initial set, when almost complete bonding takes place, but it is possible to add layers for several days.
Materials
Don't be intimidated: cement, sand and water works at a basic level. The materials listed below are for making high-quality concrete.Concrete is a mix of portland cement, aggregates, water and other optional additives that give the mix certain characteristics.
Portland Cement
Portland cement is what holds the aggregates together and is available in different grades and colours. The type you can buy at the local hardware or lumber store is grey in colour. White portland cement has the tetracalcium aluminoferrite removed, resulting in a pure white powder, with no loss of strength. It is more expensive.
Aggregates:
- Stone: Crushed stone or gravel can range in size from 1/4″ to 1″ so is probably not suitable for jewellery.
- Sand: Sand should be "sharp", that is have sharp edges, so that the crystals of cement grab it. It is usually called sharp sand, brick sand or mortar sand. The grains of pit run sand or beach sand are usually too round.
- Fine: Stone dust, a waste product from quarries or stone works, can be added to smooth mixes for small-scale work. It adds strength, reduces shrinkage on setting, and may add to the visual appearance of the concrete. Limestone or marble dust are two types of stone dust.
- Extremely Fine (Pozzolans):
- Silica Fume: Another waste product, this admixture is from metal smelting. It is a very fine dark grey powder. Particle sizes are 1/100 the size of portland cement particles. If used in the right proportions (about 8% by weight of the portland cement) it can double the compressive strength of the concrete, reduce permeability, increase density. It can be difficult to handle as it is very fine, and makes the wet mix "sticky".
- Metakaolin: Metakaolin (used at about 8% by weight of the portland cement) can double the compressive strength of the concrete, lowers permeability and increases density but also has advantages over silica fume. Metakaolin makes the mix creamier, less sticky, and is a plain white in colour. Particle size is smaller than cement but bigger than silica fume. Metakaolin is a fairly new additive and may be difficult to find. (Try distributors of plastering materials for the pool industry.)
- Plastic Fibres: Fibre additives, such as FiberMesh and Fiber Ad (polypropylene) are chopped (about 1/2″, 1 cm) strands of plastic. They disperse into the wet concrete mix and help prevent shrinkage cracks as the concrete sets. On a jewellery scale the fibers also add a small amount of tensile strength. They are almost invisible in the final product.
- Glass Fibres: Glass fibres added to the concrete mix must be alkali resistant, or the alkalinity of the cement will eventually break them down. Their purpose is to add tensile strength to the concrete, replacing steel reinforcing in special circumstances. They probably have limited use in jewellery applications.
- Steel Reinforcing: Steel is the most commonly used reinforcing to give concrete tensile strength. In construction projects it use used as rebar, 1/2 to 1″ rod. Smaller art projects can use varieties of galvanized steel or stainless steel meshes.
- Super Plasticizers: In mixing concrete you try and get all the dry particles in the mix to be wetted. The aim is to use as little water as possible, because water not chemically combined stays in the dry mix and causes weakness. Plasticizers help to wet the surfaces, enabling the mix to use less water. One brand is Pozzolith. Tiny amounts are used. You don't need them if you use acrylic or latex additives.
- Latex or acrylic additives: Latex or acrylic additive is sometimes used in concrete, adding it to the water first. It acts as a plasticizer (to use less water), increases strength and makes it more waterproof, and increases adhesion (for example, when adding a surface to an older piece of concrete).
- Pigments and dyes: Pigments or dyes can be added to the mix, or applied to the surface of set concrete. Special dyes are made for this purpose because common pigments can be broken down by the alkalinity of the cement. The range of colours are in the earth tone range: black, grey, brown, ochre, dark red. Blues and greens are available but costly for large projects. Pigments are available as liquids, or as powders. Concrete can also be surface coloured with acid stains or opaque stains made for outdoor use. The latter has a wide range of colours, but some may not be long-lasting.
- Sealers: In some circumstances it is advisable to seal the concrete surface to reduce water penetration.
- Acrylic: Most of the readily available sealers are acrylic-based. Some may affect the surface finish leaving it glossy and they may yellow slightly over time, and need renewing if used outside.
- Siloxane: Silane or siloxane sealers combine chemically inside the concrete leaving a natural surface. Siloxane does not change the surface appearance of the concrete. The solvents in these sealers demand a lot of ventilation.
- Potassium based: There are several water-based penetrating sealers for concrete, claiming to be more effective over time than the siloxane or silane sealers. These "highly modified catalyzed potassium hybrids" are clear and odourless and works by chemically combining with any free lime in the mix, to form a gel which hardens and consequently decreasing the moisture permeability and porosity. The concrete can be damp (not wet) when it is applied.
- Waxes: Hard waxes (such as carnauba) work well as a final finish.
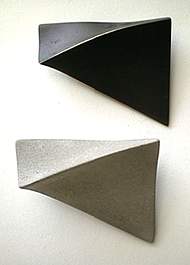 |  |
| Four Ridge Pins: Brass, patinated black, and concrete. About 2″ (5 cm) long. The brass pins were made first and used as molds for the concrete. 1999. © Andrew Goss | |
Mixes:
Concrete mixes are variable, and specific to certain applications. As a general rule, the larger the final piece the larger the aggregate. These are basic mixes that I have used and developed over time and work well in terms of plasticity, compressive strength, density and finishing characteristics. I have not suggested liquid volumes as they are too variable (depending on moisture content of the sand etc.) but the general rule is to use as little as you can get away with. You can experiment with the basic mix: more cement will make the mix more plastic, but you will have more shrinkage; more aggregate lessens the shrinkage but will make the mix more crumbly.
Always mix the dry ingredients well first. Then slowly add the liquid, stirring with a stick — don't use soft wood. For small mixes (jewellery scale) I use plastic containers. My apologies for mixing metric and teaspoon measurements, but for the record a teaspoon (tsp) is 5 ml and tablespoon (tbsp) is 15 ml.
Very Small Scale (jewellery):
- 1 tbsp stone dust (screened, limestone or marble)
- 1 tbsp portland cement (grey or white)
- half tsp metakaolin
- pinch fibres
- (optional) 1 tsp metal filings (silver, bronze)
- acrylic solution (full strength, as little as possible)
This mix works well casting into small metal molds, or applying around a steel mesh armature.
Smooth Coatings:
- To rub into cracks or holes, to overcoat as a final smooth layer.
- 1 tsp portland cement
- 1/8 tsp metakaolin
- pigment (never more than 10% of the cement)
- acrylic solution
What's Next?
Sift the stone dust and cement and metakaolin through a sieve to remove lumps. The cement is mixed well with all the dry ingredients, then thoroughly wetted, but not sloppy. This means a consistency as much like clay as you can get. If it is placed in the mold it can be a bit wetter. If it is applied to a metal armature, it can be more like clay. Then cover it with plastic wrap for 24 hours, making sure the surface does not get dry. After this period it can be uncovered and wet sanded to shape. Small air holes can be filled with a mix of the same proportions and covered for another day then wet sanded again. After a weeks curing (covered, or submerged in water, not allowed to dry out) it can be sealed.
Cautions
Contrary to how a lot of contractors deal with it, concrete can be hazardous to your health. Cement is extremely caustic when mixed with water and not cured, so use common sense. This means it will burn your skin. Wear protective gloves and glasses or goggles. The dust, either from mixing cement and sand, or from sanding dry concrete, is toxic (free silica, chromium contaminants). Wear an appropriate mask or respirator (one approved for toxic dust). Always wet sand rather than dry sand whenever possible.
"Allergic dermatitis" means that once you develop a sensitivity to cement, in the form of a skin allergy, you may not be able to use it any more. So use preventive measures to make sure you do not develop the sensitivity in the first place. Check the Material Safety Data Sheets for whatever materials, additives or sealers you are using.
Never wash cement off your tools in the sink or it will clog the drains. Always use a bucket of water. Let it settle a day before pouring off the water and disposing of the hardened cement and sludge.
Sources
Cement and sand are usually available from local hardware and lumber suppliers as well as masonry suppliers. For steel mesh (sometimes called hardware cloth) try a hardware store. Ask for the 1/8″ mesh if you're doing jewellery. You can also use glass mesh or scrim, from sculpture suppliers. Acrylic admixture or additive is a liquid now found at Home Depot and other large suppliers, in the masonry section.
For stone dust, try a local stone quarry if you are lucky enough to be near one. You can often find limestone dust (sold as dolomite) in the gardening section of hardware stores; it is sold as a soil sweetener to counter acidity. Sealers can be found in hardware and lumber stores, as well as masonry suppliers.
For plastic fibres you may have to contact a local redi-mix plant and see if they will sell you a one pound bag - enough for years of jewellery making. Pozzolans (like metakaolin) are the biggest problem to find. You may have to buy a huge bag. Try a local pool builder; they sometimes use it to add to their mixes plastering the inside of pools.
Lastly: More details and sources are available at http://www.makersgallery.com
Related Articles

20th Century Swiss Jewelry Designs

The School for American Craftsmen (SAC)

The Artemis Medallion

Forging Modernist


The All-In-One Jewelry Making Solution At Your Fingertips
When you join the Ganoksin community, you get the tools you need to take your work to the next level.
