
Hinge Pin Installation Options
It is, however, usually best to bevel the openings of a tube slightly to give the rivet a better purchase in use. A beveled tube end produces a good flush rivet.
15 Minute Read
As written by Charles Lewton-Brain this article lists the other hinge pin installation options or methods that can be used
Beveled tube ends for riveted hinges
It is, however, usually best to bevel the openings of a tube slightly to give the rivet a better purchase in use. A beveled tube end produces a good flush rivet.
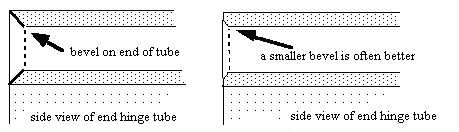
Again, a flush rivet can provide a color design option for the end of the hinge tube. When beveling the end of a tube, I like to use a round burr. The reason for this is that the round burr automatically stays centered in the hole, no matter what angle it is held at. I probably won't use a flexible shaft for this, but instead, I will grip the burr in my fingers, or in a large pin vise clamp, and just twist it by hand. It takes surprisingly little effort to produce too large a bevel. In general, make a small bevel most of the time for a flush rivet.
Other riveting methods
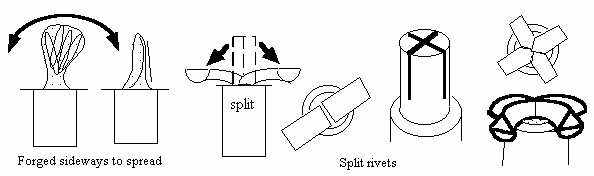
One can rivet the hinge using hammers, a hammer handpiece, punches, specially adapted pliers, a rotary riveting wheel or equivalent, by balling up the wire ends with a torch-any way of spreading the wire to lock it in place in the hinge counts. Some approaches, like forging the end of the wire out sideways or splitting the end of a wire with a sawblade and peeling each side back, work, but are not particularly functional or attractive unless you are doing a vast production run and speed of installation is important. You may see such rivet ends on tin toys.
Upsetting the tube instead of riveting the hinge
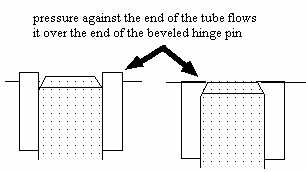
Instead of riveting and upsetting a hinge pin to hold the hinge together, it is also possible to bevel the ends of the hinge pin itself slightly and to use a tube of a reasonable wall thickness that juts out from the edge of the hinged part a little. This is so that one can upset and thicken the tube, thus flowing it over the beveled end of the hinge pin and fixing the hinge pin in place. You would plan for this, because when you upset or thicken the tube into itself like that it gets a little shorter-hence the suggestion of having your tube knuckles jutting out a little bit before you start. Important points are: it helps if your tube is a little bit higher than you need it to be, so that as you thicken it and deform it towards the edge of the hinge, you have the correct amount of metal available; the hinge pin itself has to be the exact length that you're going to need it.
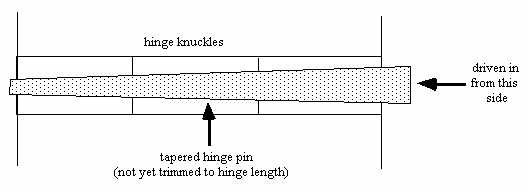
Tapered hinge pins
It is fairly normal in teapots, coffee pots, silver boxes, and similar heavy-duty hinges that may need to be disassembled at a later time, to use a tapered hinge pin to allow for repair work. The hinge pin tapers only slightly-we're not talking a great big cone or anything, only a slight taper-and it's driven in from one side of the hinge, so it's a force-fit hinge pin. The advantages of a tapered hinge pin are that it's very strong, it's a very stable type of hinge pin, and it allows you to repair a hinge quite easily; you just knock it out in the correct direction with a well-placed punch, and out it comes. What this means, is that if you're ever faced with taking apart a hinge on a teapot, coffee pot, or box, look at it very carefully to examine the visual diameters at each end of the hinge, to make sure you know from which side it's going to knock out correctly, because if you don't, you're going to end up with a mess on your hands-you can damage your hinge. Usually the taper is not very great and there is no attempt to shape the hinge knuckles to fit a taper; instead, when the hinge is assembled, the tapered pin is driven in from one side and the tubes flare slightly to fit the taper. This results in a very secure force-fit, and such a hinge pin, in my experience, does not fall out unless you actually drive it out.
Because tapered hinge pins are used most frequently for larger objects, they tend to be larger hinge pins as well, two to three millimeters in diameter even. Another advantage of a tapered hinge pin is rapid installation.
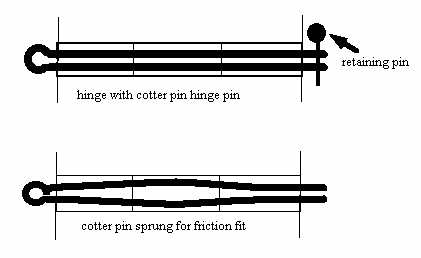
Cotter pin relatives
Cotter pins and similarly functioning pinstems can work in some situations. The idea is that the hinge pin is removable but does not fall out by itself. In industry, these are usually used on machinery linkages and hinges that need to be rapidly and easily opened and removed or assembled, but still be a stable and strong linkage.
They are not normally used in jewelry systems except on some women's watch bands, but there may be a time when this would be an appropriate solution to some technical problem you are facing. There are a couple of hinge pin catches which are similar in design. Cotter pins are frequently used as retaining pins on large connecting linchpins used in industrial linkages.
Tubing as hinge pin
Tubing can be used as a hinge pin material, but you need a fairly good-sized inside diameter for the hinge knuckles, and, if possible, a fairly strong material for the tube. Reasons to use a tubing hinge pin might include low weight, speed of installation, design considerations such as color, having a hollow hinge pin for threading something through or for placing a second hinge pin of a different colored metal inside the tube hinge pin, for a decorative effect.
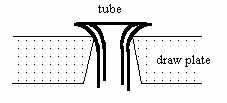
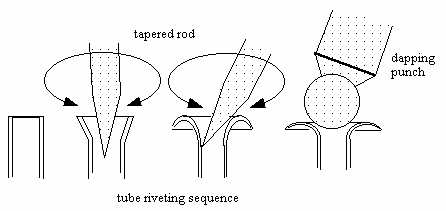
If you use a tube as a hinge pin, the installation is quite rapid and easy-you're basically making a tube rivet, so you would flare one side first, then insert your tube through the hinge. You can place the tube through a hole, such as in a drawplate, to support the tube while you flare the first side.
Then you would take a tapered tool, like the tapering end of a center punch, and by rotating it would enlarge the end of the hinge pin tube. Perhaps you might change to a dapping tool or the round end of a chasing hammer to widen it a little bit more to complete the riveting. As described above, I usually do one side of the tube outside the hinge first, then slide it in and flare the second side to finish the installation.
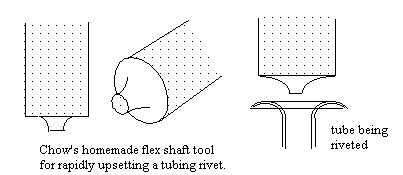
Linda Chow has a rapid method for upsetting tubing, which she uses for some hinged bracelets. Essentially it is an eyelet tool, such as you might use for inserting grommets into canvas tents, jeans and things like this, and the idea is to spread the tubing rapidly and smoothly. She makes the tool for this out of a piece of steel rod which is filed to shape in the flex shaft, high polished and then used while spinning in the handpiece. Chow reports that the tool she describes gives her a very smooth, uniform, machined look to the flared spreading of the tube.
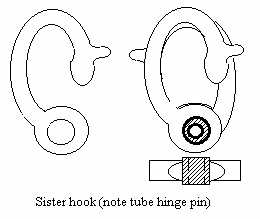
An example of tubing used as a rivet with which all goldsmiths are familiar is in sister hooks (a type of catch used for chains), which is really a two-part hinge (see Figure 99). With a sister hook, the use of a tube as a hinge pin allows you to insert things through the hinge pin itself: a cord, a jump ring, a hanging device, and so on.
Where I personally have used tubing as a hinge pin, it has often been as a decorative element. I will take a tube of a different color than the body of the hinge, set that as a hinge pin, and then slide a wire of yet another color through the tube, and rivet that as well, so that I have a pattern like a bullseye visible on the side of the hinge.
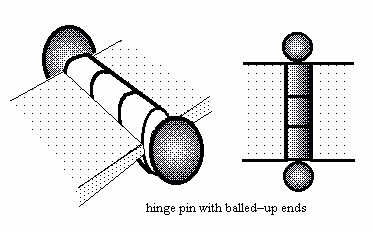
Balled-Up Hinge Pins
An option for a hinge pin which is very rapid to install and has a highly decorative effect, is to ball up the ends of the hinge pin where they emerge from the hinge. To do this, I would take my wire, ball up one end of it first, then insert it through the hinge, and cut it off about, I'd say, two and a half millimeters away from the far side of the hinge. Then, using a mini-torch or other extremely pointed, small, very hot heat source, ball up the wire, skimming the flame sideways across the hinge so as not to heat up the body of the hinge, and this way you end up with a beautiful ball on each side of the hinge. This is another opportunity to use a different-colored metal as a decorative element. An advantage of this approach is speed of assembly.
Spring hinge pins
There are a number of hinges that require a standing tension on them, so they open by themselves. The place that jewelers often see this is in cigarette cases. One of the most common ways of dealing with this is to use a coiled spring with legs around a portion of exposed hinge pin in the middle of the hinge, which functions rather like one sees on hair clips. This will be dealt with further in the section on spring hinges.
There is, however, one type of hinge pin used for a spring hinge where the hinge pin itself provides tension on the system so as to open the hinge. For this particular spring hinge, we need a hinge with a fairly good-sized inside diameter hole-I would say at least 2 to 2.5 millimeters across. In the first approach you take thin strips of springy steel, such as you would find inside an old-fashioned clock or watch: a watch-spring-you can also use packing-crate strapping, and it's possible to use nickel white gold and to roll it out thin. What you need are long, thin strips of very springy material. You then make several wedges by taking round wire that will fit into the hole in the hinge, and slicing it off at an angle, thus producing a wedge with one rounded side. The long, thin strips of steel are inserted like a hinge pin through the knuckles of the hinge, and then a wedge is driven in at one end, locking the strips in place. It may be necessary to use a wedge on each side of the hinge to lock them in.
The strips stick out some distance on each side of the hinge. Once one side is locked in place, the strips at the other side of the hinge, where they emerge, are gripped and rotated ninety degrees. They are then locked in place with wedges on the opposite side. Anything that sticks out beyond the ends of the hinge is trimmed off flush, and, because your hinge pin is twisted inside the hinge itself, it provides tension and the hinge will automatically open. You need to use hinge tubing that is quite strong and relatively thick, to avoid visibly spreading it when you drive in the wedges.
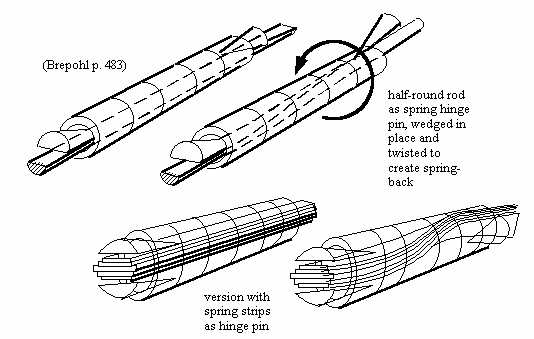
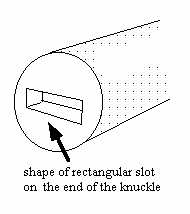
One can solder parts into one knuckle to create a rectangular hole. This locks the strips in place on that side and then you only need wedges at the other end of the hinge. There are several similar approaches; all lock the springy core in place at one side, twist the core and the lock it in place on the other side. It is generally easier to make a spring hinge in the manner shown later rather than by using a spring hinge pin. In the other approach pictured above (Brepohl, p.483), you use a half-round wire of springy material which is chocked in each end of the hinge with half-round wire wedges. It works the same way as the version with springy strips. Both versions work best with five or more knuckles.
Square hinge pins
Square hinge pins are sometimes used, usually in versions of spring hinges for catches or cuff-links where there are two main positions for the hinged parts, and one wants them to move into these positions with a "snap" that one can feel and hear. This is used for cuff-links, and versions are used for pin back systems.
(see the extract called 'Cuff link hinge pins' for more information).
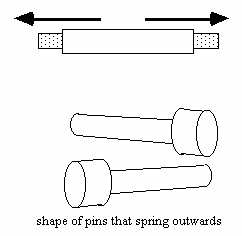
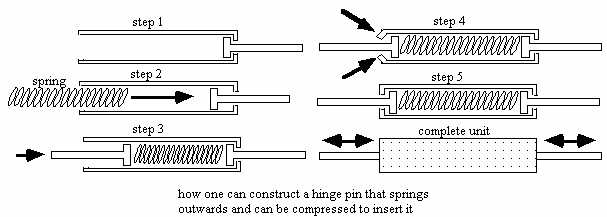
Outward-thrusting hinge pin
Watch bands often have an interesting style of expanding and retracting hinge pin to attach the watch bezel to the band. It is sprung so that it can be compressed to insert it and then expands to fit into the sockets of the watch bezel. The hinge pin has springs built into it, and is compressed inwards, inserted into the space, and then it springs outwards, locking itself in place, much like the way that a toilet paper dispenser spindle can be compressed and then expands to fit into its holder (see Figure 107).
There are times, when quick assembly and replacement are required, that such an expanding and retracting hinge pin would be useful. I mention these because, although it has a fairly specific usage, I have a suspicion that this particular action may be the correct solution to a technical problem for a piece of fine jewelry at some point in time.
Hinge pins from each side
Sometimes, when you are attempting to force-fit a hinge pin using a flexible shaft to spin it in, it will break off, embedding itself part way through the hinge, usually just too far in for you to be able to drill it out or remove it with any reasonable approach. In this case, you can leave it locked in place-usually it will have penetrated the outside knuckle, and probably about halfway into the middle knuckle before it snapped off-then you take another piece of hinge pin material, flush the end off somewhat flat, and drive it in from the other side with the flex shaft, until it, too, locks in place and snaps off. Be careful doing this!
Nobody will ever know that your hinge pin is not one continual piece, there will be no effect in terms of function, and it's a good way to save the day. There may, however, be a time when it is appropriate to install the hinge pin from each side of the hinge for design reasons. I mention this as a possible solution for some technical problem that you may be facing down the road. In terms of function, such a hinge pin driven in from each side has a certain relationship to peg-and-stud hinge and linkage systems. There is a hinge pin catch based on this idea.
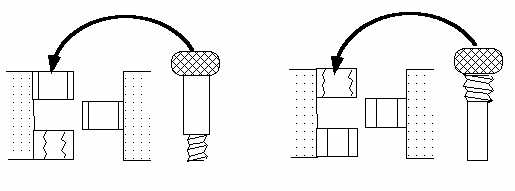
Threaded hinge pins
Eyeglasses and watch cases and bands sometimes use threaded hinge pins. The main reason to combine a threaded bolt and a hinge pin like this is to have a hinge pin that is inserted from one side of a hinge only (in glasses frames from the top so that gravity, too, assists in keeping the hinge pin in place when in use)-where the hinge pin should be locked in place but you don't want it falling out easily, and yet you still want it to be removable to allow repairs as with eyeglasses. If the end of it is threaded and has to be rotated-turned-a number of times to drive it into its finished position, it's unlikely that that hinge pin will fall out easily. Not impossible, as anyone who wears glasses knows, but unlikely. In general, the last knuckle tube has a thicker wall than the others and it is tapped to cut the threads. The hinge pin end is then threaded to fit into it. A threaded hinge pin is also a type of hinge-based catch, and this is dealt with in regard to the threaded tubing catch that is described later in the book (see page 95). Two versions are shown below with threading on opposite ends.
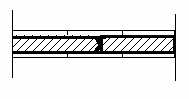
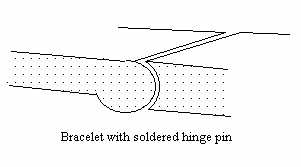
Soldered hinge pins
When I was working in a factory in Germany, we constructed a particular type of cast gold, linked bracelet designed around hinges. When we assembled the hinges we would use a gold wire of the same karat as a hinge pin to assemble the units, and then solder it in place in each outer knuckle. After finishing, this looked pretty good from the side of the bracelet (see drawing). It gave a sleek, smooth feeling to the design of the bracelets.
As well as the chance of soldering everything together into a lump, which probably happened at least once to me, when you soldered the hinge pin in, you annealed the hinge pin material, and this was then more subject to torquing from friction in the middle knuckle; it would eventually snap and so we would see these bracelets back for repair fairly frequently. When we got them back for repair, no matter how hard we tried, really, when it came down to it, the only way of repairing one of these things, when the hinge pin had snapped in the middle, was to rebuild the entire hinge. You could, if you were very careful and took a long time about it, drill out the wire and attempt to repair it, but in reality, the only real solution was to rebuild the hinge-at least the outer knuckles. The repairs were fairly nightmarish. All in all not a thrilling story. This experience was what convinced me of the benefits of force-fit hinge pins; they allow for later repair. I don't currently solder my hinge pins in place, but I mention it; there may be a time when this is a correct design decision on your part. It did look kind of pretty.
Peg/stud/pin systems
Peg-and-stud linkages that relate to hinges are used extensively in jointed bracelets, particularly in European work, and I wish to point out the importance, in linkage systems and in hinges and hinge-like mechanisms, of the use of pegs and studs. These are the basis of a whole genre of bracelets. An example of a stud linkage system that you can observe is the plastic snakes that you would buy in children's toy stores, where two studs hold one unit inside the other, and both rotate smoothly and evenly against each other, so that when the snake is held out, it has a lifelike sideways wiggling motion to it.
Hinge pins as catch mechanisms
There are a number of catch systems that are built into hinges and that use hinge pins as an integral part of how they function. Hinge-based catches will be dealt with in a later section, but I wish to mention them now, because almost every hinge can be examined and analyzed in such a manner that a hinge pin catch can be built based upon it, so that the hinge pin provides the locking, mobile mechanism for the catch.
Related Articles

Installing and Repairing Hinge Rivets

Superfit’s Hinge and Latch System

Custom Made Jewelry Findings

Different Types of Knuckle Hinges


The All-In-One Jewelry Making Solution At Your Fingertips
When you join the Ganoksin community, you get the tools you need to take your work to the next level.
