
Double Tongue Tube Box Clasp
This project is a slight variation on the standard box clasp, the clasp outlined here uses two tongues rather than one. This means that the clasp is much more secure, so theres no need for the figure of 8 safety mechanism which can sometimes spoil the clean lines of a piece. I learnt to make this clasp whilst at North Bennet Street School in Boston. The project shown here uses round tube with an inside diameter of 5mm to house the clasp mechanism. Of course the shape of the clasps housing can be changed to suit the bracelet or necklace design. However using tubing with an inside diameter anything smaller than 5mm would prove to be tricky, since there may not be room for a double tongue..
15 Minute Read
This project is a slight variation on the standard tube box clasp, the clasp outlined here uses two tongues rather than one. This means that the clasp is much more secure, so there's no need for the 'figure of 8' safety mechanism which can sometimes spoil the clean lines of a piece. I learnt to make this clasp whilst at North Bennet Street School in Boston.
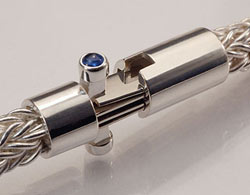
The project shown here uses round tube with an inside diameter of 5mm to house the clasp mechanism. Of course the shape of the clasp's housing can be changed to suit the bracelet or necklace design. However using tubing with an inside diameter anything smaller than 5mm would prove to be tricky, since there may not be room for a double tongue.
I used Argentium Sterling™ Sterling Silver for this project. You can of course use standard sterling, or whatever metal your design calls for. Argentium Sterling™ Sterling Silver was invented by Peter Johns, silversmith and tutor at Middlesex University, England. What makes it different is the addition of the element Germanium, which replaces a little of the copper content.
This results in a number of advantages over standard sterling. Those that I've found particularly useful are as follows: Firstly Argentium Sterling™ doesn't develop firescale when heated, so those hours of sanding away that pesky purple stain is thankfully a thing of the past.
Secondly, it is tarnish resistant so that beautiful hand-made sterling clasp you spent hours over will keep it's mirror finish for longer.
Thirdly it can be heat hardened using your kitchen oven. In it's annealed state Argentium Sterling™ has about the same hardness as standard sterling, heating it for 40 mins at 300°C makes it nearly twice as hard. My kitchen oven only goes up to 250°C and some have a top temperature of 220C. In this case, Peter Johns advises that the heating time be extended to approximately 2 hours. You need to make sure your Argentium Sterling™ is annealed beforehand. It's best to preheat your oven and also the firebrick or whatever the Argentium Sterling™ is to sit on. I use a glass Pyrex® dish without the lid.
Finally, Argentium Sterling™ sterling has a lower heat conductivity than that of standard sterling, so there's no need to heat the whole piece to get your solder to flow. This doesn't make too much difference when making a small clasp, but I've found it invaluable when making larger pieces. When soldering a hinge to a heavy gauge silver bracelet for example, there's no longer any need to get the whole bracelet up to temperature in order that the solder will flow, you can just direct your torch around the area you need to solder. It performs much more like gold in that respect.
There are a number of ways working with Argentium Sterling™ is a little different from working with standard sterling. The three differences I've found to be the most important to remember concern it's lower melting point, the annealing temperature of Argentium Sterling™ , and the effect that it's lower conductivity has on how it should be quenched.
The germanium in Argentium Sterling™ lowers the melting point of the alloy by 59°F (15°C) to 1410°F compared to standard sterling 1475°F. This means that using the standard hard silver solder isn't a good idea, because it's flow point is too high and you risk melting your piece. There are now Argentium Sterling™ silver solders on the market which contain germanium. They have lower flow points and don't tarnish. Alternatively you can use standard medium silver solder instead, but this will of course tarnish over time.
The annealing temperature of Argentium Sterling™ is also lower, and the red glow that you get when annealing Argentium Sterling™ is much much paler. Bringing Argentium Sterling™ up to standard sterling annealing colour would be too high. I tend to anneal in a dark corner, so that I can see the colour change more easily.
Care also needs to be taken when quenching Argentium Sterling™. Argentium's™ lower conductivity means that heat takes longer to dissipate from it. As a result, quenching the alloy too soon after annealing can cause stress cracks. I leave Argentium Sterling™ to rest for a good 20-30 seconds or so before I quench it.
There is much more to read about working with Argentium Sterling™, there's some really useful documentation available on the internet:
- argentiumsilver.com is the official website for Argetium Sterling Silver.
- cynthiaeid.com Cynthia Eid has written an excellent technical article which is available on her website.
- Trevor's Argentium Silver blog Trevor F shares the results of his experiments with Argentium on his excellent blog.
- The Ganoksin Project There is also very useful information on the Orchid forum.
What You Need: | |
| 1. Sterling Tubing, 6mm Outside Diameter, 5mm Inside Diameter (wall thickness about 0.5mm or 24ga). 2. Sterling sheet, 14ga (1.6mm) 3. Sterling sheet, 20ga (0.8mm) 4. Sterling sheet, 24ga (0.5mm) 5. 14k Nickel white gold. 24ga (0.5mm) 6. Hard and Medium Sterling solder. 7. Sharpie™ 8. Dividers 9. Scribe 10. Ring clamp 11. Saw frame and blades (4/0 or 5/0; 6/0 & 8/0) 12. Soldering torch | 13. Soldering pick 14. Soldering block 15. Pickle pot and sparex 16. Flux - liquid rather than paste if you are working with Argentium Sterling™ 17. Files: half round or flat hand file, needle files 18. Emery paper corse to fine 19. Pliers, flatnose and roundnose 20. Chasing Hammer or other with ball end 21. Steel block 22. Flex shaft or similar for drilling 23. #77 twist drill bit 24. Polishing compounds and buffs 25. Non essential: micro files |
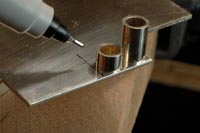
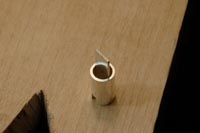
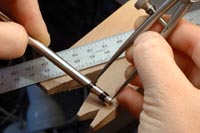 | First we need two lengths of tube for the clasp housing, one 4mm long and the other 9mm long. It's good practice to make sure all your stock is in a fully annealed state before you start working with it, particularly if you are using Argentium Sterling™. I and others have found that there is slightly more 'expansion' after annealing work hardened Argentium Sterling™ than there is in standard sterling. This difference is tiny, but I've found it can have an effect if you're working with very precise measurements as we are here. File the end of your tubing flat and square. Then scribe guide lines using your dividers, one at 4mm, one at 5mm and one at 14mm. I mark my metal with a Sharpie™ first so that the scribe lines are easy to see. |
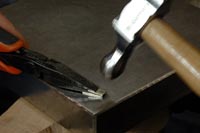
  | Saw between your 4mm & 5mm marks and on the outside of your 15mm mark. 4/0 and 5/0 saw blades are good for 22ga metal.
File to your scribe lines, make sure that the ends of your tubing are filed flat and square. |
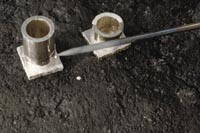
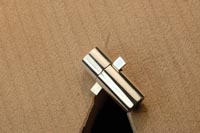
 | Place your tubing on the 20ga sterling sheet and check that there aren't any gaps between the sheet and the tubing where light shows through. It's also important that the tubes are both perpendicular to the sheet and are not leaning like the Tower of Pisa. Mark out enough sheet for ends caps for each tube. |
 | Solder the end caps on to your tube using Hard solder. If you are using Argentium Sterling™ silver, don't coat the whole piece in flux and anti-firescale coating, you just need flux on your joint to help your solder to flow. When annealing or soldering standard sterling, firescale occurs when oxygen penetrates the alloy and combines with the copper to produce cuprous oxide or firestain. Flux and anti-firescale coatings help protect sterling silver from this annoying purple stain by preventing the oxygen penetrating the surface. However when working with Argentium Sterling™, we want oxygen to have access to the metal so that it can combine with the germanium to form a thin surface layer of germanium oxide. It's this layer that prevents any oxygen penetrating the piece, therefore preventing firescale. For the solder joint, Peter Johns recommends the use of a liquid flux such as My-T-Flux™ with Argentium Sterling™, rather than a paste flux which can sometimes stain the surface of the metal slightly. Quench and pickle your tubing - if you are using Argentium Sterling™, remember to let it cool for 20-30 seconds before quenching. |
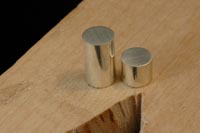
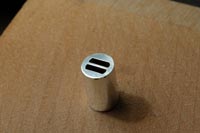
 | File and sand the end caps flush with the tubing. |
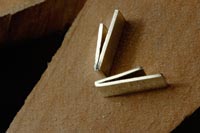
 | To fabricate the tongues, I find it best to use nickel white gold since it provides the 'spring' needed. Scribe, saw and file square two lengths of 24ga white gold sheet, 4mm wide and 17mm long. Make sure your metal is annealed. Nickle white gold needs to be annealed to a cherry red color and either air cooled or quench in alcohol once the red heat has dissipated. Check with your supplier for their nickel gold annealing recommendations. On each tongue, scribe a line at 7mm from one end, make sure your line is square with your strip of gold. |
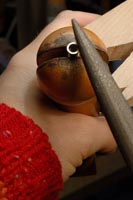
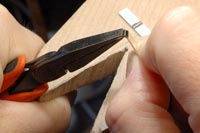 | Using flat nose pliers to hold the tongue, fold the strip over at your scribe line using your fingers. Make sure your fold line is square and that you're not bending the strip at an angle. Ensuring your flat nose pliers are parallel with your scribe line will help with this. |
 | Once you have bent the tongues back as far as you can with your fingers and the flat nose pliers, you will need to tap the bend gently with a hammer to complete the fold on each tongue. I find the ball end of my chasing hammer best for this. Hold the tongue with your flat nose pliers on a steel block and gently tap just slightly above the fold, rather than actually on it. Be careful not to hammer too much or you'll thin out the metal and weaken it. |
 | You may find that this planishing has caused the metal to splay slightly at the fold, so you may need to file the tongue square again. Your tongues should also be springy now they have been work hardened. |
  | Since I used 6mm tubing for my clasps' housing, it's necessary to bevel the edges of the upper part of the tongue, so that it has room to spring up into the tubing. Scribe a line on the upper part of the tongue 0.5mm in from the edge and file to this line at 45™. If your clasp housing is square or larger than mine, you won't need to do this step. |
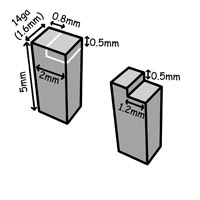 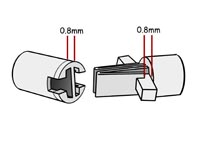 | To make the clasp triggers take your 14ga sterling sheet and scribe, saw, file and sand two pieces 2mm wide by 5mm long. Now scribe a line 0.8mm from the end of the 2mm length, and 0.5mm from the end of the 5mm length as shown in the diagram. File away the 1.2mm x 0.5mm section with a square needle file to leave a 0.8mm wide, 0.5mm high lip. Make sure you don't over file. The 0.8mm wide lip on the trigger corresponds to the thickness of the end cap which your tongue will click in to. If this lip is too narrow, the upper part of each tongue won't be able to click up into place, and if it's too wide the tongue will be able to waggle back and forth within the clasp housing. So it's important to be meticulous at this stage. |
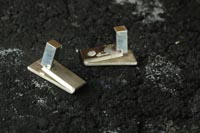 | Solder the triggers onto the top centre edge of the tongues using hard solder. Make sure that they are dead centre and that they are pushed right up against the tongue. If you wedge something under your soldering block in order to tilt it slightly, it will help make sure your trigger stays butted up against the tongue whilst you solder. Try to use a small flame directed only at the trigger area and get in and out quickly so that you don't end up fully annealing your nicely work hardened tongue. You can also heat sink the tongue by holding the fold end with tweezers whilst you solder. Don't worry too much if you don't manage this, it is possible to re-harden the tongue once all the soldering has been done. Pickle and remove any excess solder. |
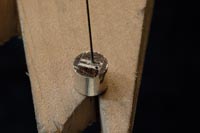
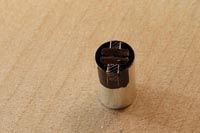
 | Prepare the short tube to receive the long ends of the tongue. Scribe two 4mm long, 0.5mm wide parallel lines, 0.5mm apart so that the midpoint between the two outside lines is the dead centre of the end cap. |
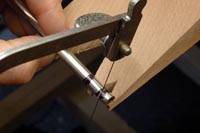
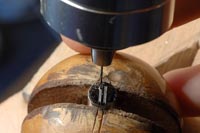 | Drill a hole at each end of your two scribe lines using a #77 drill bit. |
 | Insert a 5/0 or 6/0 saw blade into your drill hole, tighten it in the frame and saw along your scribe lines.Be careful here not to saw over your line, the tongue needs to be a very tight fit. Using the saw blade gently as a file, ream away and smooth out the metal until the tongues fit tightly. You may find that using an 8/0 saw blade makes it easier to be more accurate. You can use micro files for this too, but if you don't have them, saw blades work just as well. |
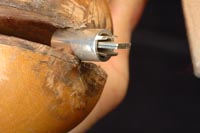
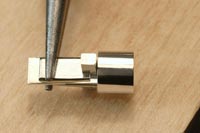
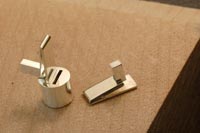 | Position the long end of each tongue into the slots you have pierced. Make sure that the tongues are aligned straight with the tubing and that the back of the trigger butts up against the endplate when the trigger is compressed. Solder using hard solder. It's best to place the solder on the inside of the tubing where the tongue and end cap meet, and then use your torch to draw it though to the outside of the end cap. That way you won't have excess solder to clean up on the outside of your end cap. Again, try to use as small a flame as possible and direct it at the end cap so that you avoid annealing the tongue as much as possible. This is easier to do with Argentium Sterling™ since it's not necessary to get the whole of the piece to temperature in order for the solder to flow. |
 | Prepare the long tube to receive the folded ends of your tongue by following the procedure detailed in steps 12, 13 and 14. This time though your slots need to be 4mm long, very slightly more than 1mm wide, and again 0.5mm apart. Slowly saw and file away the metal, frequently checking your progress with the tongues. Be careful not to over file or your tongues will be loose within the clasp. |
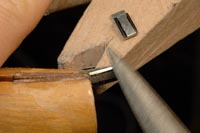
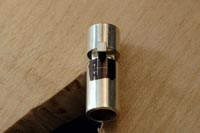  | Insert the tongues into the large tube until the trigger butts up against the end plate. You can now scribe the position of the trigger where it hits the end plate, and also scribe the 2mm long slot you will need to file away to accept the trigger. |
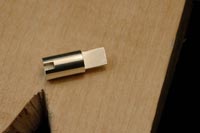
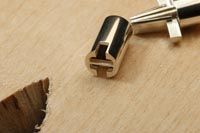 | Carefully saw and file away the unwanted metal. Again, it's important to be accurate so that there is no play in the clasp. Keep testing your progress with the clasp tongue, filing slowly until the two end caps butt up against each other and you hear the very satisfying 'click' of your well made box clasp. Make sure both tongues are clicking into place. |
  | The final steps strengthen the 0.5mm wide cross-bar in the centre of the long tube's end plate. It can also help remedy a clasp that is loose due to over filing the two 4mm x 1mm slots in the end cap, so it's really worth doing. Saw and file a length of 24ga sterling the same width as the inside diameter of your tubing. Bevel the long edges of this strip very slightly so that it fits tightly into the tube. Make sure the end is flat and square so that it butts up against the end cap cross-bar with no gaps. I tend to leave the strip slightly long so that I can gentle tap it into place if need be. However if you need the keep the inside of your end cap clear, cut your strip shorter. |
 | Solder your centre strip in place using medium solder, quench and pickle. File your centre strip flush if need be. |
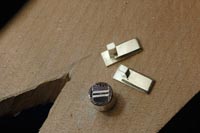
 | You can of course embellish your clasp trigger as you wish, small cabochon bezel set stones look good on the triggers and make the clasp comfortable on the fingers when opening and closing. If you do add a bezel, make sure your file down the triggers first - they should be about 5mm high in total. You can heat harden your Argentium Sterling™ clasp in your oven as described. Make sure you've finished any soldering you need to do, since this will undo your oven hardening. You may find your Argentium Sterling™ comes out of the oven with a slight yellow tinge. This is easily pickled off. When polishing Argentium Sterling™, it's a good practice to use separate polishing buffs than those you use for standard sterling. This prevents contaminating Argentium Sterling's tarnish resistant surface with standard sterling. Others also recommend using separate soldering bricks too, but I must admit that I don't do this and haven't noticed any ill effects so far. |
Troubleshooting
My tongues have lost their spring .
If after soldering your tongues they no longer have enough spring to click into place, you'll need to re-harden them. A good way to do this is with a double tongue is to first slide a piece of 24ga (0.5mm) of hard metal (steel or nickel white gold) between your tongues. Then using round nose pliers, firmly hold both tongues and the metal between them together so that your pliers are positioned across the tongue 2-3 mm from the tongue's fold. You can then bend back the trigger end of the tongue and the tongue will bend and stress the metal at the point the pliers cross the tongue rather than at the fold.
My two end caps butt up against each other when I insert the tongues, but the tongues don't click up into place.
If this isn't because your tongues have lost their spring, it may be because the gap between the back edge of the tongue at the trigger end and the face of it's end cap is smaller than the width of the longer tube's end cap. They should be the same width. It's possible to remedy this problem by carefully filing down the back edge of the tongue to make the gap slightly wider.
The tongues snap into place but my clasp wiggles back and forth inside the longer tube.
This is likely to be because the gap between back edge of the tongue at the trigger end and the face of it's end cap is larger than the width of the longer tube's end cap. You may have to replace the longer tube's end cap, using thicker sheet.
The tongues snap into place but my clasp wiggles from side to side inside the longer tube.
This is likely to be because the longer tube and end cap was over filed in steps 17 & 18. You may have to replace the longer tube's end cap and file another slot for the tongues.
Related Articles

All About Hidden Hinges

Installing and Repairing Hinge Rivets

Box Clasp Fabrication

Hinges with Bearings


The All-In-One Jewelry Making Solution At Your Fingertips
When you join the Ganoksin community, you get the tools you need to take your work to the next level.
