
Gem Microscope Considerations
This short paper discusses some of the things to think about when considering obtaining a microscope to use for gemology. There is some emphasis on inexpensive options. In putting together my own modest gemmology lab I did a lot of comparison shopping and adapting of various equipment to keep my costs down.
8 Minute Read
This short paper discusses some of the things to think about when considering obtaining a microscope to use for gemology. There is some emphasis on inexpensive options.
In putting together my own modest gemmology lab I did a lot of comparison shopping and adapting of various equipment to keep my costs down. The polariscope for example was a piece of PVC sewage pipe (new of course) which had an access port cut in the side and two rings made by cutting a chunk from a slice of the same tube which then support the filters. There were $7.00 polarizing camera filters used in it. The 49 mm filters used happened to fit the GIA immersion cell perfectly and furnished me with a very useful polariscope at low cost. Polarizing filters have some use on microscopes as well.
See this URL for more specific information on making your own polariscope: https://www.ganoksin.com/borisat/nenam/polaris.htm
Given a good microscope and the correct filters and refractive index fluids one can identify most gemstones in commercial use by determining their internal characteristics, refractive indices, double refraction estimation, optic characters, etc (see Liddicoat, Webster, Anderson et al).
Although probably the most expensive piece of equipment to purchase a good microscope is well worth investing in. Best is of course to buy the properly designed top of the line microscope-this is however not always an option for a poverty stricken student. Therefore we will now discuss other options. A new binocular microscope such as is used for biology or geology can be adapted for gemological usage fairly easily. Russian microscopes are on the market and they can be very inexpensive for good quality (Leica type lens technology) though there is not always a good range of magnifications available-you should check this before committing to this route. Machinists supply companies sometimes offer good quality binocular microscopes fairly inexpensively.
For general usage in gemmology you will want 10X, 30X or 40X and perhaps 80X magnification options either through a rotating objective lens underneath or by using exchangeable eyepieces. Lighting from below the gem and above as well is good, a zooming objective is very pleasant, a darkfield well is heaven (then you don't have to figure out how to make one and install it). When you make a decision check for eyepiece and small replacement bulb availability's (this last comment is the voice of experience). While you can use a monocular microscope (I've done that, I've been there when I started-functional if somewhat limited) a binocular microscope gives you the depth perception necessary for examining inclusions happily and with better results.
One can begin the search by contacting used and surplus dealers such as advertise in the back pages of the Lapidary Journal magazine or some science publications. If buying a used instrument it should be carefully examined for play in the focusing adjustment (it should not sink by itself under the weight of the body tube or head), the condition of the lenses, cleanliness, accessories, function for gemological use and the lighting system. Well suited to the aspiring gemologist is a stereoscopic (gives that feeling of depth) biological dissecting microscope which gives a wide field of view and lots of room between lens and stage to work in. These are often 20X and 40X which is sufficient to start with but one may want higher magnifications at a later date so remember to ask if higher magnification eyepieces are available for the model you are looking at.
Again, also check for the availability of replacement bulbs for the lighting system. As described above it should have both substage (from below the object) and incident (from the side and above the object) lighting. These sell at about $1,000.00 for biological use but one can obtain them for far less. I obtained my biological microscope new in the original wrappings but surplus for $345.00. Many of the current series of relatively inexpensive gemological and diamond microscopes available appear to be biological microscopes which have been adapted for gemological use.
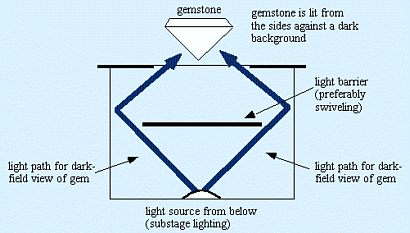
If using an unadapted stereoscopic microscope one can visit the local camera repair center where they will usually give you free the iris diaphragm from a broken camera lens. The iris diaphragm is usually still functioning and is are very useful for controlling the amount of light reaching the gemstone from below (transmitted light conditions) both for the microscope lighting system and also can be used as a lighting control method on other light sources when using a spectroscope. I found one that neatly fits in the light well of my microscope and which allowed me to control the light coming up from the substage bulb very well indeed. The iris diagram I have also happens to fit the GIA immersion cell perfectly which is beneficial because I often examine gems immersed in distilled water. By attaching a swiveling disc inside the iris diagram frame a 'dark-field' system was made. A dark field system is very important in order to light inclusions from the sides against a dark background so as to see and understand them better. If one has several such diaphragms one can rig one as a permanent dark field unit and interchange them as necessary. A swiveling dark-field unit does however provide more versatility in lighting conditions.
Here is a diagram of a dark field system for a vertical microscope. The light rays have to bounce before they get to the gemstone. It provides light entering the gem from the sides or obliquely against a black background which thus lets one see the inclusions more clearly than using transmitted light conditions (where the light path is directly through the stone from below). If you can set up a situation of lighting from the side (or all around) against a black background you can obtain dark field-like conditions. If you use a fiber optic light to light the gem from the side (preferably immersed in a liquid) against a dark background (like black paper under a transparent class cell or small jar) then you can emulate dark field conditions.
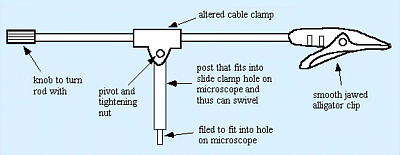
I use alligator clips with all the teeth filed off as interchangeable stone holders on my microscope. One can have several loaded and ready to go. This arrangement is far more pleasant than commercial stone holders and one never drops a stone into the light well on the microscope as the stone is put in the holder before the holder is in place on the microscope. It is also very inexpensive compared with commercial options.
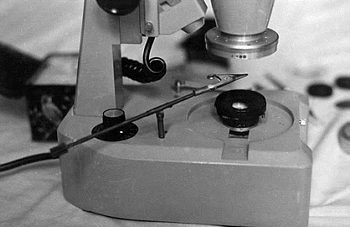
Here is a photograph of the system in place. Note the polarizing filter attached to the objective above the alligator clip stone holder.
For the beginner the Hanneman stereoscope has been highly recommended. Gemologist Ken Hamilton of Dartmouth, Nova Scotia uses his for most microscope examination purposes although he has a very good Bausch and Lomb model which he resorts to on rare occasions. At $150.00 or so it is the least expensive practical microscope going. It may require some innovation in lighting techniques (Hanneman supplies some accessories) and it is not the type of microscope to impress customers in a store, as some other ones seem designed to do. It has 15X, 30X and 45X magnifications and rack and pinion focusing. Similar very small binocular microscopes are available from suppliers for high schools and hobbyists (for example Efston Science in Toronto).
At a higher range of quality in dedicated gemological microscopes by preference and price come GIA's models and offerings from the Gemmological Association of Great Britain as well. A number of American microscopes are available. Check Lapidary Journal and Gems and Gemology for other sources. Gemmological microscopes will have a dark field well, stone holders, filter places above and below the gem perhaps a zoom instead of rotating lower lenses. The GemOro microscope systems get good reviews and are reasonably priced at this time.
Note that European style gemmological microscopes tend to be horizontal in orientation rather than the North American vertical ones. I think this is primarily a reflection of the importance of economics in the gem instrument supplier world. Because the horizontal ones don't look as impressive as a vertical one to the customer in a jewelry store (and are a little more fiddly to use; requiring more skill) they are not promoted in North America-not enough sales to jewelry store owners. A horizontal microscope gets any nasty fumes from refractive index fluids away from one's face but then perhaps on the other hand a vertical one encourages use of distilled water only which is safer than using such liquids. I still like a horizontal one though sometimes. and feel that for colored stones they have some advantages. That said there is a place for the vertical orientation in speed of use. It is possible to convert a vertical stereo microscope to horizontal use if you are willing to try constructing some parts for the conversion.
Fiber - Optic Lights
An addition to your microscope system that is really nice to have is a fiber optic light or two. This allows very effective side lighting of a gem against a black background (especially good for creating dark-field conditions). They can be purchased from gemology suppliers and provide several settings of a tungsten - halogen intense spotlight on a long gooseneck that can be twisted and positioned very easily fairly close to a gemstone held under the microscope objective. The end of the 'light pipe' or gooseneck is about 1/2″ across. They are very pleasant to have around and enable some really accurate spotlighting and side lighting of gems and their inclusions. Besides the intense light they put out they also allow easy positioning of lighting from almost any angle. They also serve admirably as a light source for spectroscopy or for a refractometer providing one has a sodium line filter in place on the refractometer. A side note is that I use my fiber optic light as a wonderful addition to my photographic system to light objects for taking good slides of them.
Related Articles
Colored Stone Light Source

SpeckFINDER HD Takes Magnification to High-Tech Levels

Make Your Own Polariscope

Bench Tools for Jewelers


The All-In-One Jewelry Making Solution At Your Fingertips
When you join the Ganoksin community, you get the tools you need to take your work to the next level.
