
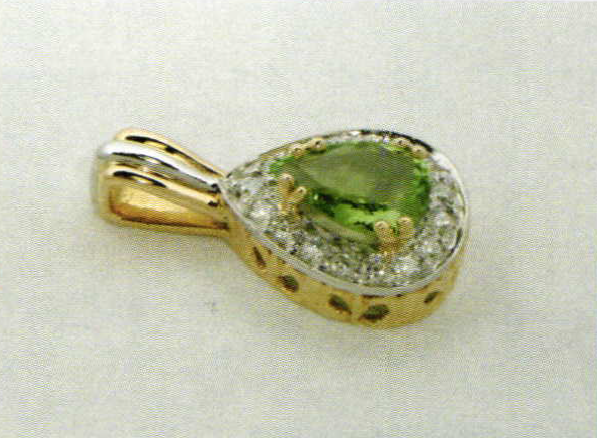
Fabricating a Pear-Shaped Pendant
7 Minute Read
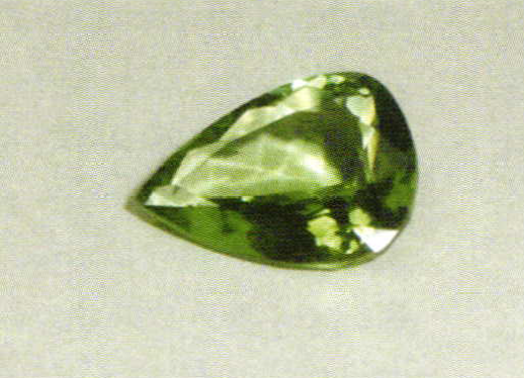
A customer selects a pear-shape sea foam tourmaline from your loose stone s and informs you she would like a pendant. While determining the style of jewelry she likes, she points to a piece of pierced filigree jewelry stating she really likes that style.
You make a few counter sketches to make certain the two of you are both thinking alike, inquire about what size and style of chain she will be wearing it on, and set an appointment for her to return to see your drawing.
For this hand-fabricated pendant, you choose a simple 2-D CAD program to design the jewelry. Traditional renderings in colored pencil or watercolor could be used, but the cut and paste features of a CAD program will make this drawing easier. A 3-D CAD program is great when a wax is needed for casting. However, as this will be a hand-fabricated piece this feature is not needed, and a 2-D program is easier to learn and use.
Your customer returns at the appointed time and looks over the 4 or 5 renderings you present. She likes all the designs and has a hard time settling on just one. After much deliberation, a design is selected and she gives her approval for you to begin. She leaves a deposit and you start creating your magic in gold and platinum.
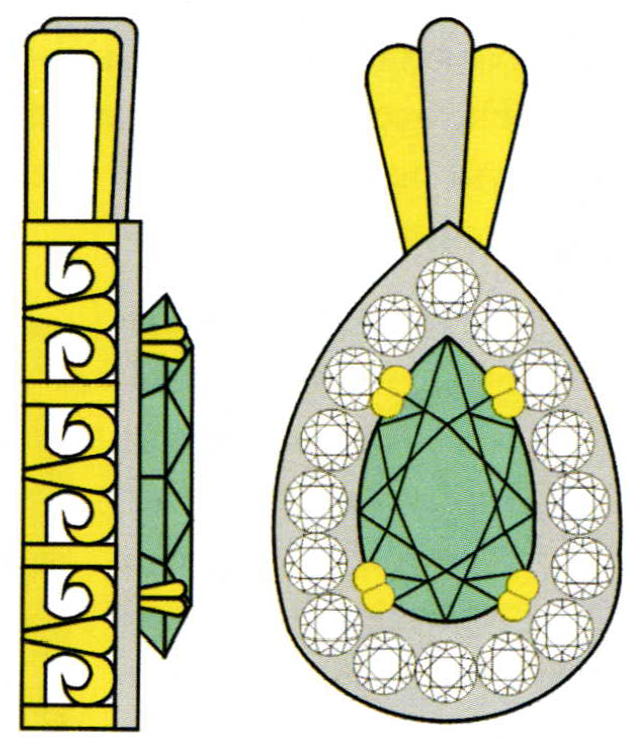
The first part you need to make is the platinum plate for the diamonds circling the tourmaline. For this project, use a plate 1.2 millimeters thick. Melt a small amount of bee's wax on the plate and place the center stone table down on the wax. The wax will help hold the stone in position during subsequent steps. Next, use a scribe to draw a line the exact size and shape of the girdle of the stone. This is the most critical part of the layout phase. If this line does not match the stone exactly, the pendant will not be proportioned correctly, the stones will not fit properly, and regardless of the quality of workmanship during the rest of the project, the outcome of the pendant will look shoddy.

Next, use dividers to mark the outside edge of the plate. The diamonds are 2 millimeters in diameter, so set the dividers for 3.5 millimeters. This will provide one millimeter of room on the outside of the diamonds for the bright cut, and the edge of the diamonds will be just outside the circumference of the center stone. Next, remove the stone from the plate and mark a line with the dividers one millimeter smaller than the girdle of the center stone. This will provide room for the inside bright cut and fill in the space under the center stone when set. A brush finish on the plate will make the scribed lines standout, making them easier to see.
Drill a hole and cut out the center of the plate. Mark the center of each diamond and drill holes for them. Drill the holes now, before you cut out the plate. This gives you a larger area to hold while drilling, making the job easier. Next, cutout the plate and file to shape. Lay the center stone over its hole and make certain the outside of the plate is evenly spaced around the stone.

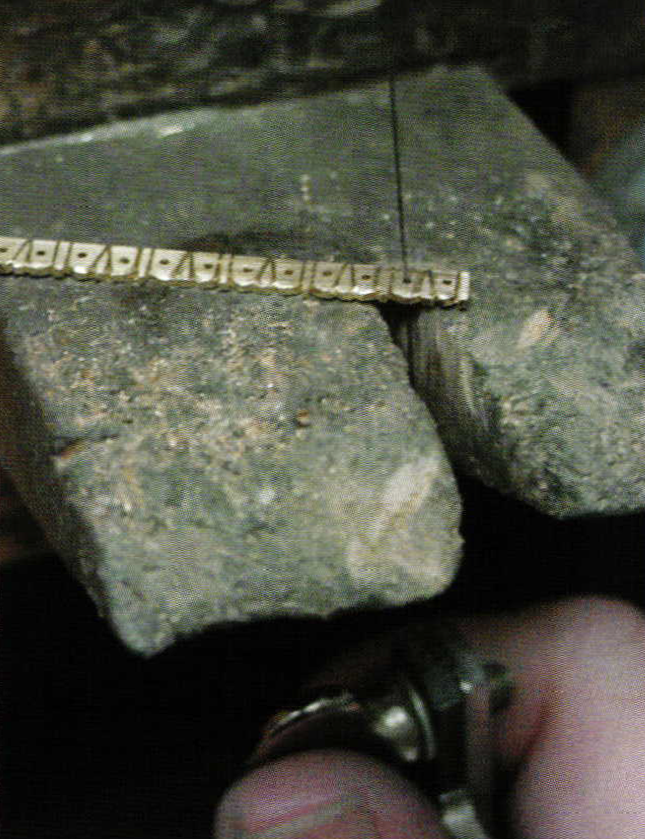
The next step is to create the filigree under-bezel. This is cut from a length of 1×4 millimeter 18-karat yellowgoldstock. You can lay out the pattern with dividers and a scribe, or an easier method is to print the 2-D image on a label using your computer printer. Place the label on the gold stock and drill and saw through the label shaping the gold stock. Remove the label, and refine the shape with your saw and needle files.
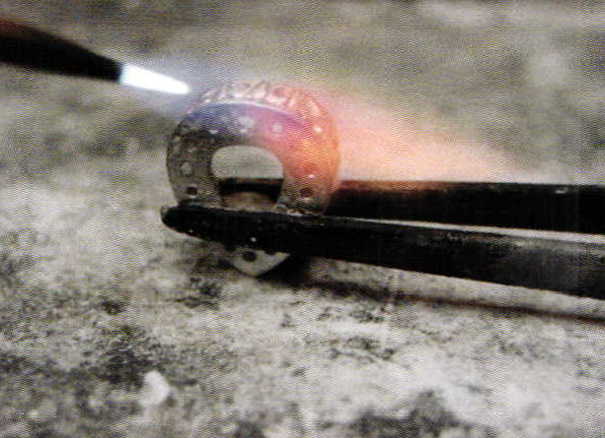
Bend the under-bezel into a pear shape making certain it fits the platinum plate. File the joint to fit tightly and solder closed with yellow 18-karat hard flow gold solder. Polish the under-bezel and platinum plate, and solder together with yellow l8-karat medium flow gold solder. Do not use too much solder. Excess solderwillbe difficult to remove without altering the pattern in the gold or leaving marks in the side of the platinum plate.
The next step is to create the prongs from a section of 1 x 2 millimeter l8-karat yellow gold rectangular stock. Cut the prongs to length, a little longer than the stone is deep is adequate. Next, cut a line down the center of the prong. Use the saw blade as a guide as to how deep you cut the line. 2/0 blades are 0.6 millimeters deep. Cut until the back of the blade is even with the surface of the metal. Then you will know that you have cut just past half way through the metal. Using a needle file shape the outside of the prongs. Making a double wire prong in this manner is easier than trying to solder two wires together, and it leaves a flat smooth surface on the inside of the prong to facilitate setting.
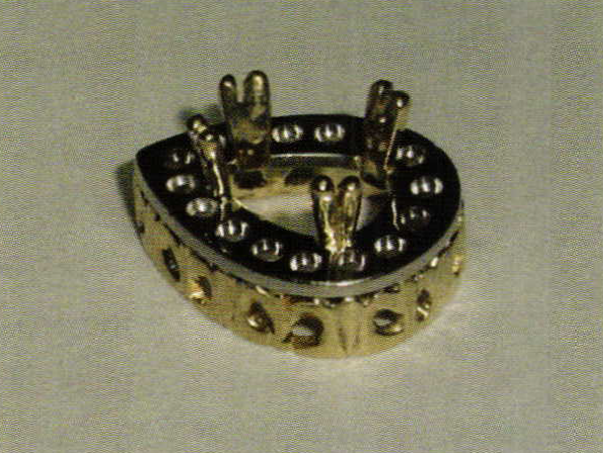
Mark the location of the prongs on the platinum plate. Then using your saw cut out notches in the platinum plate for the prongs. Solder the prongs into place with yellow 18-karat easy flowgold solder.
The final step in fabricating this pendant is to make the bail. 1 X 4 millimeter 18-karat yellow gold stock is used for the back and top of the bail. Mark the length of the back and top, however, do not cut the length at this time. The extra length will make it easier to work with, and you will be more accurate in cutting the length after making the bend.
To make the bend between the back and top of the bail, saw a line 3/4 of the way through the stock. Again, use the depth of the saw blade as a guide as to how far you have cut. When the back of the blade is just past flush, you have cut far enough. Next, bend the gold just enough to close the saw curf, then re-saw through the line, and bend again. Keep repeating the sawing and bending until the gold stock is bent at a 90o angle.

Be careful when sawing so that you do not saw all the way through the gold stock. If the two pieces separate, it will be difficult to line them up while soldering. By sawing only ¾ ofthe way through the gold stock, the bend will have a soft corner, which is preferable on a bail. If you wanted a sharp corner you would need to cut until you were almost through the gold stock, working carefully to keep from breaking the two pieces apart before you get them soldered together.
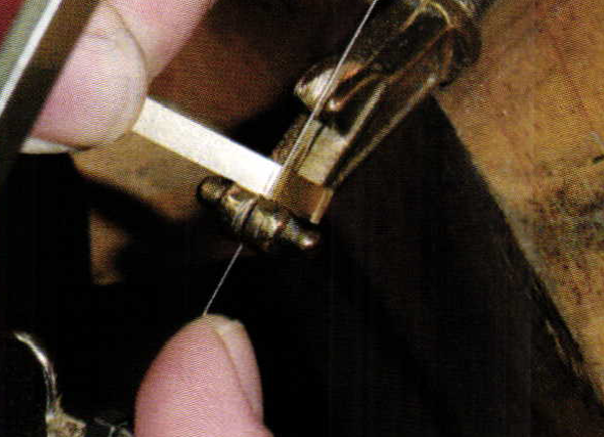
Next, solder the seam closed with yellow 18-karat medium flow gold solder. After soldering, cut the bail to length. The inside of the back is l0 millimeters long and the inside of the top is 5 millimeters tall. These measurements will allow the pendant to be worn on an 8 millimeter Omega chain.
Next, stamp the gold stock with l8k, and Plat stamps as well as your makers mark. Doing this now before it is attached to the rest of the pendant makes it much easier to stamp. Polish this sections of the bail, especially the inside areas. Then fit and solder it to the pendant using yellow 18-karat medium flow gold solder.
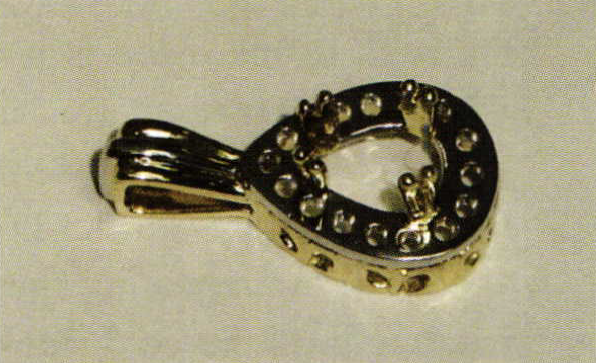
Next, select a piece of 1.5 X 6 millimeter l8-karat gold stock for the front of the bail. Cut it to length, and file to a taper. Then, using a saw and file, cut a groove in the front of the bail to accommodate the platinum accent. Then, round off the gold on each side of the groove with a file and polish. Solder the top of the bail onto the pendant using yellow 18-karat easy flow gold solder.
Next, select a piece of 1 x 2millimeter platinum stock. Bend it in the same manner as the back section of the bail and solder the se am closed with 1300 platinum solder. File the platinum to shape and polish it to a high shine. Platinum must always be pre-polished before attaching to gold or else you will over polish the gold trying to achieve a polish on the platinum. Solder the platinum accent to the bail using yellow 18-karat easy flow gold solder.
Polish the pendant with rouge for a final polish, and the pendant is completed, ready for setting.
Related Articles

A Conversation with John Marshall

The Modern Art of Gemstone Carving
Recent Sightings: Jewelry Teachers

Mary Ann Scherr


The All-In-One Jewelry Making Solution At Your Fingertips
When you join the Ganoksin community, you get the tools you need to take your work to the next level.
