
Engraved Bezel with Vertical Walls
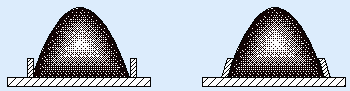
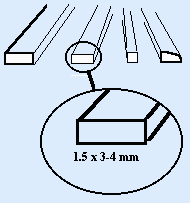
Stonesetting has been a part of goldsmithing for as long as people have worked in precious metals. Perhaps the oldest and most used setting has been the bezel. The simplest form of the bezel is a ring of metal fitting the circumference of the enclosed cabachon or tapered material soldered onto a base plate. The stone fitted inside, and the metal is pushed, burnished or hammered towards the stone.
16 Minute Read
Stonesetting has been a part of goldsmithing for as long as people have worked in precious metals. Perhaps the oldest and most used setting has been the bezel. The simplest form of the bezel is a ring of metal fitting the circumference of the enclosed cabachon or tapered material soldered onto a base plate. The stone fitted inside, and the metal is pushed, burnished or hammered towards the stone. This closes the taper on the cabachon enough to hold it in place (see illustration 1.0).
A further development of the bezel came about as the goldsmith wished to set the stone up off the metal surface for decorative or illusory purposes, and as round and oval facetted stones were developed.

I will describe several methods of making the setting and then go on to the procedure of engraving out the bezel, which is the concentration of this article.
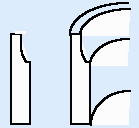
One way of making the setting is to solder a wire to the inside of the bezel. Another is to solder a fitted inner tube to the bezel. The stone rests on this shoulder and the metal above it is closed about the stone, setting it. Shoulders for facetted stones are beveled with a half-round file before soldering into place, or carved away afterwards with a flat engraving tool or careful use of burs (2.0).
The beveled slope serves as a close-fitting seat for the pavilion of the facetted stone (2.1, 2.2).
Without this being a good fit the stone might break under the pressure of hammering while being set. (see 5.1) Both of these methods require construction by the goldsmith and may take longer than engraving or burring a seat for the stone.
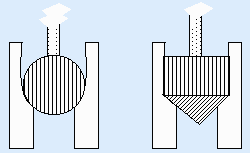
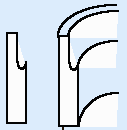
With smaller round bezels (tube settings), the seat may be successfully and speedily burred out with a suitable round or stonesetting burr (3.0). A round bur has the advantage of always being centered no matter what angle you put it in the tube and of working well for stones under 3mm or so. For larger stones one can choose to follow up very gently with a setting burr to clean up the seat-be careful not to tip the setting bur as that will damage the setting.
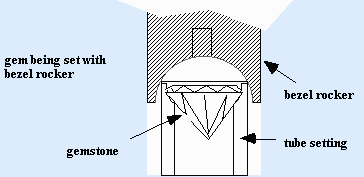
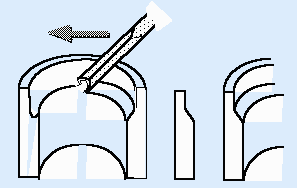
They may be set by hammering, burnishing, with pushers, punches or with a polished concave hemispherical punch called a bezel rocker. These tools may be bought or made in different sizes. The bezel rocker is rocked to and fro until the stone is set, or if the bezel wall is thin and speed is important, it is used as a punch and set in one blow (4.0).
With ovals and larger round bezels, engraving tools are often used. The bezel wall is cut away to the desired depth and proportion of wall thickness and the seat engraved out (5.0).
With practice this method is fast and as crisp as a good constructed setting. The bezel should be at least 1 mm in wall thickness and the stone should cover about half of this thickness when placed onto the bezel and viewed from above prior to beginning. The bezel as part of a piece is held in a ring clamp or set into a pitch stick. It is suggested that practice settings be done with glass stones, as glass is a good test of stonesetting ability. Glass stones with sharp or angular girdles should be rounded slightly using a file or carborundum stick, as too sharp a girdle can lead to breakage while setting.
During the engraving of the setting, the stone is constantly checked for a good fit using the wax. It should be fairly tight and on an even seat. If it rocks when pressed with the fingernails at opposite ends it is rocking like a see-saw on a fulcrum and the middle is high so the seat must be corrected by carving out some of the seat in the middle from where the fingernails could rock the stone. This rocking, testing and slight carving of the seat is repeated from different angles until the stone does not rock any more. Note that it is fine to be a little deep in a setting, chances are you chewed up the top of the bezel a bit and so the top will need filing down a touch.
One should try for a best case of a perfect fit to the pavillion of the stone, which on an oval stone means that the angle of the seat changes as it goes around the stone. This is why knowing how to engrave is useful: it can be more difficult to control bur angles than to carve them with an engraving tool. A perfect fit is easier if the seat is not too wide: aim for a seat that is about .3 to .5 mm wide. Make a small seat. The wider it is the more work is involved in cutting it. I'm mentioning this because people often make their original measurements so that they have to carve too much material away to make the seat which is difficult and time consuming.
The situation to avoid is when the seat is a shallower angle than the pavillion of the stone and this results in pressure on the stone when the wall is hammered down onto it during setting. This pressure often cracks a stone. Acceptable, easiest and fastest is to have the angle greater than the pavillion (exagerated slightly in the drawing that follows). This places no pressure on the stone and ususally results in a satisfactory setting. (5.1)

Before discussing the technique, a brief description of the tools is needed:
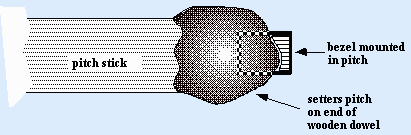
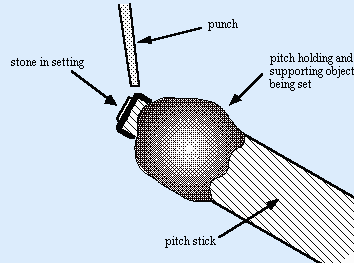
Pitch stick. A wooden dowel about 2.5 cm in diameter and 12-15 cm long. The pitch melted onto the top is hard setters pitch, too hard to be dented with a fingernail and not too brittle. The setting is heated and pressed into the previously softened pitch. (Do not burn pitch while heating it.) It may be rapidly cooled in water if necessary. The pitch should be smooth and not bumpy. This is for comfort in working as will as for safety, as lumpy pitch may break under pressure (6.0).
 Wax stick; wax cone or a 'wax leg' is used to manipulate and move stones and small objects around. It is made by taking a lump of beeswax about the size of the top joint of your index finger and kneading it between the fingers until it becomes soft and pliable. Then it is rolled in powdered charcoal (one can file a charcoal block or drawing stick) and thoroughly kneaded to mix it. One adds charcoal powder and kneads again. Occasionally one tries to pick up a pair of pliers with the wax. When it will pick up the weight of a pair of pliers and hold it for a count of ten then the mixture is about right. The wax mixture is shaped to a conical form and the pointed end is used to pick up stones and manipulate them in their settings. The wax cone will also remove a stone stuck in it's setting by working it down upon the stone and suddenly jerking upwards with the wax. Even an apparently impossibly stuck stone will come out eventually using this procedure. One rather repulsive name for it I've heard used by a setter is a 'booger stick'. Sometimes it is placed on the end of a small stick.
A magnifier: One often needs to check ones work under magnification while stonesetting, and especially while learning. Jeff Demand tells me that in Toronto it is becoming the norm for employers to check all hand work for quality with a ten power loupe before putting it into the store or passing it on to the customer. This is a pretty high standard. Gemologists use a ten power loupe which has been chromatically corrected, that is corrected to mostly eliminate distortion of focus and color. For merely checking your work an inexpensive plastic (2-3 dollars) ten power loupe is quite adequate. Some people use Optivisor® and similar head set mounted lenses; my personal preference is to work without them and check with the loupe. Some setters use head mounted surgical lens systems which are like high tech Optivisors®. At least one setter I know had 7 power lenses ground and fitted into standard spectacle frames so as to have a very wide field of magnified vision. This is a good solution for those who already wear glasses. A new trick I came up with is to use an old 55 mm camera lens (one can be obtained from a used camera store; if the iris diaphragm inside is damaged the lens may be free), this gives one a very large area of enlargement, perfectly distortion free and easy to see through. While I am not sure of the magnification it seems to be at least seven times and provides a really good field of view. As with the normal loupe one usually keeps the eye not looking through the lens open and uses the dominant eye to do the looking.
A stone leveling tool functions to produce a small area of pressure on a stone's facet to level it in it's setting. It therefore must have a small end to produce a restricted pressure point and be soft enough that it will not scratch or damage the stone. Traditional materials for such a leveling tool include wood, ivory, bone, copper and brass. A toothpick will work. My favorite is a traditional tool made of a brass rod tapered on both ends with a lentil-like boss in the middle which one presses against with the fingers when using it.

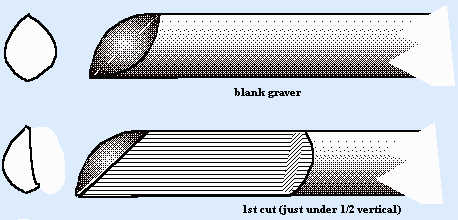
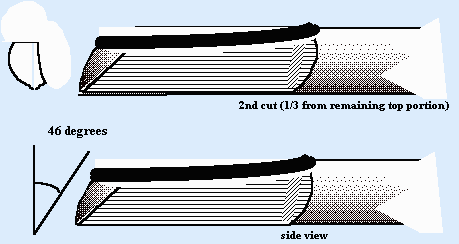
Oval graver. An oval graver (no. 6 is good for starting) should be ground to shape. When the handle rests in the palm of the hand and the steel against the ball of the thumb, it should stick out about 1-1.5 cm beyond the end of the thumb. When grinding an engraving tool, cool it very frequently. Any colouring of the metal means loss of temper and the ruin of the coloured area. The left side is ground back about 3 cm and about halfway across the tool to the middle. The top is then ground down about a third of the height of the graver. Any sharp edges on the top are rounded slightly. The front angle is cut on the grinding wheel and then by hand on the oilstone. (7.0).

Round graver. (Suggested no. 3). The top is ground back from the point about 2-3 cm. The point is ground to the correct angle and finished on the oilstone. The height of the front is about 2-2.5 mm (7.1).
Flat graver. (No. 6 or no. 10). The top is ground back about 2-3 cm and the top sides are strongly beveled (7.2).

Flat file. Normal size for the hand, in a fine cut. For cleaning up and finishing certain stonesettings one needs several 'safe files'. These are files where one edge has been emeried smooth and high polished so the file can slide against a stone without much chance of damaging it. Even stones harder than steel can be damaged sometimes by catching on a file so the safe file is quite useful. I was told in Germany that the traditional lubricant was 'nose oil', that is to take a little swipe from just above one's nostril and rub it on the polished side of the file before use. While one can make safe files from needle files my favorite safe file has a cross section of about 2 by 6 mm and is about 30 cm or a foot long. The long sweep is efficient and smoothing.
Chasing hammer and a vise or engravers ball to clamp the pitchstick in during setting. A panavise works well. I like a Benchmate® system for holding things for setting. The pitch however does the best job of supporting the metal during the setting procedure. Setting punches. These are about 10 cm long and hardened. The edges are rounded slightly. There are other shapes available for different setting purposes (7.3).
The secret to using engraving tools is not to push, but instead to hold the tool as tightly as possible in the hand and concentrate on the control of its forward and backward motion against the thumb. All cutting of the bezel is done with the end of the thumb pressed against it as a brake and the graver braced along the thumb. This aids in control. The end of the thumb is always pressed onto the front of the setting or the pitch.
The procedure of engraving and setting may be broken into seven steps.
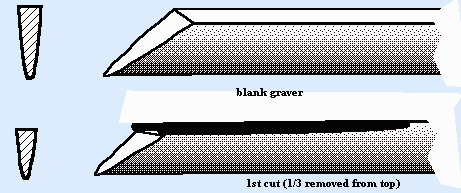
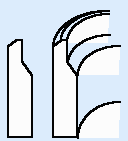
1. The oval graver is used to cut away the width of the wall necessary to admit the stone. Usually .4 mm from the inside, leaving .5-.6 mm as a bezel wall. The oval graver cuts the metal from the interior of the bezel to just under half the bezel wall thickness, so the stone fits. It is held at an angle into the bezel and the pitch stick is braced in the V cut of the bench pin. The pitch stick is rotated by the left hand clockwise towards the graver. The graver should not touch the top edge of the bezel, but should be supported by the thumb. The cut should be smooth and not jerky. It is far better to remove a little in several passes than a lot of metal in one. The graver should be sharpened as necessary. The finished cross-section is as in 8.0.
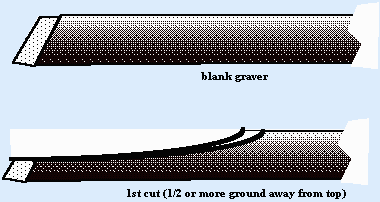
2. The round graver is held in about the same position as the oval graver was. It is used to make the wall vertical and to set the proper depth for the stone. It does this by bringing the curve at the bottom of the first cut towards the outside, creating a vertical wall with a shallow channel at the bottom. The bottom of this channel is the point upon which the bottom of the stone's girdle will rest. The channel should therefore be perfectly parallel to the top of the bezel and as smooth as possible on the vertical side (8.1)
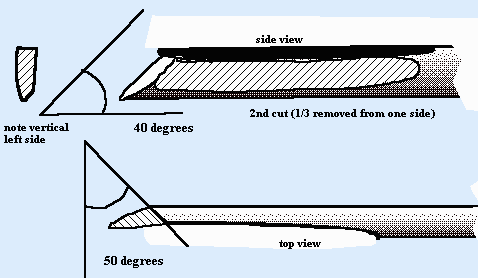
3. The flat graver is used to cut the bevel upon which the pavillion of the stone rests. It is held at an angle into the bezel, at about 40-55o and on a slant to form the bevel. Unlike the two previous gravers, it is not guided in the direction of the tool shaft, but sideways to it. This requires a very tight grip on the tool, as it tends to slip down below where it should be, or is uneven in cut. The top leading corner runs along the outer edge of the channel left by the round graver, leaving a shiny, even bevel. Do not cut into the wall with it. If it judders and skips, your angle into the bezel is probably wrong (8.2).
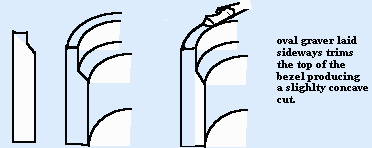
4. The oval graver trims the top wall of the bezel, sloping to the inside. It is placed on its side flat on the top of the bezel. In several shallow strokes, one cuts a small concavity towards the inside. After the metal is pushed over the stone, this reduces the amount of remedial engraving necessary (8.3).
5. The top of the bezel is now filed on a slant to the outside in preparation for stonesetting. It is against this bevel that one presses or hammers to set the stone. It is steeper than the inner bevel and takes up about 2/3 of the upper bezel thickness when viewed from above (8.4).
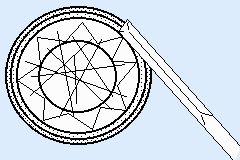
6. The stone can now be set. One may use a stone-pusher set in a graver handle, a flexible shaft hammer, a chasing hammer peen or setting punches. In every case, one 'tacks' the stone in position. It is like stretching canvas, first on one side, then on the opposite. If it were points on a compass, it would be N-S, E-W, NE-SW and so on until the metal is tight around the stone on all sides. In all method one sights frequently along the table of the stone to check that it remains level. If you arrange the setting so that the table of the stone reflects a bright even reflection to the eye and then places one's thumb upside down over it casting the stone and setting into shadow the relflection will still be bright to the eye and one can easily see if the talbe is level to the setting.
When using a chasing hammer peen or a flexible shaft hammer, one places the thumb over the stone while hammering, both to protect it from damage and to hold it in place. One changes the angle of the blows as the bezel moves in, to ensure a tight flow of metal against the stone. If the metal is thin and ductile enough to warrant it, one can use bezel pushers, holding the stone in place with the left thumb or forefinger. On thicker and less ductile metal, setting punches offer good control. One must, however, be aware of working the metal too much, as cracks may result. The pitch stick is placed in an engravers ball or vise, freeing both hands. Using a ball is surer, faster and easier than using a vise. One braces the fingers on the bezel and pitch, holding the stone in place with the little finger. The punch is held against the bevel. It helps to set the pitch stick at an angle so that the punch is perpendicular to the table and thus easier to hit. The bezel is tacked and flowed tightly against the stone. The inner bevel cut in step 4 now forms a right angle to the crown facets of the stone. The stone is now set. During the hammering process, one must have good control of the punch. In any setting method, the tool, especially a punch, must not touch the stone (8.5).
7. The outer bevel may now be filed to smooth over any marks left from setting. To reduce later polishing and rounding of the bezel, one can use the bottom edge of the flat graver like a scraper to smooth the outer bevel. The inner bevel will probably require a little touch-up work with a sharp, polished flat graver (8.6).
When one works well and cleanly, the setting may need little or no polishing because the inner bevel is cut to a mirror finish and the outer almost the same through scraping with the flat graver. Stones set this way are very secure and more resistant to wear than those set in more ductile metal or thinner bezels.
Grateful acknowledgement to my teacher Walter Zeiss.
ENGRAVED BEZEL
Tools:
- Pitch stick
- Wax stick
- Pusher and/or punch and hammer
- Oval gravers, one or two with a cross section of at least 3x5mm
- Round gravers, two with a base 1 mm across.
- Flat gravers, two, with bases 2 and 3-4mm across.
- 1 flat fine cut narrow (3-5mm) file if available.
- 1-5 18cm (7″) lengths of broomstick handle to put pitch onto for pitch sticks.
- Hard setter's pitch (Black setter's pitch from Fischer-see below) or orange flake shellac.
- Arkansas hard sharpening stone or equivalent.
- 1 fine (600-800) grit sanding stick to be rubbed with pencil and used to polish gravers.
- Set of medium cut round burrs; or one each of 1.5mm, 2mm, 2.5mm, 3mm, 3.5mm, 4mm sizes.
- Set of medium cut setting burrs; or one each of 1.5mm, 2mm, 2.5mm, 3mm, 3.5mm, 4mm, 4.5mm, 5mm sizes.
Bezel wall thickness: 1 mm
- The oval graver is used to cut away the width of the inside wall to admit the stone.
- The round graver is used to make the wall vertical and to set the proper depth for the stone.
- The flat graver is used to cut the bevel upon which the pavillion of the stone rests.
- The oval graver trims the top wall of the bezel, sloping to the inside.
- The top of the bezel is filed on a slant to the outside in preparation for setting.
- The stone is set using: stone pusher or setting punches and hammer or hammer handpiece on flexible shaft or chasing hammer peen.
- The outer bevel may be filed smooth to remove marks from setting. A flat graver may be used to clean up the inside of the bezel, if necessary.
Related Articles

Flat Topped Solitaire Setting

Jenny Reeves’ Layered Ring

Basic Gypsy or Flush Mount Setting

950 Palladium: Making a 3-Stone Ring


The All-In-One Jewelry Making Solution At Your Fingertips
When you join the Ganoksin community, you get the tools you need to take your work to the next level.
