
Easy Enameled PMC Pendant
4 Minute Read
For those of you who have not worked with Precious Metal Clay, you'll find there are certain terms unique to the PMC 'lingo'. For example, when rolling out a sheet of PMC the goal, usually, is to obtain a uniform thickness. It is common to use playing cards for this purpose. They are thin, which allows for small incremental changes in the thickness of the sheet to be rolled out. Hence, you'll see instructions such as 'Roll a sheet four cards thick', or 'Roll out a sheet five cards thick'. Five cards is equivalent to 1 1/2 mm thickness, before firing. During the firing process the PMC will shrink in length, width, and thickness.
There are three formulations of silver
PMC. The following project is a pendant made from PMC+ (PMC plus). This formulation has an approximate 12% shrinkage rate when fired.
Tools and Supplies
20 grams PMC+
Small container of water
Olive oil
Small plastic sheet
Playing cards
Small natural bristle paint brush
Texturing materials
3 mm ball stylus
Cutting blade or Exacto knife
Brass brush or 0000 steel wool
Needle tool or metal burnisher
Fine grit sandpaper
Drinking straw
Firing furnace
Enamel
Thompson Unleaded
2430
2530
2760
Small sifter
Small firing trivet
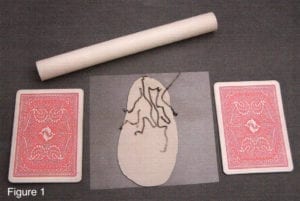
- Rub a small amount of olive oil onto a plastic 5″ x 5″ sheet. Roll out a sheet of PMC+ 4 cards thick. (Fig. 1)
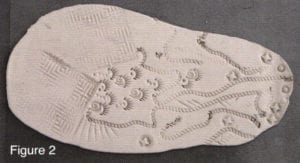
- Using your chosen texturing materials, press textural images into the PMC+ sheet. The following texturing items used here are: Philips screw, needle tool, leather stamp, ball stylus, and a rubber stamp. (Fig. 2)
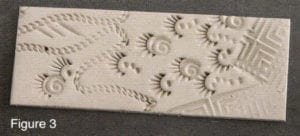
- Choose the most interesting textural combination, then cut a rectangle 3/4″ wide x 2″ long. (Fig. 3)
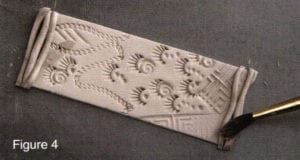
- Roll out several thin coils of PMC+ 1 1/4″ long. Moisten the top and bottom edges of the pendant with a wet paint brush. Place the coils in a casual arrangement across the top and bottom. Moisten with the wet brush all places where the coils touch each other and the pendant. Trim the coil ends even with the edge of the pendant. (Fig. 4)
Tip: Moisten the pendant, attach the coils, then let the piece 'rest' for about one minute. This will allow the water to penetrate the PMC enough that the PMC elements meld or stick together firmly. This will ensure a successful firing.

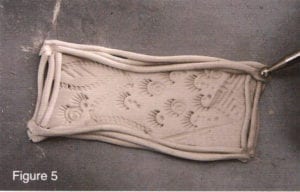
- Repeat step 4 with 2 1/2″ long coils down each side of the pendant, overlapping the ends of the shorter coils. Using a 3 mm ball stylus, press a divot into each of the four corners where the coils meet. (Fig. 5)
Set the pendant aside to dry. Drying may be accelerated by placing the pendant into a dehumidifier, or by placing it under a desk lamp or hairdryer.
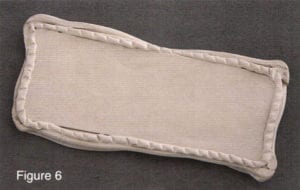
- When pendant is completely dry you'll need to fill in the gaps on the back where the coils were attached. Roll out a thin coil 7″ to 8″ long. Moisten the back perimeter of the pendant. Lay the coil around making sure all gaps are covered. Gently press to coil into the gaps. For added interest, texture the coil. (Fig. 6)
Set aside to dry.
- When pendant is dry, smooth any rough edges with fine grit sandpaper.
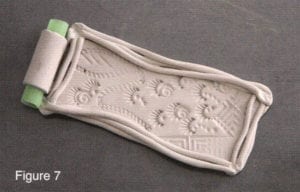
- Attach the bail. Cut a 2″ piece from the straw. Roll out a sheet of PMC+ 3 cards thick. Cut a strip 5/8″ wide. Wrap it around the short length of straw, and trim the excess length. Moisten the join with a small amount of water. Texture the bail. Moisten the top of the pendant and press the bail onto it. (Fig. 7)

- Add several balls of PMC+ across the front of the bail. Press a divot into each ball.
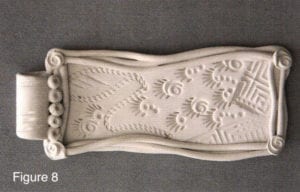
- Add a decorative motif to each of the four corners of the pendant where the coils meet. Roll out four PMC+ balls approximately 3mm in diameter. Press a texture into them. Moisten the corners of the pendant, then place the textured motifs onto the corners. (Fig. 8) Set the pendant aside to dry.
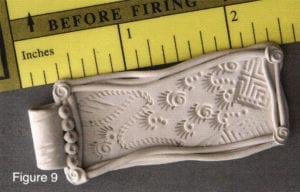
- When completely dry, inspect the pendant. Make sure all sharp edges have been smoothed using the fine grit sandpaper, and all elements are securely joined. Fig. 9 shows the size before firing.
- Fire the pendant at 1650°F for one hour. Place the pendant onto a fiber blanket and lay on a firing tile. Place into a cold furnace. Ramp the furnace up to 1650°F. Once it reaches temperature, set a timer for one hour.
- When firing is complete let the kiln cool until the orange glow disappears. Using heat proof gloves and a long handled spatula or firing fork, remove the piece from the furnace. Quench the piece. (Immerse it in a metal bowl with water).
Figure 10 shows the size of the piece after firing.
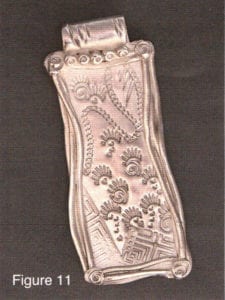
- Using the brass wire brush, or the 0000 steel wool, rub the pendant until it has a satin finish. If desired, the high areas can be brought to a high polish using a metal burnisher. (Fig. 11)
The piece is now ready to be enameled. Set the furnace at 1425°F.
- Counter enamel the back of the pendant. Sift enamel onto the back of the pendant. Fire 2 to 2 ½ minutes.
- Sift or wet pack the three enamel colors onto the front of the pendant, blending the colors. Wipe the excess enamel powder from the tops of the coils. It's important to keep the coils as clean as possible. If the coils need to be stoned, the rounded edges will be lost. Fire 2 to 2 1/2 minutes. (Fig. 12)
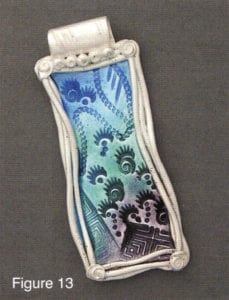
- Repeat step 2 to fill in the color. (Fig. 13)
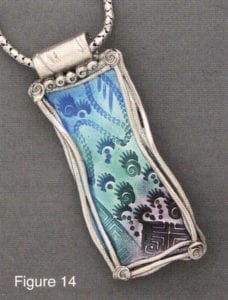
- Patina the pendant with liver of sulfur.
- Add a chain and it's ready to wear! (Fig. 14)
Next project: Intermediate Level
Editor's Note: Jeanette Landenwitch will be a featured instructor at the W.W. Carpenter Enamel Foundation Open House on September 22 & 23. See then place the textured motifs onto page 70 for a description of her workshop.
Related Articles

Enameling Tips: Cause and Effect

Book Review – Beginner’s Guide to Enamelling

Enameling on Electroformed Vessels

Enameling Safety Issues You Should Know About


The All-In-One Jewelry Making Solution At Your Fingertips
When you join the Ganoksin community, you get the tools you need to take your work to the next level.
