
Copper Granulation Technique
11 Minute Read
Granulation, a technique used in jewelry and metalwork, is the decorative use of minute metal granules attached to the surface of the same metal, or, in some cases, attached to each other. In attaching the granules to a surface or to each other, the objective is to create a minimally visible, if not invisible, joint.
Traditionally, gold granules are attached to each other or to a gold base, and silver granules are attached to each other or to a silver base. Gold granulation is more prominent than silver in historical jewelry. In contemporary jewelry, granulation is produced in gold and silver, but not in other metals.
Recently, the authors have developed an innovative method of producing granulation in copper. The reasons for using copper are as varied as individual artists. Some are esthetic and some are practical. The color of copper, whether polished or oxidized, has a particular beauty. Since the discovery and use of gold and silver, copper has been relegated to the use of practical objects, while silver and gold were assigned as materials for jewelers and goldsmiths.
Nevertheless, during the past 15 years, copper has infiltrated the contemporary metal arts. In 1977, the "Copper, Brass and Bronze" exhibition at the Museum of Art, University of Arizona, directed the attention of artists and critics to the new position of the nonprecious metals, in this case, copper and copper alloys, in the metal arts, With copper, as well as any other nonprecious or precious metals, the more versatile and adaptable it is to metalworking techniques and procedures, the more attractive it will be for use. On a practical basis, both students and artists must contend with the fluctuating and often exorbitant price of the precious metals. Copper is a useful alternative to precious metals especially in cases of larger pieces of metalwork.
Copper Granulation Technique
The technique for copper granulation to be described evolved directly from the traditional granulation method of surface layer on a metal that has a lower melting temperature than the core of the metal. The advantage of this for granulation is that there is less of a chance of melting down minute granules during attachment than there is with welding. In gold granulation, a layer of copper is diffused into the surface of the gold, creating a gold-copper alloy which has a lower melting temperature than pure gold. Surface alloying in gold has been produced through various methods. From the gold-copper phase diagram (Figure 1), one may observe that the addition of copper to gold of from 1% to approximately 87% results in an alloy with a lower melting point than pure gold. The alloy of 80% gold and 20% copper has the lowest melting point of any gold-copper alloy.
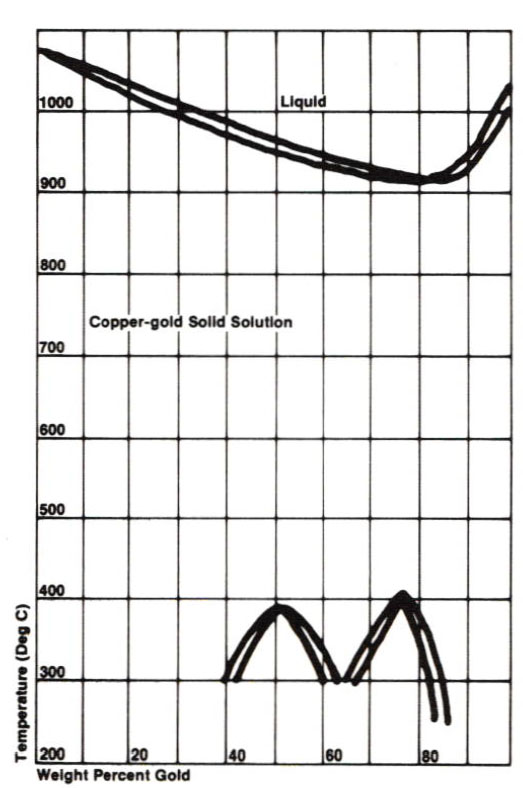
Figure 1
For the sake of comparison, a technique for gold granulation by surface alloying is as follows:
- The granules are attached with a mixture of a copper salt in a gum tragacanth solution.
- As heat is applied, the gum tragacanth carbonizes, creating a reducing atmosphere as it volatilizes. A layer of the reduced copper remains on the surface. Through further heating, the copper diffuses into the surface of the gold.
- Copper which has diffused into the gold surface creates an alloy which has a lower melting point than pure gold. The melting of this alloy creates the joint (see Figure 1).
After studying the procedure for gold granulation by surface alloying, Bonnie Deutsch, began to look at copper phase diagrams to see if any other metals combined with copper would lower its melting temperature, It was found that several metals, antimony, cadmium and manganese, could serve as surface alloying elements with copper. Experimentation with these combinations was next carried out.
The experimental procedure was quite simple. Samples of copper to be used for the bases with the granules were 20-20- gauge, ½" x ¼" rectangles with a small hole through each piece. The granules were made by cutting bits of wire, placing them on charcoal and applying enough heat to form small spheres. The granules were applied to each piece of copper base with the oxides of the alloying metal in combination with a dilution of Elmer's glue and water. After the granules were dried in place, each test piece was mounted on the tip of a thermocouple wire and placed through a port in the door of a small muffle furnace. As the temperature was elevated, the test piece was removed and visually examined at various intervals to see if a granular joint had formed. When the joint appeared to have occurred, the thermocouple with the sample was removed and air cooled. The granules were tested for adherence by pulling at each one with tweezers. Each successful test piece was labeled according to the granulation method, alloying element and the temperature of the granular joint.
The initial experiments resulted in the conclusion that copper granulation cannot be equated to gold granulation that simply. The first set of experiments in which the samples were placed in the furnace produced a "false" granulation. What appeared to be granular joints were actually oxide coalings on each piece that held the granules in position. As the oxide chipped off, the granules fell off. In actuality, the oxide coating formed a barrier between the granules and the base in all cases.
To prevent oxides from forming, the test pieces, coated with the oxide mixture, were placed in a crucible and then covered with powdered charcoal to provide a reducing atmosphere. Unfortunately, granular joints did not form through this method either.
In a less structured studio experiment, the samples with the oxide mixture were placed on a charcoal block and heated to an orange color (950° C). Upon cooling, there was only a light layer of oxide, which was dissolved away in a hot solution of sulphuric acid and water. The pickled samples were dried and fluxed, then reheated to an orange color on a charcoal block. There was again a light formation of oxide, but some of the granules adhered.
Thus, the following procedure was adopted. Each sample, coated with the oxide mixture, was heated on a charcoal block with a reducing flame to 950°C, then pickled in the solution of hot sulphuric acid and water (Sparex #2 pickling compound (NaHSO4), diluted to approximately 1½ cups per gallon). These were dried and fluxed with boric acid flux. When the flux dried, each sample was placed in a graphite crucible and covered with powdered charcoal. After being placed in the furnace, each piece was examined at various elevating temperatures.
The results of these experiments did not provide adequate granular joints through surface alloying in most cases. The exception was in the case of antimony, which alloyed with the surface of copper. The temperature at which the joint was observed to occur was 1056°C (pure copper melts at 1084.5°C). Copper granulation with an antimony surface alloy can be seen in Figure 2, which shows a magnified section of the granule and base, etched to reveal the grain structure. The illustration shows a definite joint between granules, but not between the granules and base. The joint is questionable, although it withstood the tweezer test. The grain structure of the base is dendritic, At the grain boundaries, a copper-copper antimony eutectoid structure can be seen. The granules appear to be single grained, with a single evident physical joint where the small granule (top right) is joined to the larger granule.
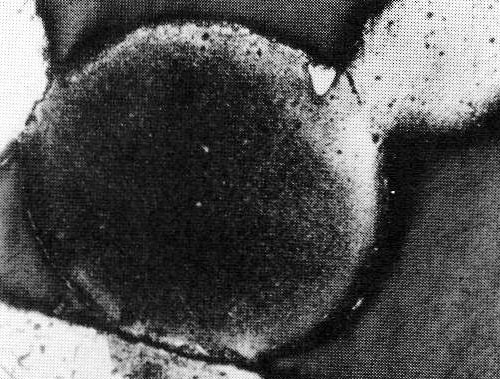
Figure 2
An electron microprobe was used to determine the amount of antimony present at various points in the sample. There is a gradual variation of 0.1% antimony at the center of the granule lo 0.4% antimony at the granular joint. This illustrates the consistent gradual decrease in composition that is apparently effective in the creation of copper granulation. From this standpoint, one would conclude that the copper granulation technique works well with the combination of copper with the antimony surface alloy.
Having accomplished a reliable copper granulation. Bonnie Deutsch, applied the new technique to a piece of copper metalwork of her creation, the lcebag Purse (Figure 3). The bottom of the baglike form is constructed of a copper sheet that was formed in the manner of a typically raised bowl. When the bowl became the desired depth, the sides were folded through hammering on a crimping stake. This copper form bears the resemblance of a heavy satin that has been folded and gathered around a cylindrical neck. The neck of the icebag is made of 2″ diameter 16-gauge copper lube. Decorative holes were drilled into the tube.
The neck of the lcebag Purse was the surface on which copper granulation was constructed. The sizes of the granules were varied in order to complement the sizes of the decorative holes drilled into the surface. The granules were applied with a mixture of antimony trioxide, water and Elmer's glue. When the mixture dried on the neck, the neck was heated in an annealing pan on a charcoal block. Heat was applied with a reducing flame until the copper became a glowing orangish color. After the neck was air cooled, it was placed in a bath of hot sulphuric acid. Then it was rinsed, fluxed, dried and placed in a graphite crucible, which was packed with powdered charcoal. It was finally heated in a furnace until the temperature of the object reached slightly above 1056°C (the temperature determined in previous experiments). The granules were joined without any noticeable oxidation of the surface, although the joints did not seem as strong as when silver and gold were used. Some granules did fall off, but most have remained.
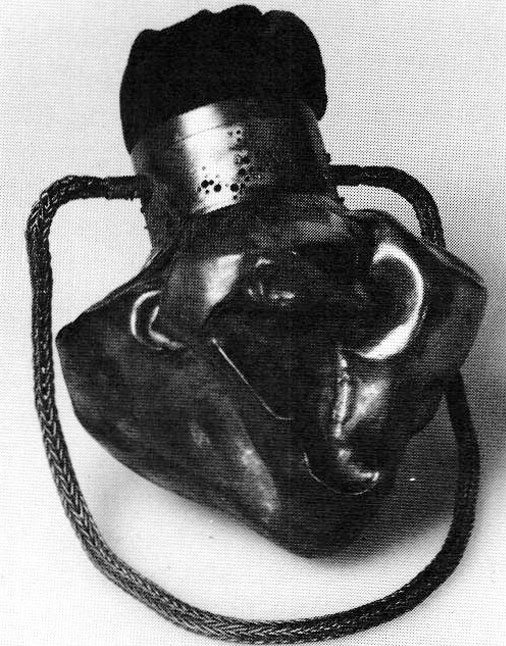
Figure 3
Thus, the procedure developed for copper granulation is a transfer of the principles for the traditional method for gold and silver to a new method for copper. Essentially, the procedure for copper granulation may be stated as such:
- Prepare the surface and granules for attachment. The surface and granules should be pickled in hot sulphuric acid, rinsed in water while being brushed or washed with a cloth. If the surface of attachment needs to be polished, it should be done, After polishing, the copper should be cleaned with ammonia and then rinsed in clean water and dried.
- The copper granules should then be attached to the surface with a solution of ½ t. H2o, ¼ t. Elmer's glue and 0.1 antimony trioxide and allowed to dry completely.
- The surface and granules are heated on a charcoal block with a reducing flame until the copper becomes a glowing orangish color.
- After the metal is air cooled, place in a bath of hot sulphuric acid. Rinse with water and let dry. Because the granules are not permanently jointed, it is important to handle the whole piece with care.
- Cover the metal with flux, dry and place in a graphite crucible and pack with powdered charcoal. Place in a furance of kiln until the temperature reaches slightly above 1056°C. Remove from heat, air cool and rinse in sulphuric acid and water. At this point the copper granulation process is completed.
The copper granulation temperature, slightly above 1056°C, is very close to the melting temperature of copper which is 1084.5°C. Knowing the exact temperature of the copper object placed in the kiln or furnace is essential. lf possible, use a thermocouple (chromel-alumel) and a student potentiometer or similar device to monitor the temperature. Place the thermocouple on or near the copper object in the graphite crucible. If the use of a thermocouple is not possible, make test pieces of copper granulation and carefully observe the temperature of the creation of the granular joint by a pyrometer or some other instrument or method. Pyrometers do not present an accurate temperature of objects in a particular position in a furnace or kiln.
The following are health precautions to be taken when working with copper granulation:
- Cadmium fumes are known to be hazardous—the fumes should never be inhaled. Excessive exposure, which can occur in the span of several hours, can cause kidney damage, flulike symptoms and high blood pressure.
- Antimony fumes should be avoided. Recent research indicates that these fumes may be more harmful than was previously thought. Much of the occupational hazard from antimony is hard to place because when the worker is exposed to antimony he is also exposed to other fumes that occur because of impurity in the parent metal or incomplete combustion. (Frequently there are arsenic fumes and these may be responsible for masking hazards created by antimony.) The TLV (threshold limit value) for antimony and compounds is 5mg/m³. Antimony exposure can result in the following symptoms: 1) irritation of eyes and nose; 2) flulike symptoms-nausea, vomiting, diarrhea, muscle aches and pains; 3) chronic dermatitis; 4) anemia. People who work regularly with antimony should have regular medical check-ups that include: blood count, electro-cardiagram and urine test. Be sure to inform your physician of the material with which you work. Until something more conclusive is proved, it is recommended that the fumes from antimony be avoided.
- Pickle fumes should be avoided—either switch to unheated acid or use exhaust ventilation and a respirator for acids. The exhaust system should be constructed of material that will not be corroded by the acid. The respirator should be specifically for acids, with new filters as per the manufacturer's instructions. Also wear eye protection, rubber gloves and an acid-proof apron.
- An exhaust vent should be used with the kiln. Incomplete combustion from this operation could produce carbon monoxide fumes.
—Linda Weiss-Edwards
Related Articles
Maximizing Refining Returns

Inquartation and Parting Refining Process

Ensuring the Best Refining Experience

Master Metalsmith John Prip


The All-In-One Jewelry Making Solution At Your Fingertips
When you join the Ganoksin community, you get the tools you need to take your work to the next level.
