How to Construct a Portable Photographic Studio
4 Minute Read
The successful documentation of finished work is of vital concern to every artist. Excellent slides make better teaching tools, and it goes without saying that the quality of photographs weighs heavily when work is being considered for juried exhibitions. I feel that it is necessary for those of us who teach to impress upon our students the importance of professional quality in slide documentation. Towards this end the metals area at Illinois State University has designed and constructed a portable photographic studio for small to medium sized objects.
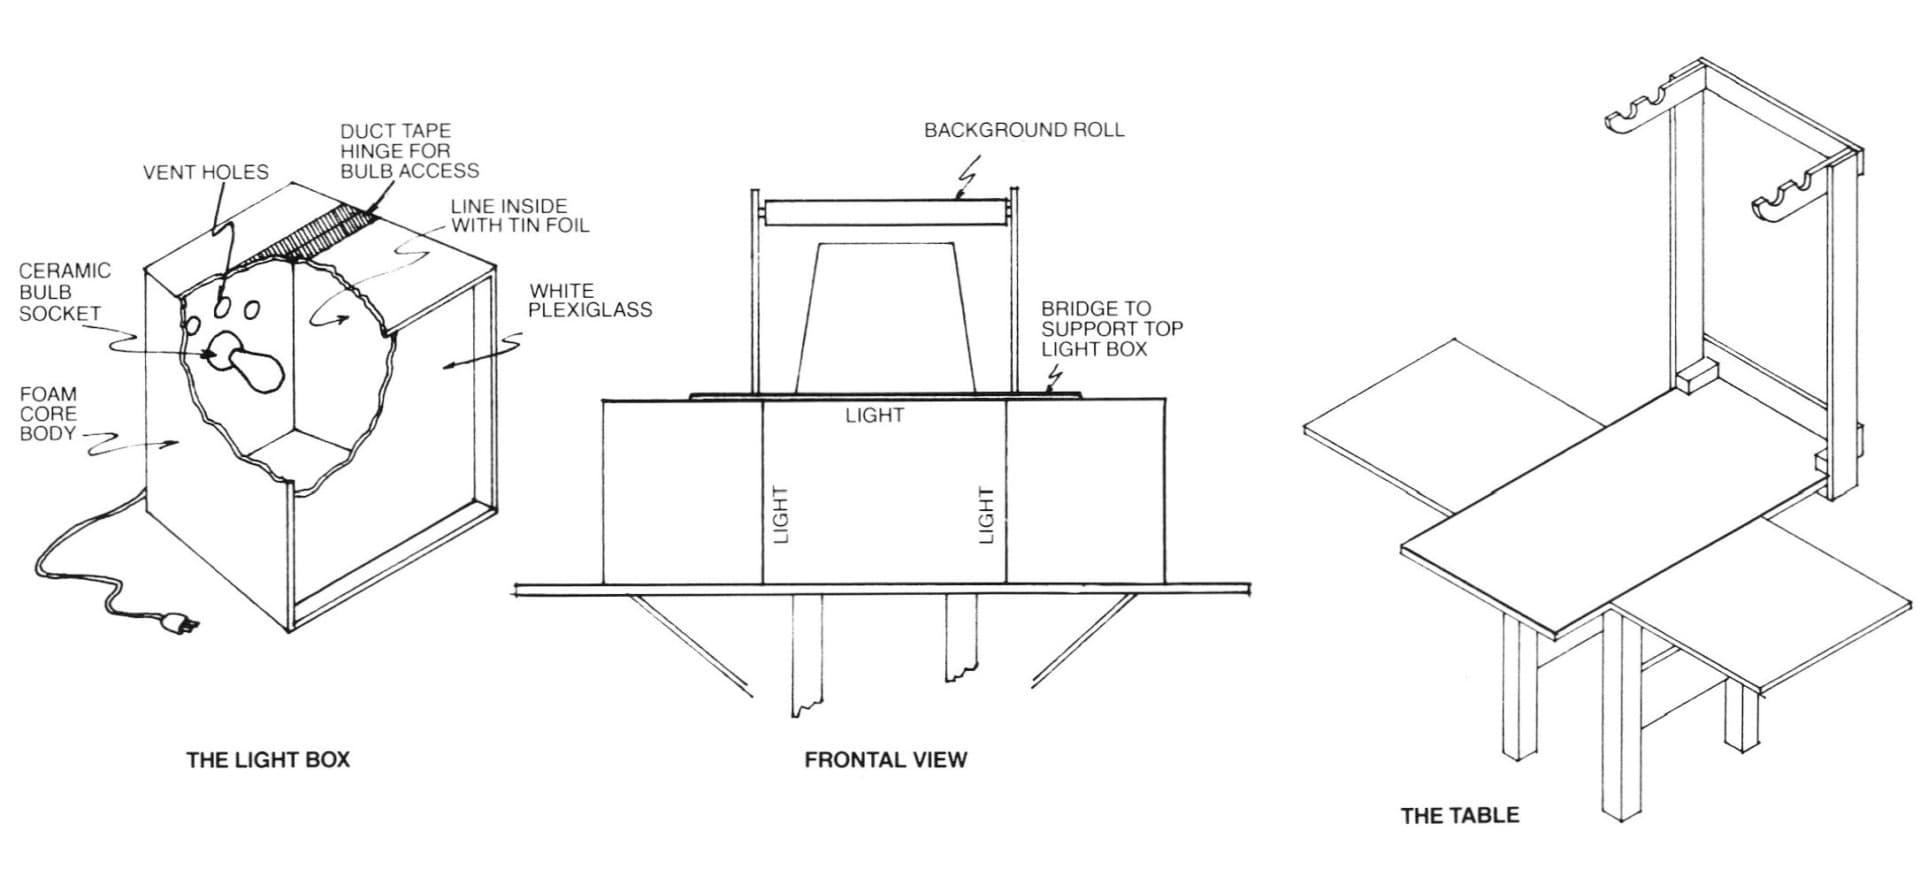
Space is a problem for us, as I'm sure it is in most other studios, so a unit was designed to be folded up when not in use. The table itself was constructed out of two pieces of 3/4″ particle board, 2′ x 4′. One 2′ x 4′ piece made up the table proper while the other piece was cut in half to make two 2′ x 2′ pieces. These became the "drop leaves." Our unit was built onto an out-of-service lapping table that was still very sturdy. Casters were added for added portability. The two drop leaves were connected with continuous hinges, and a single pivoting steel rod connected to the underside of each leaf provided the diagonal support needed to hold the leaves in position. The background paper support was constructed from 1″ x 4″ pine. It simply slides on and off the table. (See diagram.)

The lighting is achieved through the use of three light boxes, which provide a very even source of diffused light. The boxes rest one on each wing of the table while the third straddles the other two—providing a tunnel of light. (See diagram frontal view.)
The boxes were constructed using foam-core board. The measurements can vary. Ours were 18″ x 18″ x 15″ deep, with the sides tapering in towards the back. The boxes were lined with tin foil (use spray adhesive) and a ceramic socket was bolted into place. Vent holes were cut in the back, and a hinged flap was installed on top to give access for bulb replacement. The diffusion screens were milk white, ⅛" thick plexiglass, although smoked acetate could be substituted. For the light source we found that 250 watt Tungsten lamps (3200K) provide excellent illumination and perfect color balance when used with Ektachrome type B film. The finished boxes are very sturdy, but lightweight. As an added bonus, replace the 3200K Tungsten bulb with a standard 75 or 100 watt bulb, turn the box on its back and you have an excellent slide sorter that will hold 80 slides.
The boxes, when lit, provide a brightly and evenly illuminated area. The intensity can be adjusted in a number of ways: Moving the two side boxes further out on the wings will diminish the intensity. The top box will have to be supported by two rods long enough to span the distance between the two boxes. Also it will not always be necessary to have all three boxes illuminated. Often, a single side light can be quite effective, especially if a reflector card is used to bounce a little light back on the shadow side as "fill." Experiment with the set up to become familiar with different effects.
Seamless background paper can usually be found in rolls 53″ and 96″ long. We use primarily black and studio gray. The 53″ rolls when cut in half with a hacksaw (or bandsaw) provide a 26½" wide backdrop, which is adequate for most work done in the metals studio. It is important to have at least 36″ between the object you are photographing and the rear of the background paper. This distance effectively deepens and darkens the background and gives the photos a sense of depth.
A few hints for successful, professional photographs. First, a very good tripod is absolutely necessary. The extra cost here is well worth the results. Cheaper tripods are not rigid and at slower shutter speeds the action of the focal plane shutter can actually cause the cheap tripod to vibrate and render your photos blurry. Almost all my shooting is done at f stops f8 thru f16 or 22, in other words, the smaller apertures. This is especially important in close-up work such as rings and other small jewelry items. If the aperture is not "stopped down" when doing such work, the photos will be sharp only at one point. This is because of the effect known as "depth of field."
Simply put, in close-up or macro photography, the smaller the f stop, the greater the depth of field. In regular photography the rule also applies but is not nearly as critical. The smaller apertures means that the film will be exposed to less light, so a slower shutter speed must be used, but with a good tripod very slow shutter speeds are no problem. Also, when doing close-up work made sure the background paper is spotless. If this means rolling down a new section, do it, because those spots, if close to the object being photographed, will be highly visible in the photo.
Finally, a trick I learned from a photographer friend—after setting up the lighting and placing the object, step back and squint your eyes. Now you see more truly what the camera is seeing and you can make more informed adjustments.
Dennis French is an assistant professor of art (metals) at Illinois State University/Normal-Bloomington.
Related Articles

Customized Light Box & Bench Shelf

Vertical Photography Set
Lighting for Jewelry Photography

Considerations in Image Creation in Photography


The All-In-One Jewelry Making Solution At Your Fingertips
When you join the Ganoksin community, you get the tools you need to take your work to the next level.
