
The Ceramic Tissue Method
Enameled steel is the best support for the photographic image. It will withstand the burn-off temperatures without cracking the image. Copper can work, particularly on a small scale, but be warned that there may be a significant failure rate. The enameled surface first must be subbed to enhance the adherence of the pigmented gelatin. Subbing is the application of a very thin coat of hardened gelatin which seals the microscopic pores in the enamel and provides a very strong bond between the emulsion and the enamel.
27 Minute Read
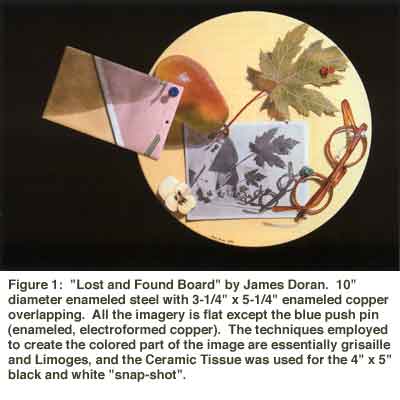
Prior to the nineteenth century, portraits and portrait miniatures in enamel, were pretty much the exclusive indulgence of the aristocracy. Then came the Industrial Revolution, and with it, social upheaval and the dreaded Middle Class, whose consumer demands, even then, were insatiable.
In the last half of the nineteenth century, photography, in its frenzied adolescence, offered a reasonable facsimile to traditional portraiture at a price that satisfied the throngs. Then, as if to answer some Bourgeois cry for enamel miniatures, a process emerged whereby photographic portraits of loved ones could be immortalized in enamel. These were not fuzzy reproductions like those seen in old newspapers, but were exquisitely detailed, subtly shaded, genuine photographic prints fused permanently onto enamel (or onto porcelain and glass, for that matter).
The technique came to be known as the Ceramic Tissue Method, (a variation of the Carbon Tissue process). It had its heyday for about fifty years, straddling the turn of the century, and then faded into near obscurity with the advent of the snap-shot camera. Of course, today you can get your kid's full-color photograph dishwashersafely "fused" onto a ceramic mug in the mall while you wait. Never mind that the image is digitized and plastic, the fact remains that it is unlikely there will ever be a renewed demand for photographic miniatures in enamel. Nonetheless, there is still an important niche in this world for Ceramic Tissue as a formidable artistic tool for the contemporary enamelist.
The Evolution of Ceramic Tissue
If you have ever made Jello, you'll know that gelatin dissolves readily in warm water. If you have ever mixed a little potassium dichromate into the gelatin solution and dried it, (you're slightly weird, and) you may have noticed that the gelatin was rendered toxic and chartreuse, yet it still dissolved readily in warm water. However, it may not have occurred to you to shine a light on the dried concoction. If you had, you might have noticed what Mr. Suckow discovered in 1830. Within minutes, the gelatin becomes quite insoluble in warm water. It still absorbs water and swells like a sponge, but it will not go back into solution. So it was discovered that dichromates (bichromates in those days), in combination with certain organic materials (colloids1), become light-sensitive.
In 1839, Mungo Ponton (great name) envisaged photographic applications for this phenomenon and sixteen years later, in 1855, Alphons Louis Pointevin, a French engineer and chemist, added powdered carbon (lamp black) to the photosensitive gelatin, spread it on a piece of paper tissue and placed a photographic negative between the light and the gelatin. The dark areas of the negative shaded corresponding areas of the blackened gelatin from the light, and when the tissue was immersed in warm water, those areas dissolved away. The areas that had been left exposed to the light through the transparent regions of the negative had been hardened and remained on the tissue to form a positive photographic image. Thus was born the Carbon Tissue method of photographic printmaking. It was left to others to substitute ceramic pigment for the carbon, to transfer the gelatin image to a ceramic or enamel surface, and to gently burn away the gelatin, thereby developing the Ceramic Tissue method of firing photographs onto vitreous surfaces.
The process is a powerful one. The quality of the prints can be superb and the permanence is obvious. Unlike other ceramic photographic processes, the tonal range is absolutely continuous and faithful to the negative, from the deepest blacks to the lightest grays. (However, pure white highlights are difficult to achieve.) We have Sir Joseph Swan to thank for the continuous tones. Pointevin found, in his early attempts at carbon printing, that his delicately shaded negatives produced high-contrast prints where the blacks were deep, but the grays washed off in the warm water. In 1858 Abbe Laborde, a French physicist, pointed out that the hardening of the gelatin progressed from the top surface downwards. Black areas were hardened right down to the support paper, whereas gray areas were only a hardened skin, with soluble gelatin beneath.
Upon "development", the soluble gelatin would wash out and tear away the skin, taking the half-tones with it. Swan's solution, in 1864 (based on a suggestion by Fargier in 1860), was to adhere the exposed gelatin face down onto another surface, carefully remove the paper (tissue) and then wash out the soluble gelatin (Single Transfer Method). The blacks and subtle grays remained attached to the second surface, thus preserving the continuous tones of the negative. Of course, this method resulted in a reversed image. However, it could be flipped back by applying the reversed image to a third and final support of paper, enamel, or whatever (Double Transfer Method). Back then, the photographic negatives were on relatively thick glass plates. Nowadays, thin negatives allow us to dispense with this second transfer by reversing the negative during the initial exposure of the gelatin. For our purposes, then, the Single Transfer Method is best and it has the further advantage of allowing us to expose the print on flat paper and then to apply it to an uneven or curved enamel surface without distortion.
The details of the working procedures, materials and recipes for this technique have all been tested and have been gleaned from several sources, historical/archival and contemporary, none more thorough than Woodrow Carpenter's article in Glass On Metal, Vol. 5, No. 2, April 1986. If the reader reviews that article, it will be clear that many of the procedures described here are Mr. Carpenter's, while others have been altered after Mr. Carpenter's and still others are derived from experimentation and other sources. This article endeavors to guide the reader around the various pitfalls encountered through months of trial and error, and directly towards a satisfactory end product - a fused photograph in enamel.
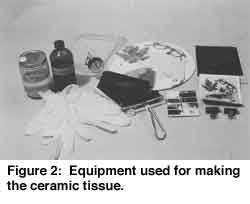
Most of the equipment recommended can be found around the house and in the enameling studio. Nothing described here is intrinsically difficult and the whole process becomes quite routine with practice. It can be summarized in 6 steps.
- Make the ceramic tissue: prepare the pigmented gelatin and spread it on the paper.
- Prepare the enameled surface to receive the image. clean and "sub" (coat the enamel with a thin film of gelatin).
- Mix up the sensitizing solution and apply it to the tissue.
- Choose a negative and expose the tissue through it.
- Apply the exposed tissue to the enamel and "develop" it by rinsing in warm water.
- Burn out the gelatin and fire the enamel to maturity.
Keeping records of each step is beneficial.
1a - Pigmented Gelatin Coating
The choice of gelatin is all-important. We want Bone Photo Gelatin 2 . Food gelatin will not do; it produces too much ash when burned out and flakes the image right off the enamel. Presumably, photographic specialty stores and chemical supply houses will sell photo gelatin. Kind & Knox will sell it in minimum orders of 25 pounds. Gelatin should be stored in an airtight container in the refrigerator. Warmth, ultraviolet light and high humidity can render the gelatin insoluble over time. The gelatin emulsion can be prepared in a hot water bath or a double boiler on the stove, or in a laboratory oven. The former is fussy; the latter may be expensive. Considering the relatively low temperatures involved (46°C; 115°F), a very successful alternative, used throughout this article, is a dehydrator, the kind seen on infomercials for making fruit leather. The one used here has a 12″ x 12″ x 5″ cavity (with the racks removed), a fan and an adjustable thermostat (26°-63°C; 85°-145°F) that keeps the interior within one or two degrees of the set temperature over several hours (according to a good photographic thermometer). To prevent dehydration, the gelatin is sealed in a screw-top jar while it is in the dehydrator. A yogurt maker also may work - check the garage sales. Much of the literature suggests that simple substitution of ceramic pigment for lamp black in the Carbon Tissue recipes will produce Ceramic Tissue. However, in practice, the most difficult part of the Ceramic process is burning out the gelatin without disturbing the pigment image. With that in mind, this recipe increases the pigment-to-gelatin ratio allowing for a thinner coating and an easier burnout.
| Bone Photo Gelatin | 44cc (3 tbsp.) |
| Distilled water | 60cc+ 5cc (4tbsp + 1tsp.) |
| Dry pigment 3 | 50cc (3-1/3 tbsp.) |
| Glycerin 4 | 6cc (1-1/4 tsp. ) |
| Temperature of dehydrator 5 | 46°-48°C (115°-118°F) |
| Makes 5-8, 5″x12″ tissues. (Incidentally, 1 cc = 1 ml). | |
Measure 60cc cold distilled water into a screw-top jar. The gelatin recommended has a grain size of approximately 1-2mm.Pour the dry gelatin into the water, swirl it around to ensure it is wet, and secure the lid. Place the jar in the pre-heated dehydrator for 6-8 hours and monitor the cavity temperature with a thermometer.The granules of gelatin will quickly absorb all the water and swell into a single mass which will eventually melt into a golden solution resembling corn syrup.About an hour before the gelatin is ready, prepare the pigment. A mortar and pestle work well, but satisfactory results are also obtained using a small glass bowl and a stainless steel spoon or knife.Combine the pigment, glycerin and 5cc water and blend into a smooth paste, the smoother the better.Add a bit more water if you need it.Cover the bowl with stretch wrap and place it in the dehydrator to bring it up to temperature. (In fact, store all your mixing utensils in the dehydrator to keep them warm.)
The gelatin is ready when it is a free-/lowing clear syrup.Spray away surface bubbles with alcohol from an atomizer 6 .Have a pan of very hot tap water ready and immerse the bowl with the pigment paste "waist-deep" in the water.This will keep the gelatin warm and fluid while you mix it.Add half the gelatin to the pigment and stir it thoroughly (returning the other half to the dehydrator while you're stirring).Then pour the pigmented gelatin back into the jar with the remaining gelatin and stir that thoroughly (while the jar is sitting in the hot water).Return the lidded jar to the dehydrator and stir it again after about 15 minutes.Spray away any bubbles.Check it in another 30 minutes and eliminate bubbles.Once all the bubbles are gone, the pigmented coating is ready to spread 7. There seems to be no problem with keeping the gelatin (pigmented or otherwise) at dehydrator temperatures for up to 24 hours.
1b - Coating the Tissue
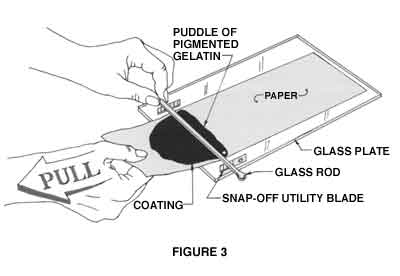
"Tissue" is misleading, but this is how the thick gelatin-coated paper is described historically.The requirements of the paper are that it be smooth and strong and able to be wetted repeatedly.Any texture to the paper will show up as a dark pattern in the final print.The ideal paper is a type used for pen and ink drawing.It is designed not to pucker when ink-washed and it is absolutely smooth and without texture 8 .Woodrow Carpenter's method of spreading the pigmented gelatin is superior to any of the other methods suggested in the literature 9 .He recommends the Doctor Blade Method, illustrated in Fig, 3.In this arrangement, the glass rod is raised above the glass plate 10 by the thickness of a 3/8″ wide snap-offutility blade (i.e. 0.016″, 0.4mm).
Alternatively, four stacked strips of the recommended paper (thickness 0.0043″) will be the equivalent of the blade thickness. Take a dust free piece of paper, say 5″ x 12″.Place it under the glass rod and pour a 1/2″ wide puddle of gelatin across the width of the paper behind the glass rod. Hold the rod firmly and pull the paper straight, smoothly and continuously out from under the rod as shown. The idea is to make the coating just thick enough so it is pure black. Any thicker makes burning off trickier; any thinner and the blackest areas in the photograph will be too light. The thickness of the coating can be controlled by adjusting the speed of the pulling. Slower makes it thinner, faster makes it thicker, practice makes it perfect. Covering the whole paper is not critical, uniformity of thickness is. You can always pull a wider strip than you need and cut it down to size later. Avoid bubbles and dust on the tissue; both show up as white spots on the finished print. Always return the gelatin to the dehydrator between pullings. (In fact, keeping the glass plate and rod warm is also desirable. If the coating is too cool when it is spread, it will be streaky and unusable. The dregs, the last of the coating mixture, should be discarded.This is where you'll find lumps of pigment.
Lay the tissue, gelatin side up, on an arched piece of chicken wire or hardware cloth.As it dries, it will curl in on itself as the gelatin shrinks.Try clothes-pinning the tissue to the wire mesh, or when it's partly dry, tack it to a board to keep it flat.When the gelatin is reasonably dry, but still supple 11 , the tissues may be stacked (not face to face) and stored flat between two boards or rolled with the gelatin facing outward.Ideally, they should be stored in a cool (10°C; 50°F), dark, airtight container (keeping the relative humidity constant at around 50%), but a tin box in the refrigerator (or wine cellar) will do.
2. Preparation of the Enameled Surface
Enameled steel is the best support for the photographic image. It will withstand the burn-off temperatures without cracking the image. Copper can work, particularly on a small scale, but be warned that there may be a significant failure rate. The enameled surface first must be subbed to enhance the adherence of the pigmented gelatin. Subbing is the application of a very thin coat of hardened gelatin which seals the microscopic pores in the enamel and provides a very strong bond between the emulsion and the enamel [12].
The enameled panel must be chemically clean. Generally speaking, firing it to maturity and letting it cool pretty much seems to do it. Another suggestion is to soak it in a solution of hot water and sodium carbonate (sal soda or washing soda), scrub and rinse. Or try washing it with household cleaner, soak for 10 minutes in a mixture of 4 parts ammonia and 10 parts water, rinse, towel dry and heat to 315°C (600°F) for 10 minutes. In any case, if the water sheets off the surface in a thin film, it's clean.
Prepare the subbing solution:
| Bone Photo Gelatin | 3cc (heaping 1/2 tsp.) |
| Water (distilled best but not critical) | 250cc (8-1/2 oz.) |
| Chrome alum 13 (chromium potassium sulfate) | 0.15g |
| Temperature of dehydrator | 46°C (115°F) |
Combine the gelatin and cold water in a lidded jar and let it sit at room temperature for 20 minutes. Then place the jar in the dehydrator for 2 hours until the gelatin is dissolved. Swirl the solution to ensure it is properly mixed, and add the chrome alum (the violet crystals turn the warm solution green). Shake the jar until the alum is completely dissolved and spray away the bubbles with alcohol. Wearing rubber gloves, hold each absolutely dust-free enameled steel panel horizontally while you pour the solution, covering the enameled surface completely to the edges. Pop any bubbles with a toothpick and tilt the panel back and forth a few times to ensure coverage. Drain the solution off and let the panel dry vertically, protected from dust, for about 4 hours. (A fan will accelerate drying). Store, you guessed it, somewhere dust- free. Forgive this obsession, but if a speck of dust gets on the subbed panel, it can prevent adherence of the pigmented gelatin over an area equal to many times the diameter of the dust grain. When the image is developed, a barely visible dust grain can leave a white spot the size of this "o". Discard remaining subbing solution.
3. Sensitizing Solution
| Potassium dichromate | 7.5cc (1/2 tbsp.) 14 |
| Distilled water | 240cc (8 oz.) |
Dissolve the dichromate in the water and store in an airtight bottle in the refrigerator. Gelatin will dissolve in this solution at 21°C (70°F), so sensitize the tissue while the solution is still cold.

Rubber gloves are imperative as you gently hold the tissue face down on the bottom of a shallow tray of sensitizer for 15 seconds 14 (the tissue will initially try to curl as the paper absorbs the liquid and expands faster than the gelatin). Remove the tissue and lay it face down on a sheet of glass that has been flooded first with water. Squeegee or blot off excess sensitizer and prop up the glass and tissue in the dark at room temperature. This arrangement protects the emulsion from dust. A fan will hasten drying. When the tissue just begins to curl away from the glass, peel it off and tack it to a board to finish drying. The tissue becomes increasingly light sensitive as it dries, hence the dark room. Store the dried tissue in a light-tight container or envelope.
If necessary, it can be stored for a few days (airtight) in the refrigerator, but it is always best to use it fresh. The sensitizing solution can be saved and re-used to sensitize up to five 5″ x 12″ tissues (or equivalent). However, once it has been in contact with gelatin, it begins to deteriorate and may last weeks or just days in the refrigerator. If it turns brown or cloudy, discard it. (Check with your local hazardous waste management experts as to the best way to safely dispose of the used sensitizer). Fresh sensitizer can be stored indefinitely.
4. Exposing the Tissue
This is a contact printing process. The print will be the size of the negative. If you are handy in the darkroom, you can take an existing negative and create a new negative of any size, or you can have one prepared commercially to your specifications. This process will print with a straight-line response to the negative, so starting with a strong negative with a long tonal range is desirable. It is advisable to apply a 1/4″ - 1/2″ border of opaque tape around the negative. This will create a safe edge on the tissue, reducing the chance of the gelatin lifting or frilling prematurely from the backing during development.
In subdued light, remove a sheet of tissue from its dark container, cut it to a convenient size, and also cut a test strip (from the same tissue) the length of the negative and an inch or two wide. Return all but the test strip to the light-tight container.
Dichromated gelatin is most sensitive to ultraviolet radiation. A cheap, controllable source of UV is a 500 watt (or even 250 watt) blue photoflood 15 in a reflector. Try the 500W. at 24″ (250W. at 15″) from the negative 16 . These lights are hot, so have a fan blowing across the negative to protect it and the tissue from the heat during the exposure.
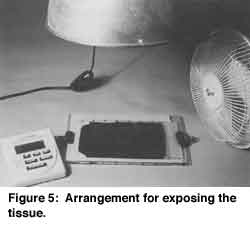
To do a test strip 17 , lay the negative (still in subdued light), shinier side down on the up-facing gelatin of the sensitized strip. (This arrangement will reverse the image for now, but it will be flipped to the correct orientation on the enamel). Sandwich the tissue and negative between two clean pieces of glass and spring clip them together (clothes-pins will do). Cover 4/5 of the strip with something opaque (cardboard, magazine). Turn on the light, exposing the uncovered portion for 2 minutes, then with the light still on, pull the cardboard back another 1/5 and expose that new portion for 2 minutes; the first part will now have been exposed for 4 minutes. Continue this in 2 minute intervals for a total of 10 minutes, and your strip will be divided into five sections exposed for 10, 8, 6, 4 and 2 minutes. (You might find exposing the strip for 5, 4, 3, 2 and 1 minute to be more appropriate for your conditions.) Apply this strip to a prepared enamel surface, develop it (wash it) as will be discussed shortly, and choose the exposure time that looks best for your final print. (Keep in mind that the fired image may look slightly darker than the wet, unfired image.) Now, expose the final print.
5a - Transfer the Exposed Gelatin to the Enamel
Do this immediately after exposure. The tissue will continue to "expose" even in the dark (the so-called "dark-reaction"). Preferably wearing thin rubber gloves, gently hold the tissue face down in 21°- 27°C (70°-80°F) water 18 . Don't let it curl. It will relax and flatten and when it just begins to curl back the other way, remove it from the water and apply it like wallpaper, gelatin-side down, to the subbed, dust-free enameled panel. (Any longer in the water, and it won't stay adhered to the enamel.) Make sure that no air bubbles get trapped. Don't try moving it once it has been applied. Using a rubber roller or squeegee, press down the tissue from the center outwards to make solid contact over the entire image. Pressing and burnishing with the fingers sometimes helps. Blot up excess water, lay a paper towel on the tissue and weight it down for 15 minutes. A good weight, which will follow the contours of the enamel, is a water-filled balloon or plastic bag.
5b - Developing the Image
Dichromate is very hard on the hands, so wear thin rubber gloves for this.
After 15 minutes, submerse the enamel and tissue face up in a flat pan of 21°-24°C (70°-75°F) water for 3 minutes, then slowly add warm water to raise the temperature to 29°C (85°F). Let stand for 2 minutes, then add more warm water until the temperature is 40°C (105°F). Within about 5 minutes at this temperature, the black gelatin should be oozing out the sides of the tissue. Lift one corner of the backing and gently peel it away from the enamel. (If it resists at all, let it soak a while longer.) If you are now looking at a blackened, muddy mess, I could say you've failed miserably, but I'd be lying. This is as it should be, and be assured, the image is under there.
Rinse the unhardened gelatin off under a gentle tap at 40°C (105°F), or more gently still in a pan of warm water sloshed back and forth, changing the water occasionally. There is no rush. Try to rotate the panel periodically to avoid streakiness in the image. You may raise the temperature of the water, no higher than 54°C (130°F), to lighten areas that seem too dark 19 . When the image is developed to your satisfaction, rinse it for a couple of minutes in cold tap water to harden the gelatin. Finally, set the panel face up in a bath of 2 tbsp. potassium alum (aluminum potassium sulfate, not food alum) in 2-1/2 cups cold water (30cc in 600cc) for 10 minutes. This should clear any residual yellow dichromate stain from the image. (The stain will fire yellow.) Save the alum bath. Rinse the panel thoroughly in cold water and let it dry vertically at room temperature for no more than one hour. A fan will accelerate drying. Do not let it dry completely! Read on.
6. Burning Out the Gelatin
This is the touchiest procedure. If you have a controlling pyrometer on your furnace or if you trust your pyrometer at low temperatures, you are well on your way. If you have no pyrometer, get an oven thermometer and place it in the furnace beside the enamel to monitor the temperature.
Let the image dry only until the obvious surface moisture is gone, but it is still damp (less than 1 hour, faster with a fan). If it dries completely, there is an increased risk of flaking in the furnace. Place the enamel into a cold furnace, turn it on Low and let the temperature climb gradually to 175°-200°C (350°- 400°F) in the first 30 minutes, then to 315°-345°C (600°-650°F) in the next 30 minutes. The image will be dark brown at this temperature. In the next 30 minutes, let the temperature rise to 370°-400°C (700°-750°F) and the brown should be lightening. In the next 30 minutes let the furnace get to 425°C (800°F) and the brown should be all but gone. In the last 30 minutes (total elapsed time 2-1/2 hours), allow the temperature to go up to 450°C (850°F). Hold it there until you are satisfied that the image is clear of all gelatin.
Do not allow the temperature to exceed 480°C (900°F) or the elapsed time to exceed 3 hours. Even on steel, the enamel may crack around 540°C (1000°F). If the temperature is taken up slower than described, there is an increased risk of the image flaking. If the temperature is taken up faster, the image can boil right off the enamel. If you do detect crazing or flaking, it will likely be in the darkest part of the image which, of course, has the thickest layer of gelatin 20 . Let the enamel cool. At this point the image is still unfused, so unwanted pigment can be simply brushed away before firing. Now fire the enamel as you normally would. You may detect a thin, brown "ash" on the surface after firing, which can interfere with the surface becoming glossy. If so, let the enamel cool, scrub the surface under water and fire again.
Conclusion
In theory , ceramic tissue could be used to produce fused color photographs on enamel, as well. This would involve making a three-color separation of a photograph, preparing tissues for each color using blue, red and yellow ceramic pigments, and going through all the steps three times, taking great care to register the images precisely each time. Of course, one also might be limited by the enamel colors available. Personally, I think that hand-coloring the black and white enamel photograph presents far more interesting artistic possibilities.
If followed carefully, this article should afford the reader early success in producing a fused, continuous-tone photograph in enamel. The reader then can begin adjusting the recipes and procedures to suit his or her needs. Guidelines have been provided throughout to suggest what effects various changes might produce.
A century ago, enamel and ceramic photographs, created using ceramic tissue, were all the rage. It's time for a revival.
Health Hazards
All chromium compounds are extremely dangerous. When mixing, do so with adequate ventilation, preferably wearing a mask. Wear gloves and eye protection. Wash away dust immediately.
Potassium Dichromate is very toxic and may cause cancer. It causes skin irritation or ulcers and is very destructive to mucous membranes. It can be fatal if swallowed. Avoid contact with eyes and skin and don't breath the dust or solution spray. Wear a mask and eye protection when working with the powder or solution spray and always wear rubber gloves. During burn-out, provide adequate ventilation. In case of contact, flush skin or eyes with water for 15 minutes. In case of swallowing, get medical attention at once.
Chrome Alum is a carcinogen and is corrosive to the skin and mucous membranes of the nasal septum, causing deep, scarring, slow-healing ulcers. Protect skin and eyes and avoid breathing dust and vapors. Potassium alum may be used as a substitute, but its gelatin hardening properties are not as great. Some experimentation may be necessary.
Potassium Alum requires no special precautions and is much safer than chrome alum. Treat it like any laboratory chemical.
Footnotes
- For our purposes, colloids are substances made up of very fine, indiffusible particles held in suspension by a liquid, in this case water. Organic colloids are derived from animals and plants and can be divided into two general groups, proteins and carbohydrates. The protein group includes gelatin (from skin, bones and connective tissue), casein (principle protein in cow's milk) and egg albumen, whereas starches and gum arabic (from the acacia tree) are in the carbohydrate group. All these colloids can be altered by light in the presence of dichromates. Some synthetic resins, such as silk-screen emulsion (polyvinyl-alcohol / polyvinylacetate solution), exhibit similar photosensitivity when mixed with dichromates.
- pH 5.93, Ash Content 0.69%. Higher pH reduces the photosensitivity of dichromat ed gelatin. This pH and ash content describe the gelatin used in this article (Kind & Knox, T7189, Lot 1) and are just suggestive of the type of gelatin to look for. Also, different gelatin formulations have different melting temperatures.
- Thompson 912E or P-l. Strictly speaking, these are overglaze enamels as opposed to oxide colorants.
- The glycerin lends flexibility to the dried coating, especially in dry climates.
- Higher temperature makes the gelatin solution more fluid; it will gel at about 40 ° C; do not exceed 60 ° C.
- This was Mr. Carpenter's suggestion, and it is very effective; some sources suggest adding 5ml of a 10% solution of thymol in alcohol to the gelatin to act as a foaming agent to force out the bubbles.
- Some sources recommend that the gelatin solution be strained through several layers of cheesecloth to remove any lumps of pigment. For most applications, you probably won't find this necessary. If you do strain it, however, you might find it useful to raise the temperature first to lower the solution's viscosity.
- Pentalic Paper for Pens, Item No.015911, pad of 9″ x 12″ sheets - M. Grumbacher, Inc., Cranbury, NJ 08512.
- Some commercial tissues were coated using a heated whirler to ensure uniform thickness and consistent quality. However, commercial tissue has not been available for over forty years.
- The rod and plate may be steel or plastic, so long as they are smooth and rigid.
- If the tissues do curl too much and threaten to crack while being flattened, just put them in a closed box or cooler with a wet rag (not touching the tissue). This will gently re-hydrate the tissues to suppleness. Or if you prefer the quick and the brutal, hold them over a boiling kettle.
- As testimony to the strength of this bond, gelatin has been used to give glass a frosted texture. It grips the glass so strongly that under certain conditions when it dries, it shrinks and literally tears the surface off the glass in little chips. I've seen this effect on enamel in my own furnace - accidentally.
- Chrome alum, available from chemical supply houses or photo specialty stores, raises the melting point of the gelatin so that the subbing will not dissolve while the pigmented gelatin is being washed in warm water. If you have access to a small scale, then 0.15g will be no problem. If not, then borrow a scale, weigh it out once, then find or make a small scoop that will accurately measure out that volume of alum in the future.
- Less dichromate in the sensitizing solution or soaking the tissue for less time increases exposure times and yields higher contrast prints (desirable for weak negatives). More dichromate or longer soaking time reduces exposure times and yields lower contrast prints (desirable for high contrast negatives). However, this also increases the risk of having a dichromate stain in the final print.
- No.2 photoflood, color temperature 3,400 ° K., available from any photographic supplies store.
- The farther the light is away, the longer the exposure needs to be, but the sharper the image becomes because the light rays become more parallel.
- Always expose a test strip before a final exposure. Many factors affect exposure times: negative density, temperature (warmer is faster), age of the tissue (older is faster; too old and it becomes insoluble), age of the sensitizer (older is slower) and most dramatically, relative humidity. On dry days, exposure times are comparatively long. Raising the relative humidity by only 30% can halve the exposure time. The tissue becomes increasingly sensitive with increased humidity up to around 80%, after which the sensitivity drops precipitously to zero at 100% relative humidity. (I once spent all day meticulously doing test exposures and was prepared with my last piece of sensitized tissue to expose the final print. I confidently set the timer for the perfect exposure and turned on the light. There was a clap of thunder, the heavens opened wide, the humidity shot up to 100% and my "image" was so underexposed, it washed down the drain.)
- Once the tissue becomes wet, it loses its photosensitivity and all subsequent procedures may be carried out in full light.
- If all the pigmented gelatin washes off, or the image temporarily appears and then washes off, the tissue has been underexposed (or the water is way too hot). If the panel remains black, despite washing, then the tissue has been overexposed, was damp or was too old.
- If the flaking in the darkest areas is chronic, then expose the image for less time. If this is not practical, then try "dodging" the darkest areas during the exposure. Tape a round cardboard disc to a stick and for part of the exposure, shade the problem area from the light, keeping the disc moving slightly so the edges of the shadow do not become well defined. (The reciprocal of dodging is "burning in", whereby a hole is cut in apiece of cardboard and held over an area of the exposing image that you might want darker).
Related Articles

Enamels in Medieval Galleries

The Enamelware of Pat Peat O’Neil

Enamelists Make Plique-a-Jour Souvenirs
The Enamelist’s Vocabulary


The All-In-One Jewelry Making Solution At Your Fingertips
When you join the Ganoksin community, you get the tools you need to take your work to the next level.
