
Jewelry Designs: Bella Pendant
7 Minute Read
Welcome to Stacey Rhodes Jewelry Designs where we will detail all of the steps involved in adding a new piece of jewelry to our line. In this issue we will be working with our latest design. I'll take you through every phase of production, from the idea to the showcase.
The Idea
As a bench jeweler, the first thing I notice are the three separate elements that are going to be married into this piece. There is a round stone at the top that will most likely be bezel set. In the middle, there is a bar with three round stones. I'm thinking of gypsy setting these, but how to keep it level and balanced could be an interesting challenge. Then, lastly, there is a briolette on the bottom. That seems like the easiest part, so let's start there.
The Briolette
I think I'm going to use an off the shelf briolette cap from Rio Grande (#693301) to hold this stone. The idea is to keep the findings simple, and let the colors and shapes of the piece make the statement. All I'm going to do is open the ring at the top of the cap, install the chain, and solder the ring closed. The last step of the entire piece will be to epoxy the briolette in place. I always use a clear two part, five minute epoxy. The adhesives industry has come a long way since the invention of super glue. Super glue is good for some purposes but not for attaching stones to metal. Super glue also vaporizes while it cures, leaving a white film on whatever it comes in contact with. The two part epoxies, available from all jewelry supply houses, as well as all hardware stores, dries quickly, with no vapor film, and is completely colorless, and invisible. Plus, the holding power is much stronger than super glue. Now that the easiest part is finished, let's work on the middle piece.
The Middle Bar
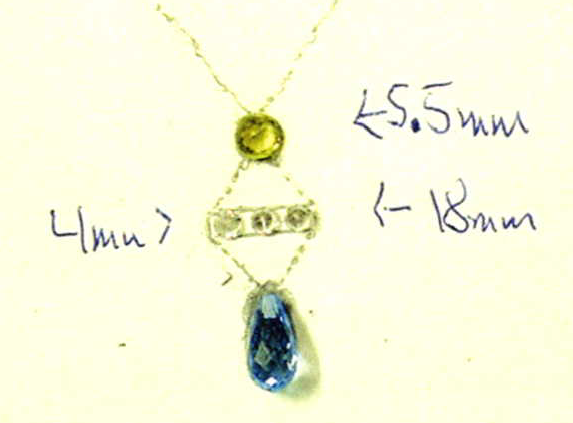
I decide that I can roll the bar out of sterling faster than I can carve a wax. So, I begin by melting some silver into an ingot mold. But before I can start to roll it to size, we have to determine the size we need. Since Stacey tends to draw her ideas to scale, we start by placing some stones on the original sketch to see what fits. The photo shows the final placement of stones and the size of 18mm x 4mm for the middle bar.
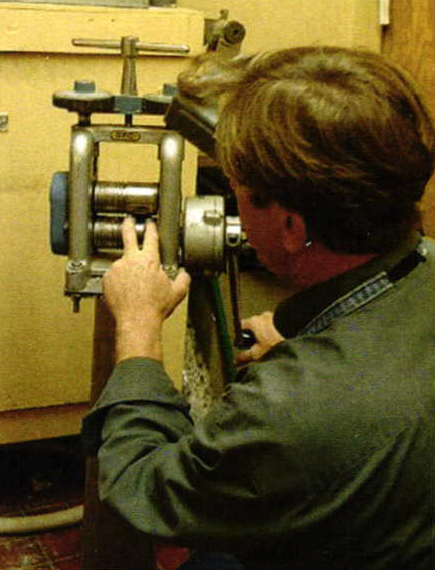
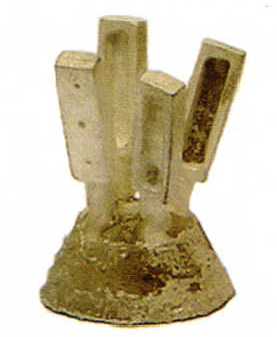
I want to take a moment first to discuss rolling and annealing procedures. It's been said that one ounce of gold can make a wire a mile long. For some, that seems impossible because when you're making wire, it breaks at about 6 inches. Annealing is the key. Gold,silver, platinum, and other non-ferrous (non-magnetic) metals have an amorphous molecular structure. Amorphous is derived from the Greek word meaning "without form". The structure of amorphous materials follow no particular pattern. Imagine, if you spread hay on the ground, and each straw is a gold molecule. There will be no pattern to the straw. But, if you begin to rake the hay in one direction, a pattern of the straws lining up in one direction will begin to emerge.
This is the same principal that occurs by running metal through a mill. Each time you make a pass through the mill, you move farther from amorphous, and closer to in-line graining. This makes the metal very brittle. Each time you stop rolling and anneal the piece, it will return to an amorphous state, and you can begin anew. This can be done infinitely. So, in theory, if you anneal enough times, you can make an ounce of gold a mile long. One last thing I'd like to point out about a rolling mill is the direction you mill your metal. Because the mill will begin to line up the molecules in one direction, you cannot change the direction you run yourmetal without annealing. If you do, you will stretch the molecules in a different direction. This is what causes the stress cracks that you may see in some rolled metals. So, every time you need to change direction, stop, anneal, and then proceed. You can never anneal enough times in my opinion.
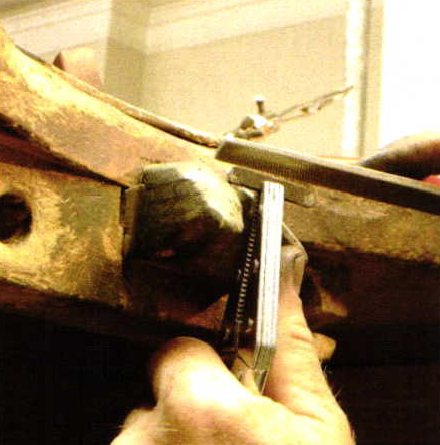
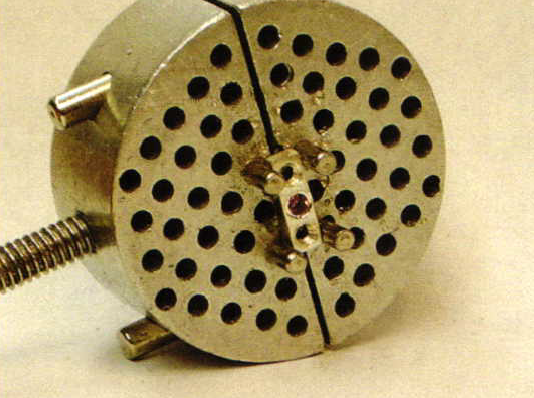
Once my bar is approximately the right size, I stop and file it to size. I use a pair of needle nose vise grips to hold the bar while I file. If you don't have a few pair of vise grips in your bench, you should. The ones in the photo were purchased at Sears, and have a lifetime guarantee. I've used that guarantee three times in the last 25 years. Once I have the bar the correct size, I hollow out the back of the bar. I do this for two reasons; first to lower the weight of the final piece, and secondly, to make it easier to drill the holes for the stones. The finished bar is 3mm deep, and I'd break two drill bits off in the piece drilling three holes that deep. I leave the center ofthe plate for the stones about 1mm thick.
Next, we decide on the location of the three stones. I mark and measure their location, and put three divots into the bar. I don't like to cast pieces with holes if I can avoid it to reduce the possibility of porosity, or failed wax patterns. I like to just mark the location, cast the piece, and then drill the holes in the metal' I solder on a sprue and make a rubber mold. Then I cast a few to see how they came out. The photo shows the divots on the front, and the hollowed back. Now let's set the stones.
The Three Middle Stones
The first thing I have to decide here is if I should set the jump rings to hold the chain now or later. If I'm using stones that can take heat, it's not an issue. But since I'm setting peridot in one, and rhodalite garnet in the other, it's a problem. I have to make a big life decision here. Yes, I'm going to give into technology and laser weld the jump rings after the stones are set. Yikes! Did I just say that? I'm going to try to incorporate the old with the new and see if I like it.
Any jeweler that does custom work has to constantly figure out how to hold the piece you are working on to set the stones. I find that my small pin vise works just fine here, and the pins don't get in my way. The photo shows the center stone set, with two more to go.
The Top Stone
About the only thing I haven't decided yet is the number, and orientation, of the jump rings to hold the chain from above, and the two lower elements suspendedbelow. Normally, I wouldmake those decisions before the stones are set, but since I've already given in to the laser welder for this project, I'll laser these jump rings as well. This stone was set in an off the shelf bezel with a 6mm, round faceted stone. I set an iolite in one, and an amethyst in the other. Once the stones are set, I get in my car and drive over to my buddy's store to get some laser welding done.
A First For Me
I'm a little slow to accept new technology, so this is a big step for me. It was pretty painless, I have to admit. I took my two middle bars, and my two top stones and had the rings set in about fifteen minutes. I elected to leave the top of the rings open till we decided on the final length of the chain sections. Once I had my jump rings in place, I went back to my shop to start final assembly.
Final Assembly
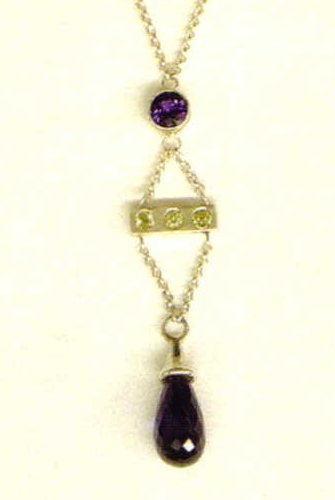
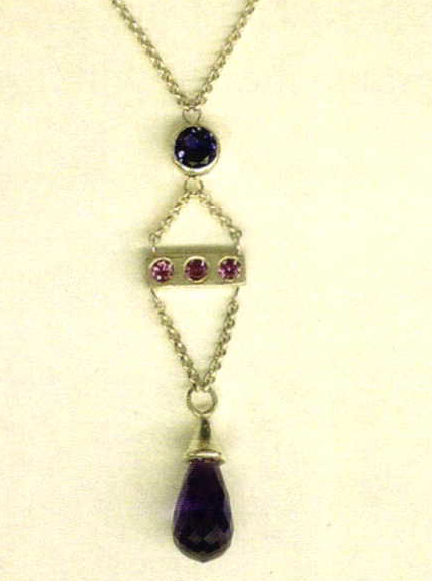
We spent about an hour trying different combinations of chain length till we were happy with the final look of the piece. Then, back to my buddy's shop to zap the rings closed. About ten minutes later, I'm heading back to my shop for final cleaning and polishing and gluing in the briolette. The photo shows the final product, a piece we call "Bella".
Final Thoughts
I'm not as happy with the laser welder as I thought I would be. It's okay, I guess, but I didn't like the structural integrity of the weld over a soldered connection. Because I had to bend the jump rings on the middle bar several times to get their final orientation, I noticed a weakening of the weld after a few bends. When I went back to get the top of the rings closed, I had him hit the original welds one more time for safety. I think in the future I'll solder the rings in place on the middle bar before the stones are set, and use the laser welder to zap them closed. The top bezel I could do either way since they don't have to be bent to balance the piece. I'm happier than I thought I would be with this piece. Some times a post-it-note sketch just doesn't do a piece justice. Write me and let me know what you think. See ya'll next time.
Related Articles

Artists’ Jewelry in Galleries

Metalsmith ’97 Fall: Exhibition Reviews

Messages from a Golden Age

Isabelle Schwarzer and Daniel Gunther


The All-In-One Jewelry Making Solution At Your Fingertips
When you join the Ganoksin community, you get the tools you need to take your work to the next level.
