
The Basic Techniques of Shell Inlay
To learn the art of inlay, its best to start with the basics. This project will walk you through the fundamentals so that you become comfortable enough to move on to a more challenging project. Once you master this simple circular design, youll be setting stones and shells in plaques of various shapes and sizes in no time!.
6 Minute Read
The unknown is always mysterious, and sometimes unfamiliar territory looks downright scary. Of course, looks can be deceiving. Inlay - the art of cutting stones or shells to fit snugly within the recesses of a setting - may seem difficult at first, but it's actually pretty easy to learn.
The Basic Techniques of Shell Inlay
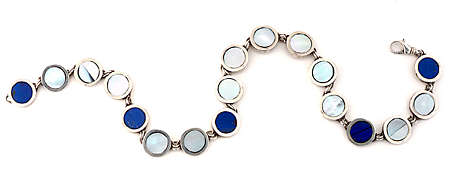
 Most of us have seen and admired the beautiful inlay created by Native American artists. They cut and polish the stones, then arrange them in plaques (recesses defined by thick-walled bezels). The plaques themselves have intriguing shapes, depicting animals, geometric forms, and even landscapes. Almost any type of stone or other hard, organic material can be used for inlay, but the most common materials are turquoise, coral, onyx, and mother-of-pearl shell. The results can be stunning.
To learn the art of inlay, it's best to start with the basics. This project will walk you through the fundamentals so that you become comfortable enough to move on to a more challenging project. Once you master this simple circular design, you'll be setting stones and shells in plaques of various shapes and sizes in no time!
Materials
- Sterling-silver wire: 8- to 10-gauge, square
- Sterling-silver wire: 18- to 20-gauge, round
- Sterling-silver sheet: 20- to 22-gauge
- Mother-of-pearl shell
- Jump rings
- Clasp
Tools & Supplies
|
|
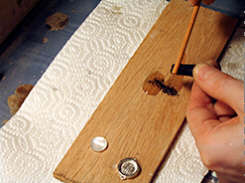
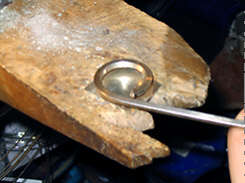 | Fabricate a plaque. Cut a piece of 8- to 10-gauge square wire to your desired plaque size. Bring the ends of the wire together to form a ring, and solder the seam using hard solder. Pickle, then rinse the ring in hot, soapy water.Cut a piece of silver sheet metal to the size of the ring. Solder the ring to the sheet metal using medium solder. Pickle the plaque, rinse it in hot, soapy water, and dry it. Use a jeweler's saw to trim around its perimeter, forming a cup. File the cut edge until it is smooth. |
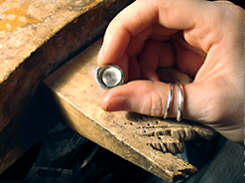 | Solder a small, U-shaped piece of 18- to 20-gauge wire to each side of the plaque using easy solder. Pickle, rinse, dry, and set it aside.Make as many plaques as you'll need to connect into a bracelet or necklace of your desired length. Although this project calls for circular plaques, you can make them different shapes; though, consider that you'll be custom-cutting shell to fit each one. For an efficient and accurate plaque-reproduction method. |
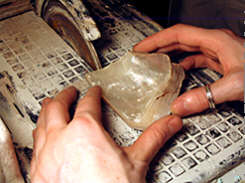 | Cut the shell into workable pieces If the shell is a large slab or chunk, use a trim saw to slice off manageable pieces close to the size of your plaques. |
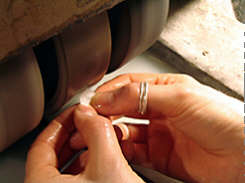
 | Scribe the shell pieces Measure the interior circumference of the plaques. Using a scribe, draw a circle with the same circumference onto the face of the shell pieces. Optionally, make a circle template out of cardboard or cardstock, and scribe many circles onto your shell at the same time. |
 | Cut the shells to size Cut the shells to size using the second- or third-coarsest-grit wheel on your cutting unit (the coarsest are usually on the left). It is important to keep the blade and shell pieces wet while cutting.Begin by cutting the back of the shell flat, if it isn't already. Then, hold the shell firmly between your index fingers and thumbs, and move it into a position near the lower third of the wheel. |
Time Saver
If you're long on creativity but short on time, here's a short-cut to help you achieve the best of both worlds. Design and fabricate one link of your bracelet, and send it out to a casting service. The casting service will make silicone molds of your link, inject wax into the molds, then proceed with a method called "lost wax casting," where molten metal takes the place of the wax piece. When you receive the castings, they will need a little filing, sanding, and polishing, but that's all.
Besides saving time, casting also ensures that each one is identical to the others. Check for casting companies in your local phone directory under "jewelry" or "casting," or search the Internet.
Technicolor Settings
When setting stones or other objects, the color of the plaque's interior often affects the stone's appearance, depending on the type of stone. Black coloration beneath mother-of-pearl shell gives the shell's surface a gray, blue, and purple haze. You can produce a fine, black coloring pigment by rubbing a wooden dowel against a charcoal stick. Grate the charcoal powder directly into your epoxy, and mix it in. You can also use this technique by grating colored pastels into your epoxy. Coat the lining of your plaque with the colored adhesive, then set your stone, shell, or other object.
Before you create a colorful mess experimenting with colored epoxies, try different color and stone combinations using colored paper or fabric. Temporarily place the material inside the setting, place a piece of dental floss across the opening (as a removal tool), and press the stone in to see how the color affects the stone's appearance.
Safety First
Dust produced when cutting, grinding, polishing, or drilling shells and stones can be hard on your lungs. A particulate respirator should be worn when undertaking heavy-duty production work, or if you're particularly sensitive to dust. It's also a good idea to protect your eyes with safety goggles. Always keep the grinding wheels and stone or shell wet to reduce airborne dust, keep the work cool, and prevent the wheels from clogging. Water is the most common coolant used.
Related Articles

Inlay Work

Fine Matte on Metal Surfaces

Stuart Devlin Retrospective Exhibition

The Department of Trier


The All-In-One Jewelry Making Solution At Your Fingertips
When you join the Ganoksin community, you get the tools you need to take your work to the next level.
