
Asscher Cut Diamond Design
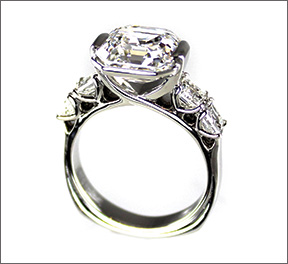
When a customer brings you a 4.27 carat, E color, VS1 clarity, Asscher cut diamond, it's tough not to be intimidated and awed. The client, one of my best customers, also had very specific requirements for the platinum bridal set that would house the stone: The engagement ring and wedding band had to be comfortable, fit flush together, and show off the quality and shape of the stone. For the engagement ring, he wanted a simple yet unique mounting that would showcase the stone as best as possible. So I set off to do just that.
2 Minute Read
When a customer brings you a 4.27 carat, E color, VS1 clarity, Asscher cut diamond, it's tough not to be intimidated and awed. The client, one of my best customers, also had very specific requirements for the platinum bridal set that would house the stone.
The engagement ring and wedding band had to be comfortable, fit flush together, and show off the quality and shape of the stone. For the engagement ring, he wanted a simple yet unique mounting that would showcase the stone as best as possible. So I set off to do just that.
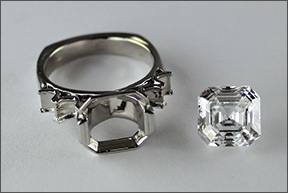 | I quickly decided that side stones were needed to balance the ring. I added two 25-point stones to each side, which I planned to have custom-cut to exactly match the proportions of the center stone. Six identical stones would be cut for the wedding band. |
 | I then focused on designing a fishtail-style mounting that would hold the side stones but accentuate the fact that they are Asschers, with cropped and rounded corners, not princess cuts, which have pointed corners. This caused a design problem: At 4.27 carats, the large center stone dictated that any standard prong arrangement would not allow the straight wedding band to sit flush against the ring. My solution was to opt instead for a bar-style setting for the center stone, which eliminated the need for protruding prongs and emphasized the shape of the Asscher cut, while allowing the band to snuggle up against it. |
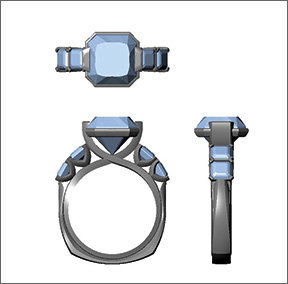
 | I presented a number of renderings to the client and got immediate approval. |
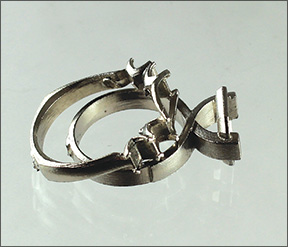 | In an attempt to have the cleanest possible mountings, I first prepared both CAD files to be milled in two parts. That didn't work well because we couldn't get perfect alignment between the parts; the slightest shrinkage threw it off. Instead, I cast each ring as one piece and spent extra time cleaning up the castings so they were pristine. |
 | I spent about eight hours pre-polishing each mounting using five steps of microfiber sandpaper, tungsten burnishers, and two different rubberized abrasives. I then polished the rings thoroughly with soft brushes using Greystar and Picassa Blue polishing compounds. |
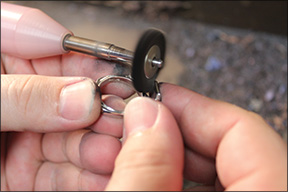
 | I started cutting the seats for the 25-pointers using a 0.003 ball bur moving in a sideways fashion. For this method, I bring the bur in at a 90? angle to the direction of the prong, cutting a trench-like seat for the girdle to sit in. This creates a dovetail effect, preventing the stones from twisting when tightened. This is a good trick to use when setting stones that require a precise orientation in a ring, such as these Asschers. |
 | With all the seats cut, I proceeded to polish them using five different coarsenesses of points followed by brushes. |
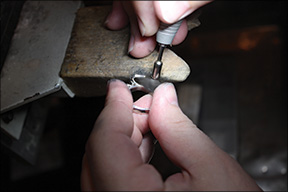
 | I set all of the small diamonds using a polished pair of pliers to simply push the prongs over each one. I then tightened the stones using a Gravermax. |
 | I finished the band by flat lapping and polishing with Picassa blue, then moved on to setting the center stone. |
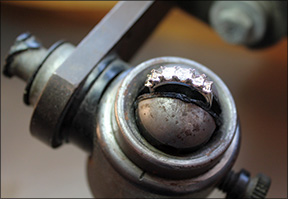
 | Using a 0.03 mm ball bur, I cut the seat for the center stone the same way I cut the seats for the side stones. With the center stone seated, I used my GraverMax to burnish the bars over the stone — always a nerve-wracking task when working with an irreplaceable diamond. |
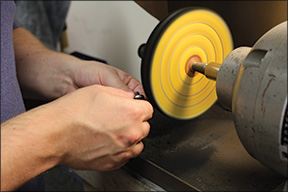
 | I polished the entire ring again using a split lap and brushes. |
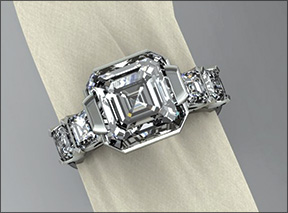
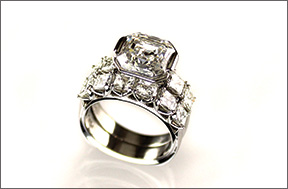 | The finished bridal set met the customer's need for showcasing the amazing Asscher cut in a simple but unique design |
![]()
In association with
![]()
The award-winning Journal is published monthly by MJSA, the trade association for professional jewelry makers, designers, and related suppliers. It offers design ideas, fabrication and production techniques, bench tips, business and marketing insights, and trend and technology updates—the information crucial for business success. “More than other publications, MJSA Journal is oriented toward people like me: those trying to earn a living by designing and making jewelry,” says Jim Binnion of James Binnion Metal Arts.
Click here to read our latest articles
Click here to get a FREE four-month trial subscription.
Related Articles

Stuart Devlin Retrospective Exhibition

Beautiful Gemstones

Chunghi Choo: The Energy Qi

Jewelry Making Study Sheet


The All-In-One Jewelry Making Solution At Your Fingertips
When you join the Ganoksin community, you get the tools you need to take your work to the next level.

