
Watercolor Technique
6 Minute Read
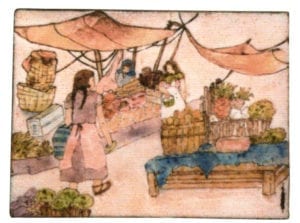
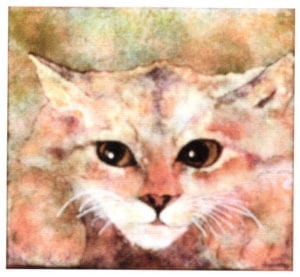
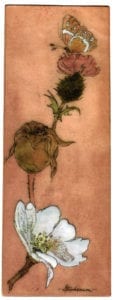
This technique involves the blending of several transparent and opalescent colors on a background of flux flecked with white, with a delicate tracery of fine line black, outlining rather nebulous forms.
I was introduced to this technique many years ago by Emily Moser, an enamel teacher here in San Diego. With painting in Watercolor and Chinese brush painting as my background, this method quickly became my favorite technique in enameling. I hope you will enjoy it too.
To begin with, it would be easier to use a flat piece of copper. Start with a paper template of your copper, sketch and arrange your design and record the colors used for future reference.
Clean the copper and cover the back side with Scalex. When this is dry, cover the front of the piece with a smooth layer of flux, not overly thick, but completely covered. Dry and fire until mature. When cool, clean and cover the back with counter enamel. If the back will be seen on the finished piece, use colors that will compliment the front of your piece instead of the regular counter enamel, and make it as beautiful as the front. Dry and fire to, at least, orange peel. When cool, clean the edges. If the flux has a red cast, refire until clear, and again clean the edges.
Apply Klyr-Fire™ to the fluxed surface and sift a thin, even coat of opaque white. Dry and fire until the flux begins to break through the white in golden flecks.
Use 2015 or 2030 flux for the first coat on the front and 1030 for the second coat. For those who still have lead-bearing Thompson, my favorites ate 426 flux and 718 medium fusing white. This flux and white makes a nice background for your water color. If you wish, add color or shading into this background. It may be added now or at any time during the work on the design.
Using a fairly large palette, place small amounts of enamel near the edge and leave spaces between each for mixing some of the colors while working. I use a small sable brush for the enamel and a very small sharp-pointed quill-type pen for the fine line black.
To lay in the colors, I usually start at the top left, or in the center if the piece is round. Some of this will be close, delicate work, and this will give a place for your hand to rest without smearing what you have already done. Apply distilled water to the enamels on the palette with an eye-dropper. Most of the time, more water will be needed as you go along, especially on a warm, low humidity day. Work with more water than usual. As a general rule, work from light colors to dark, using plenty of water to give a soft flowing look. If the applied enamel looks too thick in some spots, just dip your brush in clean water and touch it to those spots gently - just touch, don't brush. If you find there is too much water, dab the excess with a small piece of paper towel. All sections that touch one another are best done at one sitting. If an area dries out completely, the space touching it absorbs so much water that it becomes difficult to keep it wet enough in the new area without causing other problems in the already done area.
The next layer of color probably won't cover everything. Some areas are best left very light and pale. I use mostly transparents, with a small amount of opaques for accent. When adding more color over your base design, use the same colors for some areas. One example is to use a second coat of tea rose over the first coat of tea rose, or use a darker pink over a lighter one. For flowers, add these colors, finishing one petal at a time. This will make each petal stand out on its own, when the whole flower is finished. Don't forget to have one petal overlay another here and there, or a whole or part of a flower in back or partly in back of another. Do this same thing with the leaves. If your garden is lunch for bugs, etc, as mine is, give your bouquet a blemish or hole occasionally, for a truly 'fresh from the garden' look.
The next step is to add some shading before you fire again. Some of the accent can be added by using a tiny sifter. (Touch up with a clean brush before firing.) This will aid in keeping the number of firings as few as possible. When all of the layers of color are on and fired, it is time to add the fine line black. The piece can be left without any fine line black, but even a small amount will add a finishing touch, such as making the center of the flowers stand out. Remember to leave a break in the line here and there, instead of outlining everything completely.
To prepare the fine line black, MIX THOROUGHLY. This is a very important step. Since you want a thin line of the black (with only a few places a bit heavier for contrast), do not leave the ink too thick. But, it should be thick enough to write black, not gray. When you feel it is a medium consistency, try writing on an enameled surface. If this is removed before firing, it will not hurt the enameled piece. When it seems to be the correct consistency, but it is difficult to make it write, check out the following, and adjust as needed:
- Be sure the enameled piece is very clean and dry.
- Thicken or thin the black line ink as needed.
- Hold your pen at a different angle from the writing surface, trying several angles.
- Be sure the pen point is clean. (Don't leave it clogged on the underside above the point - that can result in a blob. Drawing through an already dried line can clog the point.)
If none of this works, take a break and begin again at the directions that say 'mix thoroughly'.
When applying the fine line black, keep a light touch. It should be black, but do not press down so hard that it becomes a heavy dark line. You can press slightly to vary the width of the line. Remember that pressing it too hard may also damage the pen point. Let the fine line black dry completely. A few spots of touch-up color can be added at this point, but do not let the moisture touch the already dry fine line black. If the back of your piece needs a final coat of enamel, do this before firing the ink, and fire upside down.
If you have ways to do any of this that work better for you, or you have any questions or suggestions about what I have written, please get in touch with me. Exchanging ideas would be a help to me, and happily we all learn from one another.
About the Author
My first classes in enameling were with Emily Moser. I have had the opportunity to study with teachers from many states and several other countries, including Phyllis Wallen, Marion Brown, John Killmaster, Woodrow Carpenter, Kay Whitcomb, Gerry Grove, David Pimental, Mary Chuduk, Ken Bova, Harlan Butt, Fay Rooke and Jean Tudor.
I am a member of the San Diego Enamel Guild, Enamel Guild: West, and the Enamelist Society.
Dorothy Stephenson, 8988 Caminito Verano, La Jolla, CA 92037 USA; (858) 453-9341.
Related Articles

Jewellery Career Options

A Conversation with Angela Cummings

Samuel Yellin, Metalworker

Deborah Aguado: Use of Image and Enigma in Jewelry


The All-In-One Jewelry Making Solution At Your Fingertips
When you join the Ganoksin community, you get the tools you need to take your work to the next level.
