
Tips for Repairing Pearl Jewelry
When taking in a piece of pearl jewelry for repair, it may be necessary to remove the pearl to avoid damaging it. Since most pearls are held in place with glue, you can remove them by gently warming the jewelry piece. You want the part near the pearl to get warm and soften the glue. Most glues will soften with heat, allowing you to pull the pearl off the peg easily.
3 Minute Read
When taking in a piece of pearl jewelry for repair, it may be necessary to remove the pearl to avoid damaging it. Since most pearls are held in place with glue, you can remove them by gently warming the jewelry piece. You want the part near the pearl to get warm and soften the glue. Most glues will soften with heat, allowing you to pull the pearl off the peg easily.
If epoxy was used to attach the pearl, a soak in the appropriate solvent, such as acetone, may permit pearl removal, but it's a good idea to try the gentle heating method first.
When repairing pearl jewelry, you may need to replace a pearl. Finding a perfect match for the piece may require half-drilling an undrilled pearl. The following tricks can make holding a pearl in place and drilling it a lot easier.
Holding a hard, slippery pearl still while successfully drilling it can be tricky. It's dangerous to hold the sphere in your fingers, so other methods are necessary. Give the following holding tools a try:
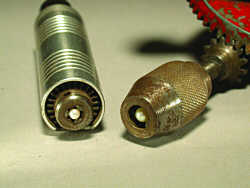
- A three-jawed chuck (see photo), such as that on a hand drill, a flex-shaft handpiece, or a three-jawed miniature lathe, can be used to hold a pearl in place securely. You can remove the flex-shaft handle when using it as a clamp. (Please tighten the tool gently and use a piece of cardboard or cloth to cushion the pearl).
- A commercial tube-cutting jig can be used to clamp a pearl. Originally designed to hold a round rod, these jigs also work with spheres. Graver-sharpening jigs can also be used.
- A simple tool for holding pearls is a piece of metal with holes in it. Bend the metal over the pearl so two holes surround it on either side. You can hold the metal piece in a pair of pliers or a hand clamp while you drill the pearl.
- Sections of piano hinges or similar small hinges are great for this purpose, as they already have holes drilled in them that line up perfectly when the hinges are closed around a pearl.
- self-locking tweezers with ring-shaped ends can be used to clamp a pearl for drilling.
- This circular version is a relative of a standard commercial pearl drilling jig. The commercial jigs clamp even better than this design and cost under $10. They are available from most jewelry suppliers.
When drilling a pearl, the drill bit tends to skid off the surface, endangering you and the pearl. To prevent skidding, make a small indentation in the pearl prior to drilling. Start by clamping the pearl securely into one of the holding devices listed previously. Take a sharp pointy steel tool, such as a soldering pick, heat the point to glowing orange-red, and press it onto the pearl. Move your hand in a circling motion while pressing down. This will make a small indentation that your drill bit can grab onto, preventing skidding.
To avoid this situation, back the drill bit out every 1 mm as you advance it into the pearl. This pulls out the packed dust and releases it. Be sure to drill carefully and avoid using too much pressure, which can cause the pearl to split.When you start drilling, you should drill in a little and then back out the bit repeatedly. The hollow grooves in the bit carry chips away from the drilling surface, but they tend to become packed with pearl dust during drilling. This can jam the bit in the hole and cause it to snap off—not a pleasant problem.
To gauge drilling depth, wrap a piece of tape around the drill bit to indicate the stopping point. Some jewelers make a small tape "propeller," which serves a dual purpose: it gauges drill depth and also blows away any dust that accumulates as you drill. (This trick is great for wax work and wood work, as well.)
![]()
In association with
![]()
The award-winning Journal is published monthly by MJSA, the trade association for professional jewelry makers, designers, and related suppliers. It offers design ideas, fabrication and production techniques, bench tips, business and marketing insights, and trend and technology updates—the information crucial for business success. “More than other publications, MJSA Journal is oriented toward people like me: those trying to earn a living by designing and making jewelry,” says Jim Binnion of James Binnion Metal Arts.
Click here to read our latest articles
Click here to get a FREE four-month trial subscription.
Related Articles
Pearls of the Ocean

Fabricated Reversible Pearl Pendant

Chinese Freshwater Pearls
Pearl Treatments Explained


The All-In-One Jewelry Making Solution At Your Fingertips
When you join the Ganoksin community, you get the tools you need to take your work to the next level.

