
Steps on Making a Rolled Fold Heistad Cup
Rolled folds are folds which utilize the rolling mill and it's unique properties of equal, directional pressure on the plastic metal. Many pleated folds work well as do a series of flattened T-folds of various types. This one demonstrates the fold-forming priniciple of This rolled fold is called a Heistad Cup.
2 Minute Read
Rolled folds are folds which utilize the rolling mill and it's unique properties of equal, directional pressure on the plastic metal. Many pleated folds work well as do a series of flattened T-folds of various types. This one demonstrates the fold-forming principle of this rolled fold Heistad Cup, after Earling Heistad who made the mental jump to this shape in an early workshop in 1985 in New Hampshire.
It is a truly magic fold, and one I use to introduce students to metal as their very first act in the jewelry studio. It takes only a few minutes to make.
Steps on Making a Rolled Fold Heistad Cup | |
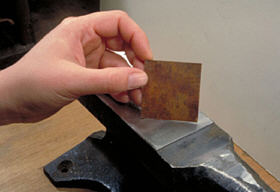 | Take a square of metal sheet. |
 | Fold the square corner to corner and pinch the ends tight so they match up well. If you clamp them with a pair of pliers you will get a perfectly folded result. |
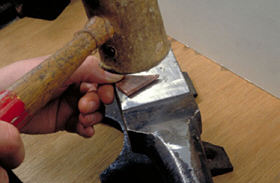
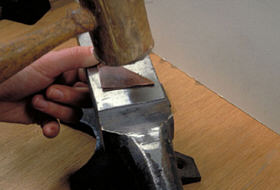 | The fold is then malleted tight on the anvil. |
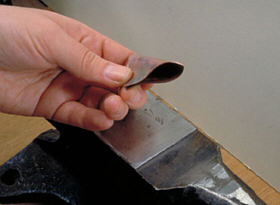
 | Now the two corners are brought together, and it is folded again |
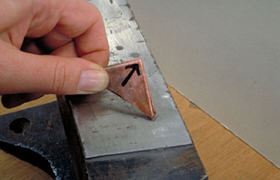
 | This is now malleted tight again. The fold is ready for rolling. Your limitation on size is going to be the width of the mill. |
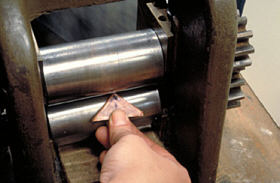
 | The folded cup is inserted into the rolling mill from the closed point first, as shown. It does not need annealing before rolling, and if you quenched it you would get water in the seams which would then squirt out onto the mill, potentially damaging it. |
 | Here it is after one pass in the mill. The cup is then rolled repeatedly until it has lengthened a least 2-3 times its starting length. |
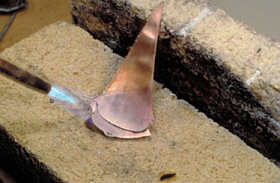 | The cup is annealed now, turning it over to ensure that all the layers are evenly heated. Then it is quenched. Quench it fast and deep in water and hold it down until it has finished quenching. If you were to take it out too soon scalding water could squirt across the room. |
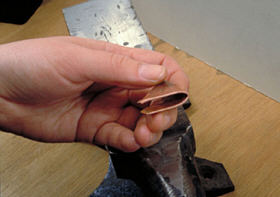
 | The cup is now gently opened with the fingers. The curve is set equally on each side of the central fold edge. |
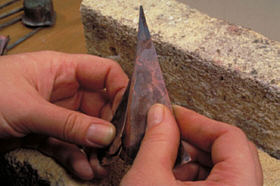
 | Grab a small piece of each side of the cup with pliers and just begin to open it. Just a little tug to start it is all that is needed. Switch to your fingers as soon as you can to avoid leaving tool marks on the metal. |
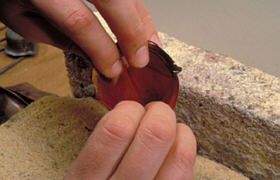 | The cup is now opened with the fingers and shaped to suit. Avoid using tools to pry it open as this may cause unsightly dents. If you have to use tools when doing this with stiffer metals like sterling or 14k gold then use flat, blunt wooden or plastic tools so as not to damage the metal surface. |
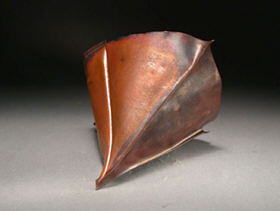
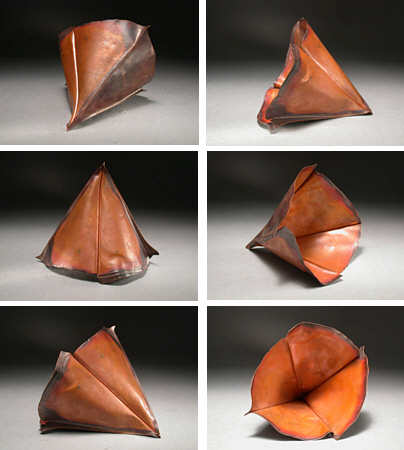
Here are some images of a Heistad cup from different angles. Note there are many ways of folding up a cup, and this fold is just a starting point for this avenue of exploration.
Related Articles

Fold Forming Tool List

The Origins of Fold Forming

Scoring and Bending Procedures

Jewelry Using a Microfold Brake


The All-In-One Jewelry Making Solution At Your Fingertips
When you join the Ganoksin community, you get the tools you need to take your work to the next level.
