
Resists and Electroplating to Create Patterns
With the ever-higher cost of precious metals, many jewelers are increasingly working with non-precious metals such as stainless steel, titanium, and copper. As jewelers design with these materials, color and pattern development have become popular ways to dress up the surfaces of these pieces.,,,
3 Minute Read
With the ever-higher cost of precious metals, many jewelers are increasingly working with non-precious metals such as stainless steel, titanium, and copper. As jewelers design with these materials, color and pattern development have become popular ways to dress up the surfaces of these pieces.
The Prep
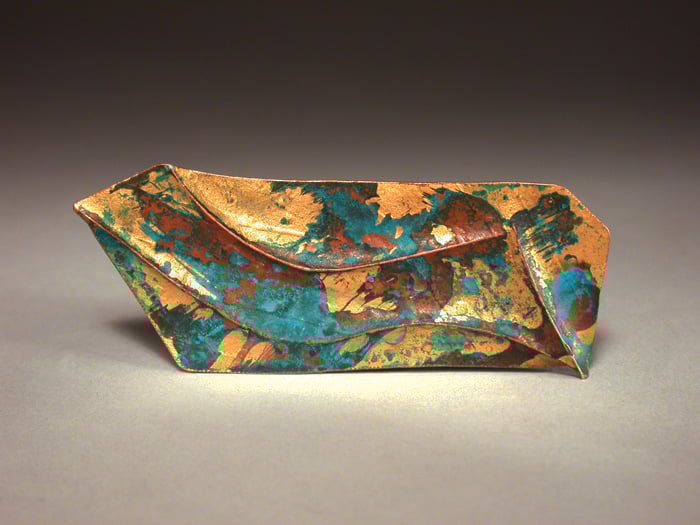
An easy way to create colors and patterns on less precious metal surfaces is to use resists and electroplating. Long employed by jewelers in electroplating, resists can be used to block off sections of metal to prevent them from being plated. Several types of resists can be used for creating patterns, including non-conductive paint, electrical tape, nail polish, a thick permanent market, and vinyl sign material that can be computer cut into incredibly detailed geometric patterns.
My favorite resist for this type of project is rubber cement. It should be thinned using rubber cement thinner, which is available at most graphic arts stores. To use, thin down the cement to a watery consistency that you can paint onto the metal. When you are finished plating and are ready to remove it, you can simply rub the cement off the metal with your fingers.
While there are many options available, the plating solutions I use to create colors and patterns are the most standard ones: nickel plating for a gray color, silver plating for white, and gold plating for yellow or gold. Other metal plating solutions, including rose gold, green gold, and rhodium, can be used, all with distinctive colors and brightness.
Additional colors can also be achieved by manipulating the metal after plating. For example, greens and blues can be achieved by rubbing salt water onto a sheet of copper and suspending it in a sealed container with a small amount of ammonia. The ammonia fumes attack the exposed copper (but leave the plating alone), turning it a range of greens and blues. Or the sheet could be heated after plating and then quenched in water: This would turn the exposed copper a range of browns and blacks.
The Process
Before beginning, you must plan out your design for the best results. This process is a bit like painting Easter eggs with a wax resist. Each color is applied one at a time, and earlier colors are protected in parts so that the final result is a piece with lots of colored areas. Your success will depend on how well you planned your design for this technique.
Once your design is finalized, you can begin the plating process, which can be done using a basic rectifier and plating solutions. Take the sheet of metal and apply any texturing you desire. Using your chosen resist, mask off the parts of the base sheet you want left visible, then dip the sheet in the plating solution to add your first color. Five minutes is usually sufficient, but the plating time will vary depending on the desired thickness. Dry the metal's surface and repeat the process, applying resists to any areas you don't want plated with a second color (including the previous plating). Continue this procedure until you achieve the look you desire. Once complete, remove all of the resist material and the multi-colored patterned sheet is ready for use in a jewelry design.
Because these platings are fairly thin, they should be applied to pieces where little to no abrasion will take place, such as earrings, pendants, or brooches, and preferably pieces with raised parts or frames that protect the decorated area from damage. You can also apply a sealer to protect the piece and prevent the colors from changing. I like Nikolas Lacquer, which offers protection from oxidation, perspiration, and abrasion.
![]()
In association with
![]()
The award-winning Journal is published monthly by MJSA, the trade association for professional jewelry makers, designers, and related suppliers. It offers design ideas, fabrication and production techniques, bench tips, business and marketing insights, and trend and technology updates—the information crucial for business success. “More than other publications, MJSA Journal is oriented toward people like me: those trying to earn a living by designing and making jewelry,” says Jim Binnion of James Binnion Metal Arts.
Click here to read our latest articles
Click here to get a FREE four-month trial subscription.
Related Articles

Electroplating Jewellery

Electroforming for Innovative Design

A Method of Steel Patination

The Foundation of Japanese Patinas


The All-In-One Jewelry Making Solution At Your Fingertips
When you join the Ganoksin community, you get the tools you need to take your work to the next level.

