
Pinback Placement Hints
It is customary to place the joint at the right of the back of the pin and the catch on the left for right handed users.
2 Minute Read
This article offers some pinback placement hints provided by Charles Lewton-Brain. Please view the image for diagram.
The Joint
It is customary to place the joint on the left for right handed users - who make up most of the buyers in our culture.
The joint and catch (the pinback system) are placed in the top third of the pin to prevent it flopping forwards on the body in use. The nearer they are to the top of the pin the more stable it is on the body.
Notice that the joint is positioned so as to cause a slight upwards tension on the pin stem into the catch.
It is also important that any opening in the catch to receive the pin stem be facing down so that should any locking mechanism present in the catch fail in use gravity will keep the pin in place on the wearer's body.
At rest then the pin stem should be lying above the catch.
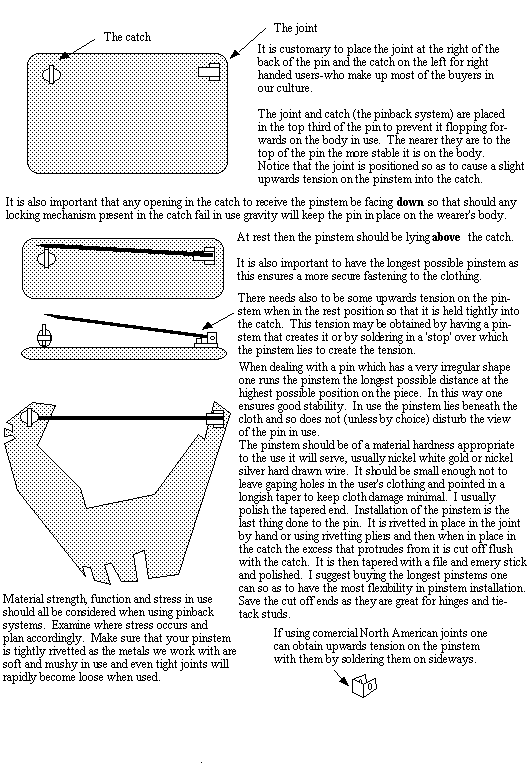
It is also important to have the longest possible pin stem as this ensures a more secure fastening to the clothing.
There need also to be some upwards tension on the pin stem when in the rest position so that it is held tightly into the catch. This tension may be obtained by having a pin stem that crates it or by soldering in a "stop" over which the pin stem lies to create the tension.
When dealing with a pin which has a very irregular shape one runs the pin stem the longest possible distance at the highest possible position on the piece. In this way one ensures good stability. In use, the pin stem lies beneath the cloth and so does not (unless by choice) disturb the view of the pin in use.
The pin stem should be of a material hardness appropriate to the use it will serve, usually nickel white gold or nickel silver hard drawn wire. It should be small enough not to leave gaping holes in the user's clothing and pointed in a longish taper to keep cloth damage minimal. I usually polish the tapered end.
Installation of the pin stem is the last thing done to the pin. It is riveted in place in the joint by hand or using riveting pliers and then when in place in the catch the excess that protrudes from it is cut off flush with the catch. It is then tapered with a file and emery stick and polished.
I suggest buying the longest pin stems one can so as to have most flexibility in pin stem installation. Save the cut off ends as they are great for hinges and tie-tack studs.
Material strength, function and stress in use should all be considered when using pinback systems. Examine where stress occurs and plan accordingly. Make sure that your pin stem is tightly riveted as the metals we work with are soft and mushy in sue and even tight joints will rapidly become loose when used.
Related Articles

Chain and Bracelet Catches 2

Hinge Pin Installation Options

Cast Hinges for Jewelers and Goldsmiths

Chain and Bracelet Catches 1


The All-In-One Jewelry Making Solution At Your Fingertips
When you join the Ganoksin community, you get the tools you need to take your work to the next level.
