
Niello Metal Mixture
Niello is a deep black metal mixture that is fused onto metal for decorative effect. Though worked on three-dimensional objects, the effect might be considered graphic because it relies primarily on shape and pattern. The contrast of the lustrous black inlay against either matte or polished metal is striking and has earned niello a special place in the arsenal of decorative techniques.
7 Minute Read
Niello is a deep black metal mixture that is fused onto metal for decorative effect. Though worked on three-dimensional objects, the effect might be considered graphic because it relies primarily on shape and pattern.
The contrast of the lustrous black inlay against either matte or polished metal is striking and has earned niello a special place in the arsenal of decorative techniques.
The process can be thought of as having two parts - making the niello material and fusing it into position. The latter is generally a matter of filling depressions or incised lines made by engraving, etching, stamping, rolling or layering (figures 10.1 to 10.3).
 | 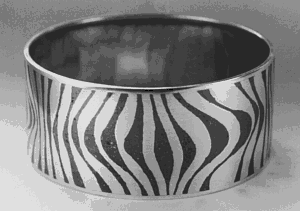 |
| 10.2 - Silver bracelet, overlay, Niello work. (student piece, School of Applied Art, Heiligendamm) | |
 | |
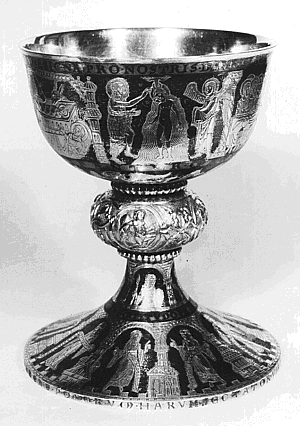
| 10.1 - Communion Chalice. Silver. Relgious motifs and inscriptions, treated with Niello and engraved. Nodus with engraved representation of the rivers of paradise, second half of the 12th century. (Monastery church, Trezemeszno, Poland) | |
| 10.3 - Silver pendant, Sawed and engraved with Niello. (student work, School of Applied Art, Heiligendamm) |
This technique can be traced all the way back to ancient times. Theophilus, a monk in the Middle Ages, has given a description of the procedure which is so accurate that it could be used here. Unfortunately niello is rarely used today, almost forgotten, perhaps because goldsmiths have forgotten how to work with engraving tools and chisels. There is no reason why niello can not be used in contemporary design and achieve again the high regard in which it was once held.
The Base Metal and its Preparation
Niello fuses well onto silver and sterling, and can also be used on gold alloys. It does not bond onto copper, brass or nickel silver. As mentioned, niello is generally used to fill recesses which can be made by any mechanical process (engraving, machining, etc.) or by the fabrication process called overlay in which layers of sheet are soldered together to create chambers to hold the niello. All soldering is completed on the piece, which is then pickled, scratchbrushed, and thoroughly rinsed.
Making Niello
A survey of the historical literature of metalworking will turn up several recipes for making niello, but for our purposes here only one will be presented. It has the benefit of being simple, reliable and proven in the studio by the author.
- In a conventional crucible, melt together 2 parts silver and 1 part copper, adding a small amount of borax as a flux. Have an assistant keep this metal molten.
- At the same time, melt 1 part lead in a steel ladle.
- Working under a fume hood with active ventilation, add powdered sulfur to the molten lead in generous amounts. Stir vigorously, the intention being to saturate the lead with sulfur as quickly as possible. Much of the sulfur is immediately burned away, so it is impossible and useless to specify the amount of sulfur needed. Instead, stir sulfur into the lead until is seems to take no more. The fumes that result from this activity have a strong odor and constricting effect on the throat. Do not attempt this unless there is a way to draw these fumes away!
- Pour the lead/sulfur mixture into the molten copper/silver alloy, stirring well with a steel or carbon rod. Failure to mix thoroughly will yield a mottled niello with flowers of sulfur.
- Preheat another crucible, preferably a tall narrow vessel, and add another generous supply of sulfur. As before, this will immediately release clouds of noxious smoke. Pour the copper/silver/lead mixture into this crucible, keeping it fluid all the while and again stirring with rod. The intention at this point is to further saturate the alloy with sulfur.
- Make a flux by dissolving ammonium chloride in hot water to make a thin paste.
- Pour this mixture into water which will break the niello into granules. Grind the niello in a mortar and pestle, adding flux to create a paste.
- Alternately, the niello can be cast into a sheet or wire ingot mold to make a solid bar and used to directly apply the niello to the work.
The two-to-one proportion of silver and copper in the recipe yields an alloy (Ag 667) that is close to the eutectic proportion for those two metals (Ag 720). This means the niello has a low melt interval, or goes from solid-to-liquid quickly.
Only a certain portion of the metal reacts with the sulfur, forming metal sulfides in the sequence of each metal's affinity to sulfur according to their atomic ranking:
- PbS 93 kJ/mol
- Cu2S 79 kJ/mol
- Ag2S 29 kJ/mol
The mass of niello consists of the copper/silver alloy with lead and with the sulfides of the composite metals. The mixture forms a number of complicated eutectic mixtures and intermetallic compounds.
Test the niello by striking a lump with a hammer. The piece should shatter like glass and reveal a fracture surface that is uniformly black. If the niello does not show both of these properties, remelt it, using more sulfur and stirring the mass more completely.
Applying and Firing the Niello
After all soldering is completed the work is pickled, scratchbrushed and degreased. After this thorough cleaning it should be handled only by the edges. Grind and mix with flux just as much niello as will be used on the current project.
The niello paste is packed into the recesses with care typically sliding it off a small carrier such as a fine brush (a goosequill is specified in the ancient texts). Pack the paste as firmly as possible with a small spatula to create a dense filling. Even with this the niello will occupy less space as it fuses and should therefore be mounded up higher than the level of the piece being filled. When the piece is "loaded" it is set into a warm spot to dry, for instance under a lamp or on a heater. If the piece is fired when wet, the expanding steam tends to throw the niello particles aside.
Goldsmiths of the Middle Ages melted their niello over a charcoal fire; today an electric kiln is preferred because of its uniform, controllable heat. The dried piece can be set directly into the kiln, or laid onto a tile or piece of firebrick to make it easier to withdraw from the kiln. First the ammonium chloride spreads over the niello as a white covering layer. As the heat approaches 500°C (930°F) the black metal powder will glow red and spread to fill up the depression into which it was packed.
In flat objects gravity will pull the taffy-like molten niello into place. When working on curved surfaces, particularly something a fully round as a sphere, gravity of course has the opposite effect, pulling the niello out of place. Rounded objects must be kept turning, a process made easier if they are attached somehow to a long rod. The piece can be withdrawn for brief times from the kiln and the niello troweled back into place with a lightly oiled steel spatula. Prolonged heating will allow the sulfur portion to burn away, leaving a porous brittle surface.
It is also possible to fuse niello into place with a torch. Because of the danger of overheating the niello, the flame is played on the work in such a way that the heat travels from there to the niello. If possible the work should be heated from below, for instance by placing it on a tripod and screen.
If there are voids or bubbles, apply additional niello paste and repeat the process, using the spatula to press the fresh melt into the first layer.
In some cases, particularly those where an engraved or stamped line is being filled with niello, the paste process just described is less successful than the following adaptation. Pour the niello into an ingot mold or similar arrangement to make rods of the raw material. Prepare the metal as described above, brush on a coat of the ammonium chloride flux and warm it with a torch. Keeping the metal warm, melt the tip of the niello rod and smear it into the prepared grooves, adding as much as necessary to fill the groove.
Finishing Work
Remove excess niello with a scraper or coarse file. Particularly in cases where the original depression is shallow, it is important to work carefully so that you don't remove the pattern entirely. As soon as the general outline of the niello-filled area is clear, shift to the conventional sequence of finishing-files, coarse sandpaper and polishing compounds.
The niello is relatively soft and will therefore respond well to burnishing. Be careful when using a flex shaft or polishing machine for the same reason: the niello will be removed twice as quickly as silver or gold. Stiff polishing equipment such as a leather stick or a felt wheel are preferred.
Niello takes a rich black shine, but also looks good in its matte version. To achieve this, polish it first with sandpaper and compounds, then give it a quick rubbing with pumice powder.
SAFETY NOTE: Because of its lead content, it is important that all traces of niello and any tools used with it are kept separate in the studio. Lead will migrate through skin, so wear gloves when finishing the niello. In addition it will contaminate all jewelry metals and must be rigorously kept away from them. Use a separate file and discard all sandpaper that has come into contact with lead or niello. Scraps can be returned to a refiner for reclamation but should not be reused in the studio.
Related Articles

950 Palladium: Casting Procedures
10 Steps to Achieving Great PR

The Beautiful Art of Appearance

The Concept of Preciousness


The All-In-One Jewelry Making Solution At Your Fingertips
When you join the Ganoksin community, you get the tools you need to take your work to the next level.
