
How to Make a Pewter Sake Cup
Pewter, an alloy of tin, antimony, and copper, dominated European tableware for half a millennium until it was eclipsed by porcelain in the early 19th century. Now, almost two hundred years later pewter has entered a renaissance in the hands of creative metalsmiths. In this project, suitable for beginners, you will learn how to cut, form, fuse, solder, and finish pewter to produce a lovely and function cup.
9 Minute Read
Pewter, an alloy of tin, antimony, and copper, dominated European tableware for half a millennium until it was eclipsed by porcelain in the early 19th century. Now, almost two hundred years later pewter has entered a renaissance in the hands of creative metalsmiths. In this project, suitable for beginners, you will learn how to cut, form, fuse, solder, and finish pewter to produce a lovely and function cup.
Steps on How to Make a Pewter Sake Cup
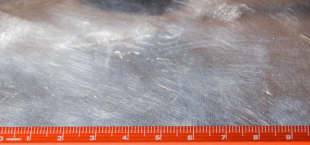 | 1. With a bench shear, hand shears, or jeweler's saw cut a piece of 14 gauge pewter to 12.6 cm x 5 cm. (Note the diameter of the cup is 4 cm, so the circumference is pi x d. If you use shears or a saw make an effort to cut a clean straight line |
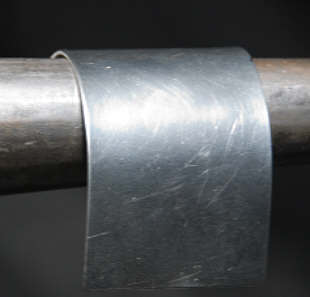 | 2. Using a mandrel or blowhorn stake gently roll the pewter into a cylinder. Roll along the long axis of the sheet. The roll does not need to be perfect as we will rene the shape after we fuse the cylinder. 3. Flatten the cylinder where the two edges meet. We want a good straight seam. Adjust the seam so that the gap is is just the thickness of a sheet of pewter. 4. Lightly sand area around the seam and then wash well with soap and water. Flux the clean seam. 5. Cut several chips of pewter, about 2 x 2 mm, place them along the seam about every 5mm or so. |
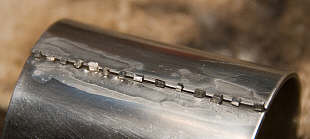 | 6. Using a # 00 tip on an acetylene-air torch, adjust the flame to about 4 mm. For fusing (or welding) we use a much smaller flame then for soldering. This may seem contra-intuitive, but in soldering we want to distribute the heat across the region to be joined and then add just enough more heat to melt the solder. In fusing we are heating a pewter chip to exactly the melting point of pewter, and hence the melting point of the adjoining material. We need to get in, apply heat quickly to the chip to melt it, and then get out. Lingering with the torch will be rewarded with a melted seam! Work carefully. 7. So, to fuse, use the small flame, warm the piece very slightly, and then quickly focus the tip of the flame directly on the pewter chip. Once the chip melts, you can move the molten pewter a bit with the torch tip, but be very careful. Quickly move onto the the next chip and then the next. If you think the piece is getting too hot, remove the torch and let the metal cool a bit before proceeding. You may need to add another pewter chip or two to completely fill the seam. Do not worry about having a perfectly clean weld. We will planish and le the joint. Be certain that the entire seam is sealed. Cool and wash the closed cylinder with soap and water. |
 | 8. Return the now rather distorted cylinder to the mandrel or stake. Using your hands and a rubber mallet, shape the piece into a perfectly round cylinder. Check the shape by eye, and if needed against a circle drawn with a compass.If you are accustomed to working in silver, gold, or most other metals, you'll notice that we have not stopped to anneal the piece. This is one of the joys of pewter. It does not work harden, and thus does not require annealing after rounds of work. |
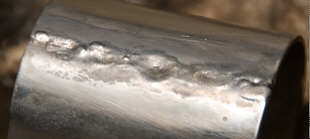
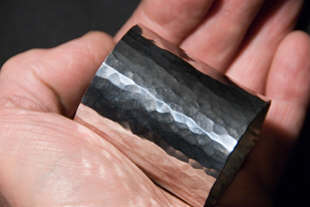 | 9. With gentle, overlapping blows, use a planishing hammer, first to work down the fused seam, and then the planish the entire cylinder. Properly done, the seam will become invisible outside and inside. This is one of the advantages of fusing, the joint is pure pewter, as strong as pewter and exactly the same color. Safety note: Hammering produces rather intense high-frequency noise. You may want to use ear protection while planishing. |
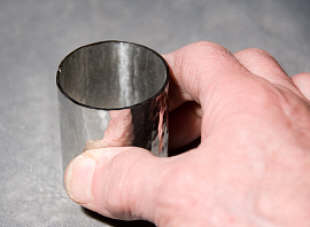 | 10. Even the two ends of the cylinder by sanding on 220 grit cloth supported on a very at block of metal, wood, or stone. Pieces of granite left over from kitchen counter projects make excellent at blocks. Color the edges with a marker and sand until all of the ink is removed. Finish on 400 grit cloth. |
 | 11. We're going to put a slightly flared rim on the sake cup. With fine tip marker carefully draw a line about around the circumference of the cylinder about 1 cm from the top. |
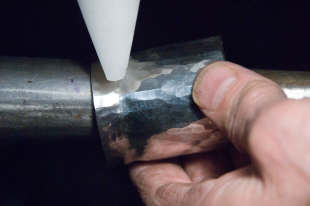 | 12. Holding the cylinder at a slight angle to the stake, use a raising hammer and carefully tap along the line you have drawn. The idea is to open a gentle air around the the rim. Using the hammer and your hands, form a graceful air. It doesn't have to be perfectly round, but it must appeal to, not offend, your eyes. Pewter is very soft and a metal hammer will leave deep tool marks. That is ne if that is the look you want. The choice is yours. I don't want to mar the planishing marks, so I am using a cross-peen Delrin mallet. 13. At this point you must decide if you want to keep the planished finish or do some other surface treatment. One possibility would be to smoothly le the entire surface with a half-round coarse bastard le. Use the round side of the le to work inside the curve of the rim. Another idea would be to use a medium grit bristle brush on a flexshaft tool. In any event this is also the time to finish the inside of the cylinder. Use bristle brushes on the flexshaft or just a succession of increasingly finer abrasive papers or sponges. |
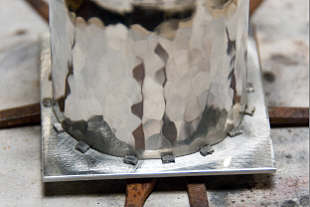 | 14. Let's put the bottom on cup. Cut a square of pewter sufficient to give yourself at least a 2 mm margin around the entire bottom of the cup. You may want to cut off the corners of the square with shears. If you want to add planishing marks to the bottom, or stamp the bottom with your own touch or hallmark or a stamp marked pewter, this is the time to do it. Also finish the side that will be inside the cup. 15. Gently sand and then wash the bottom rim of the cup and the inside face of the bottom plate. 16. Make some small (~2 mm) solder chips from Cd-based solder. (Pewter is lead-free, but most solders are not. As we will be drinking from the cup, we want to use a Pb-free solder.) Make the chips by flattening solder wire on an anvil with a hammer or by running it through a rolling mill. Use ne abrasive to clean the surface of the flattened solder. Cut the solder strips into chips with your shears. |
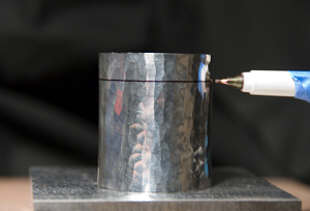
 | 17. Support the bottom plate a few mm above your soldering surface. Horseshoe nails, heavy copper wire, or metal screen works well. The idea is to direct some of the heat from the torch to under the piece. Carefully position the cylinder on to the bottom plate. Check that there are no gaps where the cylinder meets the plate. Solder will not fill gaps. Flux the joint area and add solder chips at about 1 cm intervals. |
18. Light your torch (still with # 00 tip). With a gentle motion almost like using a paint brush, apply heat onto the piece along the area of the joint. The idea is to warm to pewter sufficiently to accept the solder, but not to melt the pewter itself. As the piece begins to warm the flux will boil and then dry. At that point direct the flame tip to a solder chip. Ideally the chip will melt and flow into the joint. Remember the molten solder will follow the heat. You can direct the flow of solder with your torch. So direct the solder to flow along the joint. If you find the solder is trying to migrate up the side of the cylinder, chances are that you've gotten the cylinder too hot. If the solder simply balls up and refuses to flow, it generally means that the surface is dirty.
Cool the piece, carefully re-clean the metal and flux again. Do not try to get a recalcitrant solder ball to flow by adding more heat unless it is your intention to melt the piece! Unlike soldering precious metals, we add heat rather gingerly to pewter. There are a couple of reasons for this. First pewter melts at a MUCH lower temperature than silver, gold or platinum. Second the difference between the melting point of the solder and pewter is much smaller than for other metals. You just don't have as much working room. Finally the thermal conductivity of pewter is much lower than silver or gold. This means that the heat does not move out and away from the source as fast. There is more risk of local overheating.
19. Wash and thoroughly dry the cup. Test for leaks. Repair any leaks by carefully re soldering.
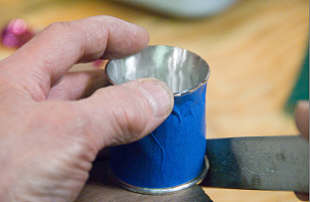
20. You're going to trim the bottom plate now. But before you do that, wrap the surface of the cup with blue painter's tape. This adds some protection to the surface in the event your saw or file slips. Coarsely trim most of the excess from the bottom plate. If you are using a jeweler's saw, be sure that the blade-gripping knob is turned to the outside of the saw frame to re- duce the chance of dinging the piece. With a rolling stroke, firmly but gently use your coarse bastard file to bring the base into a clean circle. You may want to leave a rim of about 1 mm all around. Or you can file the rim even with cylinder. If you do the latter, be careful not to nick the surface of the cylinder. You will probably need to move to finer files as you get move in.
Finish the bottom edge with successively finer abrasive sponges, again being mindful of the surface of the cylinder.
 21. Remove the blue tape and apply any additional surface work or polishing that you might want to do. With a sharp scribe sign the bottom of the cup.
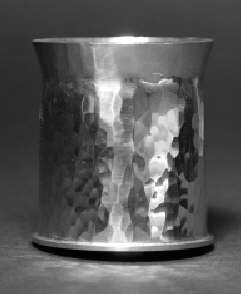
22. Wash the cup with Hagerty pewter wash. Rinse and dry thoroughly. Finish with a thin coat of Renaissance wax. Unlike silver, pewter does not tarnish, but over time, like every- thing else, it does get dirty and it begins to turn very slightly yellowish. The Renaissance wax helps keep the surface clean and bright.
23. Congratulations! What a beautiful sake cup you've made!
24. Themes and variations Of course, you don't have to flare the cup edge. You could add a rim of pewter wire. Or just leave it straight. If you want to make a set of cups simply measure your initial cylinder to to be 2, 3 or 5 times the dimension of a single cup. (Note that 4 is an unlucky number to the Japanese, so a sake set would be never be 4 cups.) Fuse and planish the entire cylinder. Then carefully measure and saw sections for individual cups. I find this cup is exactly the right volume to measure out a charge of beans for my morning espresso. Do you like napkin rings? Make a long cylinder and cut the sections to about 3 cm. Flare both ends of the open rings, or add pewter wire rims. Of course, don't put a bottom on the napkin rings.
Related Articles

An Interview with Leila Tai

International Ring Sizes Chart

Recent Sightings: Metal Book Art

The Art of Gold


The All-In-One Jewelry Making Solution At Your Fingertips
When you join the Ganoksin community, you get the tools you need to take your work to the next level.
