
How to Make a Heistad Cup
Fold-forming is a hand-working technique applied to single sheets of metal to create surfaces and three-dimensional forms quickly without soldering. It relies on the metal's plasticity and ductility to make hundreds of complex forms resembling chased, constructed, and soldered shapes. Using thin materials, you can create light, volumetric objects and surfaces. Radical changes in cross-section are possible in only three to five minutes using simple tools such as a hammer, mallet, anvil, vise, rolling mill, and your fingers.
2 Minute Read
Fold-forming is a hand-working technique applied to single sheets of metal to create surfaces and three-dimensional forms quickly without soldering. It relies on the metal's plasticity and ductility to make hundreds of complex forms resembling chased, constructed, and soldered shapes. Using thin materials, you can create light, volumetric objects and surfaces. Radical changes in cross-section are possible in only three to five minutes using simple tools such as a hammer, mallet, anvil, vise, rolling mill, and your fingers.
One of my favorite folds is called a Heistad cup. It uses one of the most important principles of fold-forming: Multiple layers worked simultaneously work evenly. Able to be constructed by hand in only three minutes, the cup is a source of mystery to many goldsmiths. They tend to study it for a long time, searching and searching for the nonexistent seam. I have used this technique to make earrings and small bells. Here are the steps:
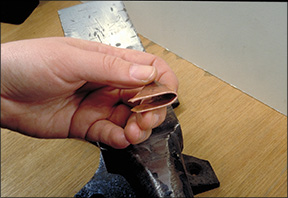 | Fold a square of annealed 24 gauge metal corner to corner to make a triangular shape. Flatten the folded edge with a mallet, taking care to line up the edges neatly. Fold the triangle in half again in the middle, which will make a smaller triangle. Mallet this flat. Make sure that the folded package will fit into your rolling mill. |
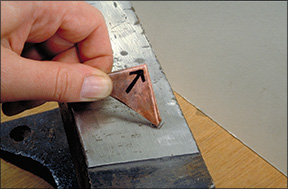 | The long side has no folds-it shows only sheet metal edges. One of the shorter sides has one thick folded edge and the other has two thinner folded edges. The closed point-where the two short sides meet-is the part that enters the mill first (as indicated by the arrow). |
 | Open the rollers wide enough to slide the folded metal through, then tighten them down onto the stack. This provides a starting point for rolling to begin (shown in photo). Tighten the mill and roll the stack through under light pressure, always starting with the same closed point of the triangle. Tighten again and make another pass. Generally I find that an eighth of a turn on the sizing handle is a suitable amount between passes. Roll the cup until the length is about two to three times the original size. When the rolling is complete, anneal thoroughly and quench. |
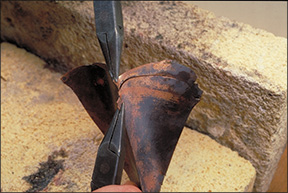 | Unfold the metal gently. Sometimes a slight tug with chain-nosed pliers is needed, but take care to avoid marking the metal. |
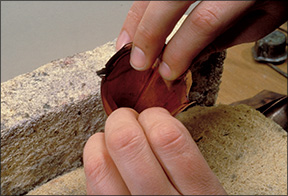 | Once the cup begins to open, use only your fingers to carefully open it, avoiding kinks and dents. |
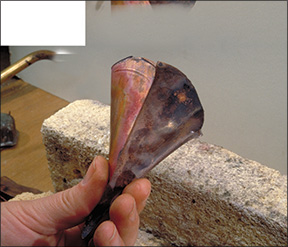 |
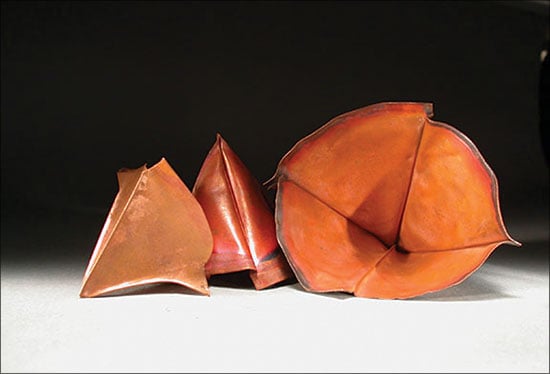
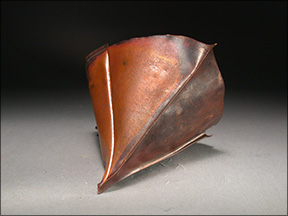
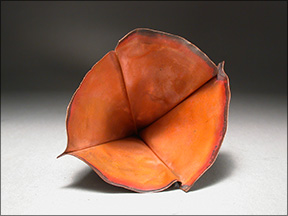
Here are three views of finished cups. The colors give an indication of where the tightness of the folds limited the access of oxygen. The black areas near the rim received the most oxygen, while the red areas received less. The inside of the cup is bright and clean because there was no oxygen present to react with the copper.
![]()
In association with
![]()
The award-winning Journal is published monthly by MJSA, the trade association for professional jewelry makers, designers, and related suppliers. It offers design ideas, fabrication and production techniques, bench tips, business and marketing insights, and trend and technology updates—the information crucial for business success. “More than other publications, MJSA Journal is oriented toward people like me: those trying to earn a living by designing and making jewelry,” says Jim Binnion of James Binnion Metal Arts.
Click here to read our latest articles
Click here to get a FREE four-month trial subscription.
Related Articles

Steps on Making a Basic Wedge T-fold

Sheet Metal Tool Modification

Steps on Making a Leaf or Ruffle

Steps on Making a Chased Wedge T-fold


The All-In-One Jewelry Making Solution At Your Fingertips
When you join the Ganoksin community, you get the tools you need to take your work to the next level.

