
Jewelry from Enamel Lumps
4 Minute Read
What is a jewel? I like to think of a jewel as a bauble that looks precious and shiny and transparently aglow from within. It is something that resides in an intricate setting and becomes jewelry fit for a queen of some never-never land.
The enamel jewelry being produced today is most attractive and modish. Unless it is made by a veritable Fabergé, however, much of it does not have that "glow from within" quality that makes it really jewel-like. Now, I'm going to tell you about a quick way to make really jewel-like jewelry that has just one drawback: no pawnshop will give you a penny for it! I suppose we must call this technique a recipe, because one can turn out these small treasures almost like cookies. I shall also give you a pearl of wisdom: Never look down your nose at any technique, no matter how 'gimmicky' it may be. It is almost certain to be useful someday.
I have always been rather lukewarm in my response to the use of enamel 'lumps' as decoration for enamel work. I have had a jar of these unground bits of enamel around my studio for a long time, gathering moss, so to speak. But now their moment of glory has come, for our new jewelry is decorated exclusively with enamel lumps!
The metal base that is necessary for almost any work in enamel functions in this case not only as the basic shape but also as the 'setting' for our jewels. It can be silver or even gold, since not much metal is used and therefore doesn't involve an enormous expense. If copper is used, the piece should be enameled with flux or a light transparent color before the Jewels' are set. Silver and gold do not necessarily need even a basic coating of enamel because of the beauty of these materials by themselves.
If silver is used, I would recommend fine silver because it holds a shape much better than does sterling silver. Whatever the metal, it should not be too thin. It is best to use 20 gauge or 22 gauge, cut into long strips that are about 3/16″ wide or even narrower.
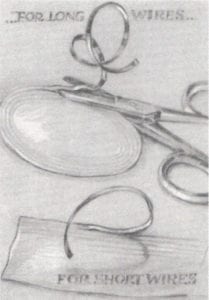
Flat wire can also be used for the setting but it should be a soft wire, not one that is hard and springy, since it must be bent and contoured into an elaborate shape.
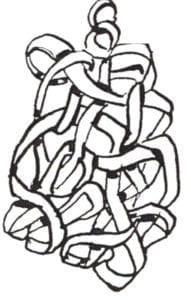
The metal strip must be handled almost as if it were ribbon. It is turned, twisted and twined until it resembles ribbon lace, loose weaving, intricate knotwork, or whatever effect you desire as the setting for your piece of jewelry. Of course, the shape must hold together and be a relatively tight mesh.
The ends of the strips should be worked into the whole with great resourcefulness; they can be curled in with round-nose pliers and used to form the actual settings for the jewels. If the piece is to be a pin, the loose ends can be situated strategically enough so that they provide a flat surface on the back for soldering on the jewelry findings. If the piece is to be a dangle earring or pendant on a necklace, the ends might be used to connect with a jump ring.
When the setting is formed as you want it, it is ready for the addition of the jewel or jewels. If the setting is to be enameled, this should be done and the piece fired at this time.
Because the setting and jewels must be fired together, work now should be done on a firing rack. The base section, whether it is enameled or not, should be placed on a piece of mica on the firing rack. If you have a small trivet that happens to fit the piece, this can be used in place of the piece of mica.
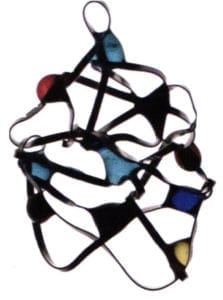
Lump enamels are now added. From an assortment of lumps, select the ones that you want to incorporate into your setting. I have found that it is best to pick up these small pieces with a pair of tweezers and insert them directly into the loops and meshes of the setting. When these are positioned to your satisfaction, carefully lift the firing rack and place it in the kiln.
Firing should be done in a 'slow' kiln that is just hot enough to fire enamel. There are two reasons for this: (1) This is the safe way to work with gold and silver; and (2) It is the only way to control the flowing of the enamel lumps. According to your own taste in the matter, you may wish to fire only until the lumps start to fuse and round out, or you can allow them to remain in the heat longer so that they flatten out more and sink deeper into the setting. I would caution you not to allow too much of this flattening, however. They might flow completely out of the setting!
This is all there is to my amazing jewelry technique. It is very easy, there is very little bother, and the effect can be quite stunning. Perhaps you will want to try other types of jewelry by this method, besides the already mentioned. How about rings, bracelets, even a tiara?
Related Articles

Grisaille Revisited

Jewelry Using a Microfold Brake

A Dedication to Olaf Skoogfors

Cécile Chancerel


The All-In-One Jewelry Making Solution At Your Fingertips
When you join the Ganoksin community, you get the tools you need to take your work to the next level.
