
Hollow Ring Project
One of metal's unique qualities is its ability to be shaped and formed without breaking - its malleability. The hollow ring project demonstrates the fabrication of a shell structure, a type of construction used frequently in goldsmithing and silversmithing. A template is used to lay out the main pattern of this shell structure. The blank is then pierced and formed with hammers. A tube and other components are added to complete the ring. The project employs such skills as hollow forming, filing, fitting, and soldering. The construction is completed by adding a setting for a round cabachon stone. After fabricating such a ring once, the maker will understand how to modify the pattern to accommodate different finger sizes and designs.
17 Minute Read
One of metal's unique qualities is its ability to be shaped and formed without breaking - its malleability. The hollow ring project demonstrates the fabrication of a shell structure, a type of construction used frequently in goldsmithing and silversmithing.
A template is used to lay out the main pattern of this shell structure. The blank is then pierced and formed with hammers. A tube and other components are added to complete the ring. The project employs such skills as hollow forming, filing, fitting, and soldering. Shop for recommended supplies necessary for this project. The construction is completed by adding a setting for a round cabochon stone. After fabricating such a ring once, the maker will understand how to modify the pattern to accommodate different finger sizes and designs.
1
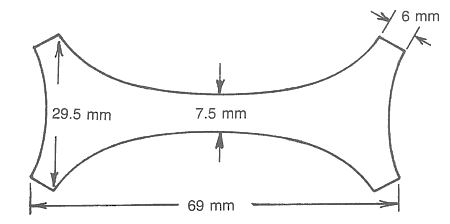
This pattern can be used to make either a reusable metal template or a blank for the ring itself (Figure P11-1). The length of the long curves dictates the finger size of the ring; the length of the short curves dictates the diameter of the top of the ring; and the length of the flat ends dictates the height of the ring above the finger. This configuration will result in approximately a size 8 ring, with a 16-mm round top that sits approximately 4 mm above the finger.
 |
| P11-1, Pattern for the hollow ring |
Once you know what size ring a pattern like this will make, you can modify it to fit any finger size or top dimension. One ring size equals 2.5 turn. This amount, or increments thereof, can be added to or subtracted from the pattern. Modifications to the length should be made in the middle, prior to laying the pattern out on metal.
2
Transfer the pattern to 0.8 mm sheet, and pierce it out (Figure P11-2). This ring blank will be distotted substantially during forming, so there is no need to correct the four curved edges by filing. However it is important to file the four small ends flat because pairs of these will be soldered together to complete the shell. Remove the burrs left from sawing by either filing them off or scraping them with a triangle scraper.
 |
| P11-2. Piercing the ring blank |
3
Anneal the metal if it is not already soft. Place the ring blank on a hard felt pad, a lead block, or into a depression that has been hammered into a wooden stump.
4
Use a forming hammer to shape both ends of the pattern, forcing each into a domed contour (Figure P11-3). Work only on the end areas; otherwise the blank will close In on itself and make further forming difficult. If the blank closes too much, use your fingers to open it up. This distortion is only temporary.
 |
| P11-3. Forming the ends of the blank in a wooden stump |
5
Use a pair of half-round pliers to close the blank into a ring. Use the pliers to align one pair of ends
(Figure P11-4). Do not align the other pair of ends yet.
 |
| P11-4. Closing the ends of the blank with half round pliers |
6
Clean and flux the pair of ends that meet. Solder them using either the paillon method of placing snippets of hard solder on the work, or the picksoldering method of heating and picking up the solder with a pick and then depositing it on the heated seam. As in all soldering operations, remember to use the torch's heat to pull the solder through the seam by applying the heat from the side opposite the solder. After you have finished soldering, quench in water and pickle to remove both flux and oxides. Rinse in water, dry, and clean with an abrasive pad. Now align the other pair of ends and repeat the soldering process (Figure P11-5). During the next phase, you must be able to see the ring clearly; dirt, oxides, or discoloration will make it more difficult to analyze the form visually. Therefore clean up the entire surface with an abrasive pad that imparts a smooth, even satin, finish.
 |
| P11-5. Soldering the ends of the ring blank |
7
Make the preliminary shape of the finger hole by forcing the ring onto a ring mandrel. Remove and reverse the ring on the mandrel in order to avoid tapering the finger hole.
8
Mount a ring mandrel by securing either the handle in a vise or the small end in a hole on the edge of a goldsmith's bench. With the small end of the mandrel in the hole, and the handle resting against your left shoulder, both hands are free to manipulate the ring.
9
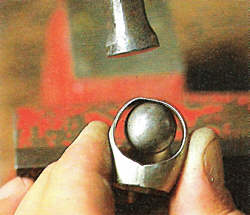
Slide the ring onto the mandrel. Use a 17-mm ball punch to round the top. Use a chasing hammer to tap the punch into the top opening until a uniform roundness is achieved. Be careful not to use a punch that is so small that it hits the mandrel, because at least one of the two tools will be damaged. If too much force or too large a punch is used, the top will flare open and be difficult to correct. After rounding the ring uniformly, the top can be modified into many other shapes such as oval, square, or rectangle (Figure P11-6).
 |
| P11-6. Rounding the top of the ring with a ball punch |
10
Select a smaller round punch to serve as a stake for transforming the flat shank into a domed contour. Protect the shaft of the punch by wrapping it in a sheet of copper and then clamp it vertically into a bench vise. Slip the ring shank over the punch. Hold the ring sideways, with the midpoint of the shank in contact with the ball end of the punch. Use a goldsmithing hammer to form the edge of the shank, which is up in the air, over the punch (Figure P11-7). Each blow moves the metal closer to the punch.
A dull hollow sound is produced until the metal comes into contact with the punch. The edge of the shank is compressed by this action and becomes slightly thicker. When the sound changes to a ringing solid ping, stop forming that section because the metal has moved all the way over the punch and is now being struck between two hard steel tools. Continue to form the entire shank in this way, on both sides and about halfway up both sides of the ring. The shank should now be domed, with the contour blending into the domed main area of the ring. After forming the shank,reround the finger hole by forcing it up the ring mandrel again.
 |
| P11-7. Forming the shank against a ball punch with a goldsmithing hammer |
11
Place a larger ball punch in the vise and slip the ring over it. Use a goldsmithing hammer to smooth the contour of the main part of the shell. Correct irregularities, pushing in bulges and pulling out depressions. To push in a bump, hold the ring against the punch, making contact at a point adjacent to the area to be pushed inward. Strike the bump with the hammer as it is formed over air, until the pinging sound indicates that it is in contact with the punch. To pull out a depression, place the sunken area in contact with the punch and strike the areas around the contact area. Continue until the entire surface of the ring is smooth and even. In addition to your eyes, use your fingers, which often can detect finer surface irregularities than you can see, especially if the surface is discolored. Run your fingers all over the surface and feel for bumps and dents. Mark these spots with a permanent marker, no matter how small they are. Correct as needed.
12
Before the body of the ring is completed, adjust the size of the top to accept a bezel for a cabachon stone. The following procedure describes how to make and fit a bezel for a 15-mm round cabachon stone from a strip of 0. 5 -mm sheet. It is best to drop the bezel into the opening, rather than soldering it on top of the ring. To calculate the length of the bezel, measure the diameter of the stone: The inside of the bezel will be the same size. The top opening of the ring will be opened up to accommodate the bezel.
13
From 0.5-mm sheet, cut a strip 48.7 mm long and 3 mm wide. File the ends flat, bend into a ring, and solder the ends shut with hard solder. After pickling, round the bezel on a mandrel, and file the top and bottom perfectly flat. Check to make sure that it fits snugly around the stone, without force. If the bezel is too small, stretch it up on a bezel mandrel. If it is too large, remove a section and resolder. The setting must have a seat which can be made from 1-mm square wire. Measure the inside diameter of the bezel and then calculate the length of material needed for the seat as if it were an inside bezel. Make the seat for the bezel out of a section of 1-mm square wire 44 mm long. Repeat the steps for sawing, filing, and rounding. If you have worked accurately, when bent, soldered, and formed into a ring, the square wire should slip snugly inside the bezel, providing a seat for the stone to rest on. If the seat needs adjustment, do so now, then insert it into the bezel, with the bottoms flush and the seams lined up (Figure P11-8). Solder with hard solder. Quench, pickle, rinse, and dry.
 |
| P11-8. Set up for soldering the sea into the bezel |
14
Correct the top of the ring to perfection: round, flat, and level. Use a protractor to check the angles. The angle between the top plane and the sides of the ring should be the same on opposite points of the ring.
15
Check and adjust the size of the top to match the size of the bezel. The top of the ring should be the same size as the bezel, and when placed on the ring, the outside of the bezel should be flush with the outside of the top of the ring. Later the opening in the top will be burred out to allow the bezel to drop snugly inside. If the top is too small, a minimal amount of filing will lower and widen the top of the ring. If the top of the ring Is too large, it can be sized down by removing a small strip of metal on both seams. To calculate the adjustment, measure the outside diameter of the top and compare it with the outside of the bezel. Multiply the difference by 3.14 and divide this amount by 2, as the adjustment must be divided equally between the two sides.
16
After the domed shell of the ring has been rounded to uniformity matching the bezel, use an inside ring file to carve both edges of the finger hole. File with a side-slipping forward motion, until you have established an even surface. Continue to open the finger hole until a flat surface has been established all around both edges. This will be important later when fitting the tube. Slide the ring onto a mandrel and check to make sure that both sides are perfectly round and the same size. An easy way to ensure roundness is to wrap the mandrel with a piece of abrasive paper and work the ring around the paper from both sides. By marking the inside of the finger holes with a permanent marker, any unevenness will be indicated by areas that still show ink after a brief sanding. Another tool for rounding is an inside sanding cone mounted on the polishing lathe. (Use caution, wear goggles, hold onto the ring with both hands, and do not force it up the spinning cone to the hilt because it will grab.)
17
The next step is to lay out and form a blank of 0.8-mm sheet into a tube or sleeve which will become the inner shank. To determine the correct length for such a blank, measure the inside diameter of the finger hole in several places using the inside measuring blades on the slide caliper. (Note: It is important to measure the inside diameter accurately. The measurement between the side points is straightforward. However, when measuring the distance between the top and bottom points on one side of the finger hole, hold the caliper blades in alignment with the other side of the finger hole as well.) Calculate the average diameter and then use that number (approximately 19.6 mm) to calculate the length of the blank that will form a tube to fit inside the finger holes. The thickness of the tube wall will be 0. 8 trim.
18
If the average inside diameter of the finger hole is 19.6 mm, then saw or shear a rectangular blank 59 mm long from 0. 8 mm sheet. The width may be determined by adding 2 mm to the maximum width of the ring at the top of the finger hole. File the ends of the tube blank parallel and flat; remove the burrs; and anneal if necessary. Then use a mallet and a ring mandrel to form the blank into a tube. Use your fingers and/or halfround pliers to make the two ends meet. Solder the seam with hard solder, pickle, and clean.
19
Next, slide this tube onto the ring mandrel to round it. Unless you are careful, the ends of the tube will become flared as the result of forcing it onto the mandrel from both sides during rounding. There is a trick to forming a long tube such as this, without flaring the ends: Slide the tube onto the mandrel, stopping about 3 mm before it makes contact all around. Then use a mallet, striking the tube to smooth and round the shape (Figure P11-9). Constantly turn the loose tube around the mandrel, exposing a different area to the mallet. By rounding without forcing the tube up the mandrel, it will become truly cylindrical rather than flared at the ends. A tube with both ends flared will leave gaps all around, whereas a cylindrical tube will fit much better.
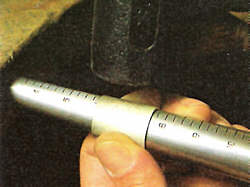 |
| P11-9. Rounding the inside tubing |
20
When complete, the tube should slide easily into one side and appear to be out of alignment and slightly too large for the other side. With force and perhaps minor adjustment it will just barely align itself and squeeze through the second side.
If the tube is just a little too large, file or sand the opening to accommodate it. If the tube is much too large, cut out a section of it along the seam. To determine how much metal to remove, measure the inside diameter of the hole and the outside diameter of the tube. Multiply the difference by 3.14 and set a pair of dividers to this amount. Then use the dividers to make two marks, on either side of the seam. Use a machinist's square as a guide for scribing two parallel lines along the length of the cylinder on both sides of the seam. There is a trick to sawing out this section: Do not saw all the way through one line until the other has been sawed to all but the last 2 mm. This will stabilize the tube while sawing the second line. Adjust and resolder the tube.
21
If the tube is just a little too small, put it on the ring mandrel and stretch it up with a goldsmithing hammer. Again, hold the tube away from the point at which it makes contact all around the mandrel. Start by striking with the cross-peen end of the goldsmithing hammer, with the wedge parallel to the axis of the mandrel. Rotate the tube around the mandrel arid stretch it evenly. When the tube has been stretched nearly all the way required to fit, smooth (planish) the marks with the planishing face of the goldsmithing hammer. This will continue to stretch the metal, although at a lesser rare than with the cross peen. If the tube is much too small, check your measurements and math and make another one.
22
Thoroughly clean the two components, and slide the tube into place with its seam in alignment with the other seams, facing the top of the ring. Remember that solder will not fill in gaps like putty or glueinstead it will form pits-so it is important to eliminate all gaps between the ring and the tube. If there are any gaps, slide the tube, with the ring around it, onto the ring mandrel and close them by tapping the edge of the ring down to the tube with the cross-peen face of the goldsmithing hammer. Another trick to take up just a little bit of slack is to flare the ends of the tube just a little bit with a 20-mm ball punch. This will distort the cylinder slightly but also will close in small gaps between the tube and the filed finger hole in the ring.
23
Prepare the two round seams for soldering by dripping flux into the interior of the clean ring and around the tube. Blow into the top, forcing the flux out through the seams. Use a flux brush to spread the flux on the outsides of the seams as well. Use the brush to pick up and position paillons of medium solder all around both seams. The solder should rest
 |
| P11-10. Setup for soldering the tubing into the ring |
on the tube, butting up against the ring shell. Be generous with the solder because your best chance for a perfect seam will be the first time you heat it (Figure P11-10). Heat the ring all over, and as an area approaches the flow point of the solder, concentrate the heat where you want the solder to flow. Use a solder pick to guide the solder. Use the pick method to add solder if it is needed. After you have completed the soldering, use a loupe to inspect the seams for flaws. In lieu of pickling, hot running water will also dissolve flux without leaving an acid residue. Resolder if needed. Pickle the ring, rinse thoroughly in water, and dry. Recessed areas like those inside this ring tend to trap pickle solution, so use an ultrasonic cleaner to loosen and neutralize all the pickle. With a jeweler's saw frame, trim back the tube, leaving about 0.5-mm excess around the entire ring. The trick here is to begin by sawing into the tube and once the blade breaks through, continue by rotating the tube into the top of the blade so only one surface is pierced at a time.
24
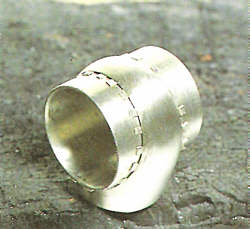
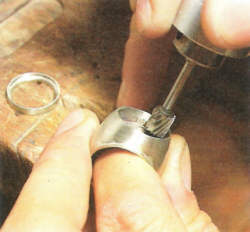
Now use a large cylinder bur on the flexible shaft machine to carve away the top opening to permit the bezel to enter. Mount the bur in the flex shaft. Step on the foot control and use a smooth scraping motion around the inside to open it up evenly and slowly (Figure P11-11). Remove enough metal to allow the bezel unit to drop snugly into place. There should be no gaps. The top edge of the ring should not come to a point, which would be irregular around its circumference. lnstead, file a very thin facet onto the top edge. This must be a very tight fit.
 |
| P11-11. Burring an opening for the bezel assembly |
25
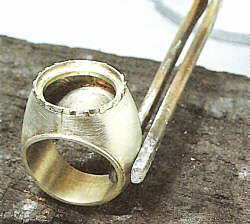
Slip the bezel in place, with the seam lined up with one of the seams of the shell. The unit should sit snugly in place, level, and with about 1. 5 mm sticking out the top. Flux and place paillons of medium solder around the bezel, resting against the shell (Figure P11-12). Again, generous soldering tends to eliminate the need to repeat this step , and a bit too much solder causes no problem because it can be removed later. Solder the bezel into the ring. Check the solder joints, pickle, and dry. Next, file away the excess of the tube, while preserving the contour of the ring. Continue to file all over the ring as necessary until a uniform, even surface has been achieved. Do not file around the bezel.
 |
| P11-12. Set up for soldering the bezel in place |
26
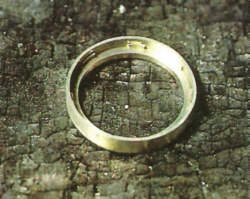
The final finish of the ring is not completed until after the stone is set However, at this time, sand the outside of the ring with progressively finer abrasive paper, up to 600-grit (Figure P11-13).
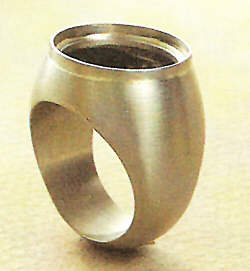 |
| P11-13. Finished hollow ring with bezel for a cabochon |
 |
| P4-13. Finished cable chain |
 | Excerpts from: Professional Goldsmithing By Alan Revere, 1991 Photography by Barry Blau Illustration by George McLean and Alan Revere
|
Related Articles

Superfit’s Hinge and Latch System

950 Palladium: Unique Manufacturing Process

Pearl Earring Repair Using Mini Pulse III

Dealing with Fire Scale


The All-In-One Jewelry Making Solution At Your Fingertips
When you join the Ganoksin community, you get the tools you need to take your work to the next level.
