
Fearless Platinum Repairs
What does it take to be successful at repairing, customizing, and servicing platinum jewelry? First, an understanding of properties unique to platinum. When platinum is mined, it is usually found with one or more of its five sister metals, called the platinum group metals: palladium, osmium, rhodium, ruthenium, and iridium.
12 Minute Read
Platinum has had a varied history in this century. Before World War II, platinum was the metal of choice for many fine jewelry pieces, especially engagement and wedding rings. Some of the world's greatest gems, including the Star of Africa and the Hope Diamond, were set in this white metal.
During World War II, however, the U.S. government classified platinum as a strategic metal and deemed it off limits to jewelry manufacturing, ultimately platinum lost its market share to the newly developed white gold, and its popularity remained in decline for several decades. Bench jewelers saw less and less of the metal, especially since consumers rarely brought in their platinum jewelry for repair - many of the pieces came from estates, and the owners feared irrevocable damage. Consequently, fewer jewelers were familiar with platinum repairs.
Today platinum is enjoying a renaissance. In the U.S. , platinum consumption has risen by over 400 percent since 1992. Consumers are becoming more aware of the metal, and therefore more jewelers are carrying platinum in their stores. However, many of these jewelers are still turning down platinum repairs; they believe the metal is difficult to work with, and fear ruining an expensive piece of jewelry. They don't realize that platinum is not difficult; it is just different.
Platinum Principles
What does it take to be successful at repairing, customizing, and servicing platinum jewelry? First, an understanding of properties unique to platinum.
When platinum is mined, it is usually found with one or more of its five sister metals, called the platinum group metals: palladium, osmium, rhodium, ruthenium, and iridium. As with all precious metals, platinum in its pure state is too soft to be used in jewelry. It must be alloyed with another metal to improve its workability. The most common alloys in the United States are 95 percent platinum with 5 percent ruthenium; 95 percent platinum with 5 percent cobalt; and 90 percent platinum with 10 percent iridium.
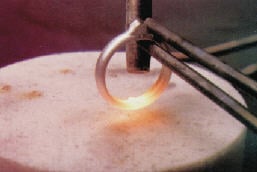
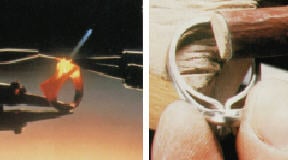
When soldering, brazing, or welding platinum, you should remember that the metal has an extremely high melting point (about 1,773 degrees Celsius or 3,224 degrees Fahrenheit; temperatures will vary depending on the alloy used). At this melting point, platinum becomes white hot, and the intense radiation can harm unprotected eyes.
When soldering small jewelry pieces for a short time, use #5 gas-welding glasses. These goggles are sufficient for most repair work. When welding for longer periods of time, use #6 goggles. When casting platinum, use #10 or even # 11 electric welding goggles; their filtering lenses also protect against harmful infrared radiation generated by the high temperature flames. Never use sunglasses to protect yourself against the rays and white light. Even the darkest sunglasses offer very little infrared protection against the image of a concentrated oxy-gas flame.
Platinum solders (often referred to as filler metals) are available in various forms: platinum extra easy 1000, platinum easy 1100, platinum medium 1200, platinum hard 1300, platinum extra hard 1400, platinum welding 1500, platinum special welding 1600, platinum seamless 1700, and platinum weld 1773. (The number behind each solder corresponds with the approximate Celsius flow point.)
When soldering at temperatures above 1,300 degrees Celsius or 2,327 degrees Fahrenheit, you will need neither flux nor a coating to prevent firescale, since platinum does not oxidize. (Some jewelers use flux to hold a small piece of solder in place, but at the high temperature being used, the flux burns away and can enter the grain boundaries of the metal, causing brittlenes's.) Flux should be used for the lower temperature solders, which are usually made of palladium and silver and contain no platinum. Only high temperature solders contain up to 12 percent platinum.
Since platinum solders do not flow over distances, to solder a seam you must place many small pieces of solder close together and follow the seam with the flame. I recommend rolling the solder very thin and then cutting the metal into pieces. This way only small amounts of solder will be used at one time. Also, the solder should not be used to fill gaps; all joints should fit closely together. When you are finished, a properly soldered joint will look shiny and clean.
Tools of the Trade
Use an alumina - or zirconia-based ceramic soldering block for platinum repair work. You'll also need safety goggles, a tungsten soldering pick, a pair of ceramic tip tweezers, a pair of AA tweezers, and a third hand. And remember: Cleanliness is essential when working with platinum. Your workbench and the soldering area should be clean and clutter-free.
Platinum is very easily contaminated, so tools used for gold or silver -including sandpaper sticks and files - should not be used for platinum. Also, during heating, lower temperature metals can easily melt into platinum and contaminate it. Even the smallest amount of lead can make platinum brittle and unworkable. And once contaminated, platinum can be reclaimed only through refining.
You should also be careful when using holding devices such as tweezers and binding wire; they can produce a dark stain on platinum that only heavy abrasives will remove. (Without removal, the stain becomes a permanent contamination if the object is reheated.) Keep these devices away from the heat source and be sure to use tungsten tweezers. Platinum has low heat conductivity, so working with the torch held one-half inch away from the tweezers is usually no problem.
In addition, before reducing the thickness of platinum sheet or wire in a rolling mill, make sure the rollers are clean; small remnants of gold or other metals could be rolled into the surface of the platinum. And never reduce platinum more than 70 percent without annealing.
Before annealing platinum, pickle it in a 10 percent solution of nitric acid; this cleans the metal sufficiently for heating. To relieve stress buildup caused by cold-working platinum, heat the piece to about 600 degrees Celsius (1,100 degrees Fahrenheit Softening requires a temperature of about 1,000 degrees Celsius (1,830 degrees Fahrenheit), To anneal, heat the platinum to a bright orange (about 1,000 or 1,830 degrees Fahrenheit) and hold it there, The size of the piece determines how long it needs to anneal. Annealing too long creates grain growth; if you anneal for too short of a time, your piece won't be soft, be sure to wear #5 or #6 goggles while you're working.
It takes about one minute to anneal a 1-mm-thick, 25-mm square piece of platinum stock. Quench or air-cool the piece after heating. If you are using regular tweezers, wait until the metal is no longer red-hot before picking it up: this will prevent staining.
Lord of the Rings
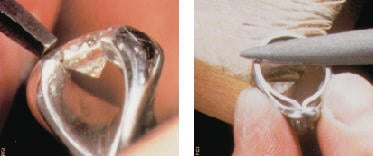
Rings are among the platinum items that jewelers most frequently receive for repair, To make a platinum ring one size smaller, remove 2.2 mm of the shank. Scribe the distance onto the shank and remove the metal with a jeweler's saw. Gently bend the shank together, closing the gap. Then cut through the seam one more time; this aligns both sides and guarantees a tight seam.
Roll a small piece of platinum until it is about 0.25 mm thick If a rolling mill is not available, just hammer a small piece flat by using a bench block. Wedge that small, thin piece into the cut, allowing the tension of the shank to hold it in place. The piece should extend about 1 mm around the cut. Hold the ring with the third hand (away from the seam) and weld the thin piece of platinum into the shank. (Remember to use appropriate eye protection.) This process can also be done using 1700 seamless solder.
 |
When a platinum prong is pushed into place, it usually stays without sag or spring. |
As soon as the fusing takes place, gradually move the torch around the shank, continuing with the procedure; this creates a complete metallurgical bond. (Be sure you weld the inside of the shank as well.) Once this is completed, you can clean the ring with a file.
I do not recommend using lower temperature solder for sizing rings. As I mentioned before, these solders are a mixture of palladium and silver and contain no platinum. Since the solders are softer, they will polish out of the seam and leave a visible indentation. They may also oxidize, leaving a dark line in the sizing area.
Repeat the above technique to enlarge a ring one size, except add 2.2 mm of sizing stock. Again, a tight fit is needed; I prefer to weld the piece in place in two operations. Enlarging or reducing a ring one size is actually easier with platinum: Heat does not travel as quickly as it does with gold, and many welds can be done near stones (with care). As mentioned before, be sure to hold the ring in place with tungsten tweezers, since steel tweezers may leave a dark spot that could become permanent upon reheating.
Platinum ring repairs often can involve retipping. This technique is usually defined as "rebuilding a prong tip with the stone in place." This definition limits the job, though, as only a few stones can take the heat needed to place a new tip onto a prong. This is particularly true with platinum: Retipping a platinum prong with platinum solder will damage any stone. So here is a bench trick I highly recommend.
File the remainder of the platinum prong flat and melt a small amount of easy white gold solder on the tip. Carefully file it flat again, leaving a thin layer of solder covering the top. Now place a piece of platinum wire on the tip and connect them by flowing the solder. Cut off excess wire, shape the new platinum tip, and polish This technique guarantees a platinum retip, and the soldering will not harm diamonds, rubies, or sapphires. (Check all stones for fracture filling, as well as damage, before applying heat.)
Setting Standards
Platinum has the distinction of being called a "dead" metal, which means it has very little or no memory. When a platinum prong is pushed into place, it usually stays without sag or spring. But platinum also tends to fill up the grooves of drills and burrs, so some care must be taken when you begin setting stones. Use only sharp, well-lubricated drills, When using a burr, make sure it is either new or well cleaned. Also, use well-polished gravers for pave', bead, and bright settings; I recommend tungsten carbide gravers, since they best hold the polish and retain a sharpened edge.
When you have a pave', bead, or bright setting, drill small pilot holes that can then be enlarged. This will take more time, but it's worth it by providing a margin for error. For example, if you have a honeycomb layout with 144 holes positioned side by side, you could drill every hole the exact size you need-but any drift in the drilling process will ruin the layout. By using a smaller drill, you can correct any drift as you enlarge each hole.
When setting a stone into a platinum bezel, make a bright cut at a 450 angle along the bezel's inside edge, after the seat has been made. This way, as the bezel's edge is rolled over for hammering around the stone, the shine will extend ail the way to the girdle. You'll then be ready for the final bright cut of the bezel without the need to cut too close to the girdle and possibly damage the stone.
After sizing and setting, you are ready to finish the ring. When platinum is polished properly, it will take on a shine that no other metal can produce. Platinum does not oxidize, nor is it affected by atmospheric conditions. This ensures a good, long-lasting finish. But it takes some effort to achieve maximum results.
As a general rule, polish as much as you can prior to setting or assembly. Also, if platinum is being joined to gold, it's important to finish the platinum section first. Failure to do so will result in over polishing the gold portion of the piece.
A typical finishing sequence for platinum begins with filing the surface, using a #4 cut file. Cross-file the metal diagonally without excessive pressure and without reducing the original surface. Repeat this procedure with a #6 file. When filing a curved surface, follow the curve to avoid creating flat spots.
After filing, remove the file marks with abrasive paper. Start with 240 paper, followed by 320, 400, and 600 paper in succession as needed. Silicon-carbide or aluminum-oxide papers are preferred. You can also find diamond-coated papers on the market that work well; they range from 220 to 50,000. As an alternative to the 400 and 600 papers, you can use a unitized (compressed fiber) wheel, which also comes in different grades.
If you discover porosity on a piece, remove it through burnishing or hammering (in some cases it might need to be filled). To burnish the edges and surfaces, use a highly polished tungsten carbide burnisher and a light oil as a wetting agent. Platinum burnishes well, but be careful; the burnisher will immediately begin dragging any debris left on the surface, resulting in scratches.
You can reduce scratches even further with a gray polishing compound, followed by a white compound and then by orange, green, or carrot rouge to get the highly reflective luster for which platinum is known.
Chain Reactions
When it comes to chain, repairing platinum is simpler than repairing gold. The high melting point of platinum makes it possible to solder even the finest wires without meltdown.
Before beginning work on a chain, measure and note the distance from the lock, inspect the clasp, and make recommendations as needed. And remember: Make sure the chain is totally clean, because body oils, perfumes, and hair will burn onto the metal.
When repairing the chain, use a low temperature platinum solder such as 1200. Also, never polish any chain on a regular polishing motor, unless the chain is properly mounted for safety. Do all polishing with a small silicon wheel, and polish only the repair.
Chain, ring - no matter what form platinum jewelry takes, one thing is certain: As platinum continues to gain popularity, nearly every jeweler will at some point have contact with this precious metal. Fortunately, by adding minor modifications to a workspace and designating certain tools to be used exclusively for platinum, any small workshop can perform the most routine repairs. And as I hope I've shown, there is no need to fear working with platinum. After all, platinum is not difficult. It's just different.
The Magnetism Of Platinum Cobalt
The recent introduction of the 95 percent platinum, 5 percent Icobalt alloy, has caused some dialog in the industry and, raised questions about just how to handle it. This alloy is slightly magnetic; you can easily identify it just by filing a small stroke on a shank and picking up the filing with a magnet. This means working with platinum cobalt requires care, since many jewelers use a magnet to separate broken saw blades from filings in the working tray.
During welding of soldering with a torch, the cobalt tends to oxidize, slightly; This oxidation is sometimes so minor that it can be removed with a wipe of the finger. If more pronounced, it can be remedied by firecoating the ring after the welding job has been completed, reheating it to a red, and pickling. However, cobalt does not oxidize until it is heated to, over 1200 degrees Celsius, so there is, no reason to be concerned regarding everyday wear.
On the positive, side, this alloy has a lower melting point and Is more "wet" than other platinum casting alloys, and thus is ideal for, casting applications.
Related Articles
Platinum Consideration Factors
Platinum Fabricating & Stamping

American Holloware Changing Criteria

Richard Reinhardt: Discontinuous Continuity


The All-In-One Jewelry Making Solution At Your Fingertips
When you join the Ganoksin community, you get the tools you need to take your work to the next level.
