
Enameling On Fine Silver Metal Clay
Enameling on pieces made from Precious Metal Clay is a joy! The clay is malleable and will take any shape or texture: it handles like ordinary clay before it is sintered. After the sintering, the material is usable in a variety of enameling techniques. Sintering, an evaporation process, is done by firing the formed clay in a kiln at a high temperature that removes the binder and water and compresses the minute metal particles into solid metal. After sintering, the object is pure silver or gold and is enameled as such.
9 Minute Read
Enameling on pieces made from Precious Metal Clay is a joy! The clay is malleable and will take any shape or texture: it handles like ordinary clay before it is sintered. After the sintering, the material is usable in a variety of enameling techniques.
Sintering, an evaporation process, is done by firing the formed clay in a kiln at a high temperature that removes the binder and water and compresses the minute metal particles into solid metal. After sintering, the object is pure silver or gold and is enameled as such.
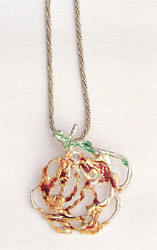 |
| Eve's Apple Pendent 1 1/2 x 1 1/2″ fine silver PMC, tumble burnished exceprt in the cervices, enamel |
Metal clay has the possibility for unusual shapes. There is no waste: all scrap is reusable one way or another. Pieces can be prepared for champleve without etching or soldering. The ultimate joy from metal clay is that there is no copper to oxidize and cause firescale problems.
The metal clay brands that I have worked with are Precious Metal Clay (PMC), made by Mitsubishi Materials Corp. and Art Clay, made by Aida Chemical Corp. Original PMC is a less sticky formulation than PMC+ and Art Clay. They all look like window putty and are worked like ceramic clay. Both brands are available in different formulations: lump form, paste, slip/syringe and paper/sheet. The new PMC Paper is very flexible and can be folded like Origami. Unlike the other forms, it only sticks to itself when water is applied to it. This is a growing field with exciting new formulations added periodically. Given a choice, my students usually prefer to use PMC+ because there is less shrinkage and shorter sintering time.
For earrings, pins, pendants, necklaces and other light stress or larger objects, my choice is the original PMC formulation. The pieces are relatively lightweight compared to fabricated forms of the same metals. The shrinkage of 25 - 30% allows detail that could not be done any other way. It is the most porous formulation. For rings or bracelets, PMC+ or Art Clay Silver with 10 - 12% shrinkage are better choices because the metal is denser and will better withstand abuse.
You can buy the metal clay in either fine silver (.999), fine gold (24K PMC) or 22K Art Clay gold. The paste and slip formulations are useful in making multi - part pieces and decoration. PMC is sold by the Troy ounce, 3 1.1 grams of silver plus binder and water. One ounce of PMC is about the size of the end joint of a woman's thumb. PMC+ and Art Clay have more silver, less binder and water per ounce, so an ounce of these is smaller in size and sold by the avoirdupois ounce, 28.35 grams.
Producing a silver or gold object with metal clay is adequately covered in today's literature, so I am covering mainly my method of enameling on silver after I have made the piece. Sometimes I sketch an idea, but I rarely draw a design in detail. Part of my inspiration comes from working intuitively and directly with the material.
The most important decision to be made after sintering is how to finish the surface of the piece before enameling. I can choose to leave areas the natural matte white of sintered silver, brass brush it to a satin finish or burnish it to a high polish. I like the look of just burnishing the raised surfaces. A variety of finishes adds a visual depth to the piece as well.
Transparent enamels reflect slightly different shades of the same color depending on the surface finish of the silver below it and, therefore, how the light reflects from it. The color will differ, e.g., between the valleys with a matte or satin finish and the highly polished ridges. If a variation of color is desired, the valleys can remain a matte or satin finish and the ridges can be highly polished. However, to have a consistent color regardless of how the light hits it, the surface must be finished evenly whether it is matte, satin or burnished. This finishing is particularly important on smooth surfaces where every flaw is noticeable.
Bring up the shine gradually, stopping to evaluate at each step. It is hard to go back to the original softer finish if the whole piece is burnished to a hard bright shine in the beginning. Taking care not to disturb the areas I want to remain matte white, I usually start with a brass brushed satin finish to bring up the metallic color on the parts to be shined. Then the burnishing closes the pores of the silver and puts on a high shine. If the surface of the metal is not closed by burnishing, excess air bubbles might form in the enamel because of porosity in the metal. My PMC test pieces showed that using the tumbler for an all - over burnished surface produces fewer small air bubbles in the enamel than hand - burnishing. Enameling requires a clean surface, so I do not use a buffing machine, which might leave polishing compounds that could be difficult to remove. An overall high shine is best done in a tumbler with steel shot, a little Fels Naptha soap and water.
I have used 80 mesh, unwashed, leaded and unleaded enamels in thin coats without discernable loss of brilliance. Counter enamel has not been necessary on thicker pieces when thin coats of enamel are used. I apply the enamel by wet packing or Sifting. I only use an adhesive when the shape requires one. I have a Vcella enameling kiln, 12 " x 12 " x 61/2 ", on a 220V line, and a SC - 2 Paragon 8 " x 8 " x 6 " controlled kiln for PM C on a 110V line.
Enamel colors appear different over silver than over copper. I made separate color charts of leaded and unleaded transparent enamels on PMC using both sides of the piece. For the leaded enamels, I made a piece of PMC, finished size 11/2 " x 3 " x 22 ga, with a tumble burnished finish. Unwashed dry enamel colors are applied in 1/4 " blocks over alternating 1/4 " stripes of bare silver and a base coat of Ninomiya N - I Flux for Silver. This color chart tells me which colors need the flux under them. Some colors do not look good either way; others look fine with or without the flux. I love Ninomiya N - 1 Flux for silver. Other fluxes for silver I have used turned yellow, but N - 1 stays crystal clear.
My unleaded color charts are on two smaller pieces of PMC, with one side showing the colors over flux and the other side showing them on bare silver. I can view the whole spectrum for the same base or flip to the other side to see the same colors over both silver and flux.
Applying enamel to sintered and polished PMC or Art Clay pieces is the same as enameling on any other fabricated or cast metal. You can sift or wet pack 80 mesh enamel as usual. Firing temperature should be kept low, 1335oF - 1400oF. Higher temperatures may change the color and may put an unpredictable metallic sheen on some enamels.
I continue to experiment with metal clay. An interesting variation is to apply dry enamel to the unfired dry clay piece before sintering. The piece can be left with the matte surface or the clay burnished before applying the enamel. I recommend using either the PMC+ or Art Clay for this technique. If PMC+ is used and sintered at the lower 1470oF for a half hour, enamel mill stay on the surface and leave a clear silver back surface. The finished sample I have made with regular PMC using dry enamel before sintering has a lovely matte enamel surface. The drawback with this technique is that the enamel will sink all the way through the piece during sintering because of the greater porosity of PMC and leave a stained, blotchy look on the back, at best. Use this technique with PMC only on pieces where the back will be covered or enclosed. My sample did not show the darker colors usually associated with long, hot sintering.
If you plan to fire the enamel longer than the usual two minutes at 1335oF - 1400oF, it %%would be wise to make a color chart using the longer sintering time and temperature for this technique. Look at your first color chart to choose appropriate colors to test. Avoid reds and oranges as they darken quickly.
Another technique that I have been experimenting with is the making of a new glass/metal alloy. I roll a small quantity of PMC+ in some enamel or add a small quantity of enamel, no more than 10 - 20%, to the clay, and thoroughly mix in the enamel. Remember the clay shrinks when fired, and if too much enamel is used, it will be squeezed out in unpredictable ways. Put a pattern on the piece and let it dry on a kiln shelf coated with kiln wash to prevent the enamel from sticking to the shelf. Fire at 1470oF for a half hour to sinter. Depending on how much enamel is used and how well mixed it is with the clay, the piece has anywhere from a shiny enamel surface to a grainy satin finish with glass throughout the piece.
In my samples of this alloy technique, I used Thompson's lead free transparent #2530 Water. Fired normally on the finished metal, it gave a lovely medium blue where applied thickly and a pale blue where thin. The same enamel when mixed with PMC+ and sintered for a half hour at 1470oF retained its light blue color as the silver turned to a matte white color. As the temperature was increased for the finished metal piece to 1560oF - 1650oF for 20 minutes, and 10 minutes for the enamel, the color turned a darker olive green. Only color tests could have shown me what color change to expect.
Color samples are invaluable. In my very first enamel alloy experiment, I used PMC and Thompson's leaded #715 - Blue Jay, mixing about 50% to 50% by volume. The pieces were fired at 1650oF for two hours. Alumina hydrate, a very finely granulated powder used to support pieces like beads that you do not want to flatten out in sintering, supported the pieces and kept the enamel off the kiln shelf The pieces fired to an uneven, very dark - almost black - color on the front with huge lumps of dark enamel that were squeezed out on the back. Where the enamel touched the alumina, there was a matte gray grainy surface. This result was not a pretty sight, but it was a wonderful teaching tool.
One of the unique qualities of metal clay that I particularly like is its ability to make a seamless blending of different karats of gold. Ropes, rolls or worms of 18K and 24K gold PMC placed side by side and rolled together create a sheet of blended colors that is impossible to duplicate any other way. Although fine metals are too soft for some pieces, metal clays with their unique properties are a wonderful addition to the lexicon of metal techniques for the enamelist.
Related Articles

The Evolution of Metal Clay Design

Cloisonne Jewelry with 24k Wires

The Work of Steven Ford and David Forlano

The Enamelware of Leila Tai


The All-In-One Jewelry Making Solution At Your Fingertips
When you join the Ganoksin community, you get the tools you need to take your work to the next level.
