
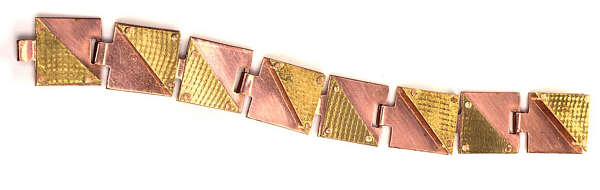
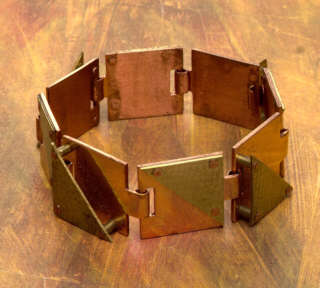
Cold Connections for Hinged Tabs
Cold connections are great alternatives to soldering, especially if you want to use fragile or flammable materials in your jewelry designs. Cold connections have many variations, and this project will give you a closer look at hinged tabs and two styles of rivets. In this bracelet, they become more than just a heat-free option -- they are the focus of the design. Half of the bracelets brass panels are riveted flush to the copper links, while alternate brass panels are raised with spaced rivets. For added design interest, the brass panels are embossed using roll-printing. The hinged tab s connect the bracelet links and visually blend with the clasp for a seamless look.
8 Minute Read
Cold connections are great alternatives to soldering, especially if you want to use fragile or flammable materials in your jewelry designs. Cold connections have many variations, and this project will give you a closer look at hinged tabs and two styles of rivets.
In this bracelet, they become more than just a heat-free option - they are the focus of the design. Half of the bracelet's brass panels are riveted flush to the copper links, while alternate brass panels are raised with spaced rivets.
For added design interest, the brass panels are embossed using roll-printing. The hinged tabs connect the bracelet links and visually blend with the clasp for a seamless look.
Materials | |
| |
Tools & Supplies | |
|
|
Anneal the Brass Sheets | |
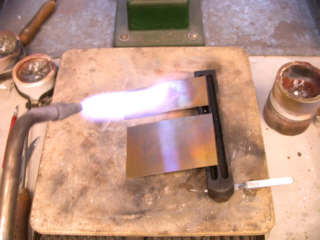 | Brass is not as malleable as copper or silver, so it is difficult to imprint. Before rolling the brass sheets through the mill, anneal them. Place two 4 x 2-in. (102 x 51mm) 20-gauge (0.8mm) pieces of brass sheet stock on a large soldering surface. Using a large torch tip, heat both brass sheets until the brass reaches a dull rose-colored glow — turn off the lights to help you see it. Quench the brass sheets in water. With other metals, you'd pickle after quenching, but pickle will dissolve more of the zinc than the copper in the brass alloy, leaving the brass looking very much like copper. There are two ways to deal with this problem: Sand the copper residue entirely off both brass sheets before roll-printing; or, soak the brass sheets in a warm solution of half hydrogen peroxide and half pickle, which will remove oxides while preventing zinc depletion. Remove the brass sheets from this solution, rinse them with water, and dry them thoroughly. |
Roll-print the Brass Sheets | |
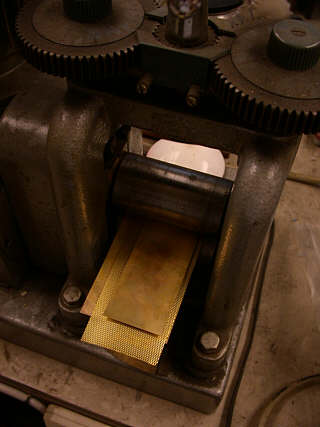 | Sandwich a brass screen between the annealed brass sheets to roll them through the rolling mill. Set the mill to the correct pressure for a good imprint by opening the mill just enough to barely squeeze the sandwich through. Remove the sandwich, and tighten the mill down one half turn. Roll the sandwich through. Each mill will vary, and it may be necessary to roll test strips to find the best setting. |
Make Eight Copper Links | |
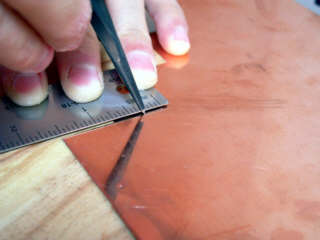 | Use a scribe and a steel ruler to mark a copper sheet into eight 11/8 x 3/4-in. (29 x 19mm) rectangles. |
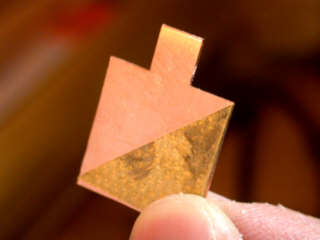
 | Saw each rectangle out of the copper sheet. On one of the 3/4-in. (19mm) edges of each rectangle, use a scribe and steel ruler to mark 1/4 in. (6.5mm) in from each of the two corners and 5/16in. (8mm) in from the edge. |
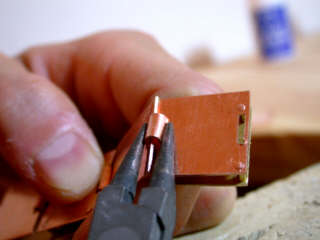
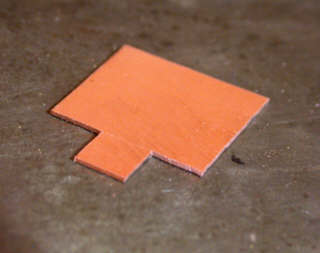 | These marks will guide you in creating a tab. Cut out the marked corners so that a tab extends, creating the basic shape of each link. |
Scribe and Pierce the Slots | |
 | On the 3/4-in. (19mm) edge opposite the tab, use the scribe to mark 1/4 in. (6.5mm) in from each corner and 1/16 in. (1.5mm) in from the edge. Using these measurements as a guide, scribe a slot, 3/64-in. (1.0mm) wide, parallel to the edge. Repeat for the remaining copper links. Secure each link in the ring clamp to file and sand all the edges until they are straight and smooth. |
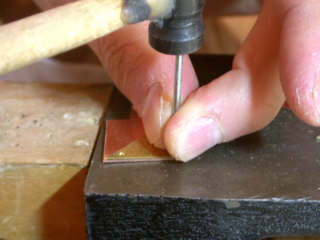
 | Rest one link at a time on a steel block. Use a center punch and rawhide mallet to make a dimple in the center of one end of the scribed slot. Move the copper link to the wooden part of your bench pin to drill a 3/64-in. (1.0mm) hole, using the dimple to guide the drill bit. |
 | Thread a 2/0 saw blade through the drilled hole, tighten the blade into the saw frame, and saw out the inside of the scribed slot. Use a flat needle file to smooth the inside edges of the slot. Repeat for the remaining copper links. |
Cut Eight Brass Triangles | |
 | Mark four 3/4 x 3/4-in. (19 x 19mm) squares on a roll-printed brass sheet with a scribe and steel ruler. Saw out the squares. Scribe a straight line from corner to corner across each square, creating two triangles. |
 | Saw out the triangles. Secure the triangles in a ring clamp. File and sand the edges straight, slightly rounding any sharp corners. |
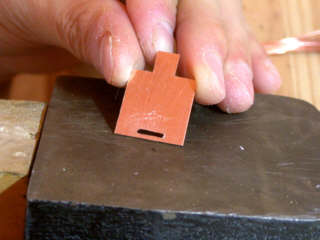
Rest the Metal on a Steel Block | |
 | Use a center punch and rawhide mallet to make dimples in the brass triangle where the holes are to be drilled. |
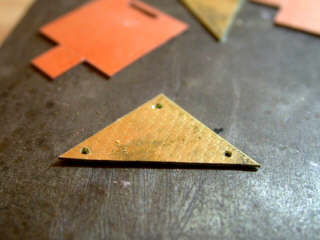 | Drill three 3/64 in. (1.0mm) holes in each of the brass triangles only. |
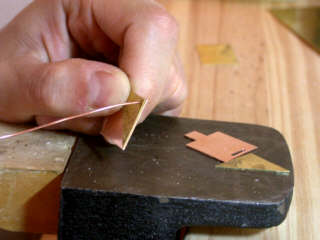
 | With the brass triangle as your guide, gently tap a fine nail with a hammer to make dimples in the copper links where you will drill your holes. Drill only one hole in the corner of each copper link. The other holes will be drilled after the first rivet has been set. |
Check for Fit | |
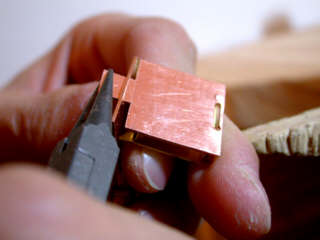 | Use roundnose pliers to curl up the tabs on the copper links. Curl each tab to create a tube, but do not close the curl. Hook the links together by fitting the curled tabs into the slots. Check to make sure they can move freely. You will be closing this curl during the final assembly. Now that most of the tool work is done, see the "Polish the Copper Links" sidebar for a trick to help keep them bright. |
Set the Rivets | |
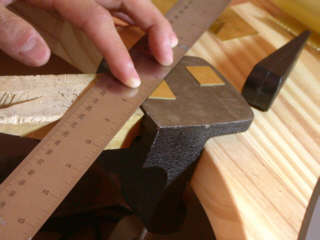
 | Thread 18-gauge (1.0mm) copper wire through the holes drilled in both metal pieces [15]. The wire should fit very snugly in the drill hole. The tighter the wire fits the hole, the easier the rivet will be to set. Cut the wire with a flush cutter so there is an equal amount, approximately 1/64 in. (0.5mm), on each side of an assembly. |
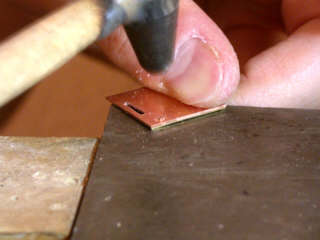 | Set an assembly with the rivet wire in place on a steel block. Using a cross-peen hammer, or the ball end of a ball-peen hammer, tap the ends of the rivet wire until they mushroom or flare. Flip the piece to flare each end of the rivet wire.Tap gently; aim is more important than force. If using a cross-peen hammer, change the position of the hammer every two or three taps. The hammer taps should be at right angles to each other, making a + on the end of the rivet wire. This will flare the end of the rivet wire outward symmetrically and result in a larger rivet. Once the corner rivet is set, hold the brass triangle steady as a guide, and run the drill bit through another hole in the brass triangle and into the copper link. Set the second rivet, and then drill and set the final rivet. Repeat for the remaining three flush assemblies. |
Raise the Brass Triangles with Spaced Rivets | |
 | Use a jeweler's saw to cut 12 sections of tubing 1/8 in. (3mm) long, three for each raised brass triangle. The tubing should have a 3/64-in. (1mm) inside diameter to ensure a snug fit. If the tubing does not fit tightly, the rivet wire will crumple inside the tubing and prevent a full rivet head from forming. Install 1/8-in. (3mm) sections of tubing onto each rivet wire between the brass triangles and the copper links |
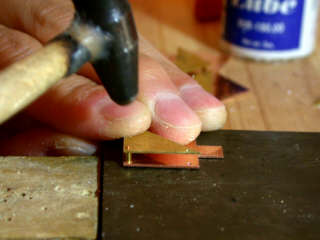 | Form the rivet as in steps 15-16. |
Connect the Links | |
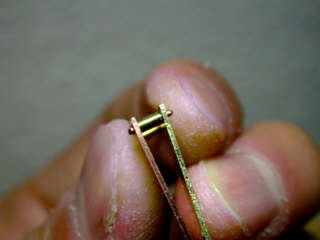
 | Thread each tab into the slot of another link. Check the pattern of the brass triangles to make sure they are alternating. Complete the curl on the tabs with roundnose pliers, then pinch the curl closed with chainnose pliers [19]. |
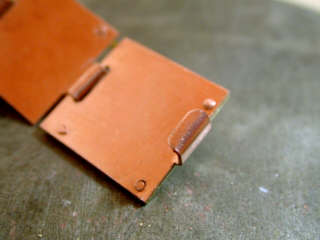 | Use the tab on the last link as a hook for the clasp. |
 | Use a brass brush and soapy water to put a soft shine on the brass triangles. |
Make It With Metal Clay
If you don't have access to a rolling mill, you can substitute textured metal clay triangles for the roll-printed brass triangles.
Lightly oil a sturdy, flexible work surface, and roll enough clay to make a 4 x 1-in. (102 x 25.5mm) rectangle that is 4 playing cards thick. Lay a lightly oiled texture sheet on the metal clay, and roll the clay until it is 2 playing cards thick. Carefully peel the texture sheet away from the clay. With a tissue blade, cut four 1 x 1-in. (25.5mm x25.5mm) squares. Cut the squares in half diagonally to make eight triangles. Let the clay dry. Smooth the edges with needle files, and fire the triangles according to the manufacturer's instructions. Then, fit the triangles to the copper links. File, drill, and rivet them together as you would the brass triangles.
Materials:
- 20g of metal clay
- work surface
- acrylic roller
- playing cards
- olive oil
- texture sheet
- tissue blade,
- kiln and kiln shelf
Polish The Copper Links
Take a few extra steps to keep the bracelet's copper bright and shiny. After you finish step 15, sand each link, starting with 220-grit sandpaper and progressing up to 600 grit. Begin polishing the copper links on a buffing wheel, using tripoli. Clean off any tripoli residue with soapy water, and continue to polish the links with rouge until they are bright. Handle the links by the edges to avoid fingerprints. Clean and dry the links.
To maintain this finish, spray two thin, light coats of clear lacquer onto the links from 1 ft. (30cm) above the links in a well-ventilated area. Allow one side to dry completely before coating the other side. This step is optional, but it will prevent the copper from tarnishing.
Related Articles

Box Clasp Fabrication

Installing and Repairing Hinge Rivets

Hinges with Bearings

How to Make Earring Posts by Hand


The All-In-One Jewelry Making Solution At Your Fingertips
When you join the Ganoksin community, you get the tools you need to take your work to the next level.
